

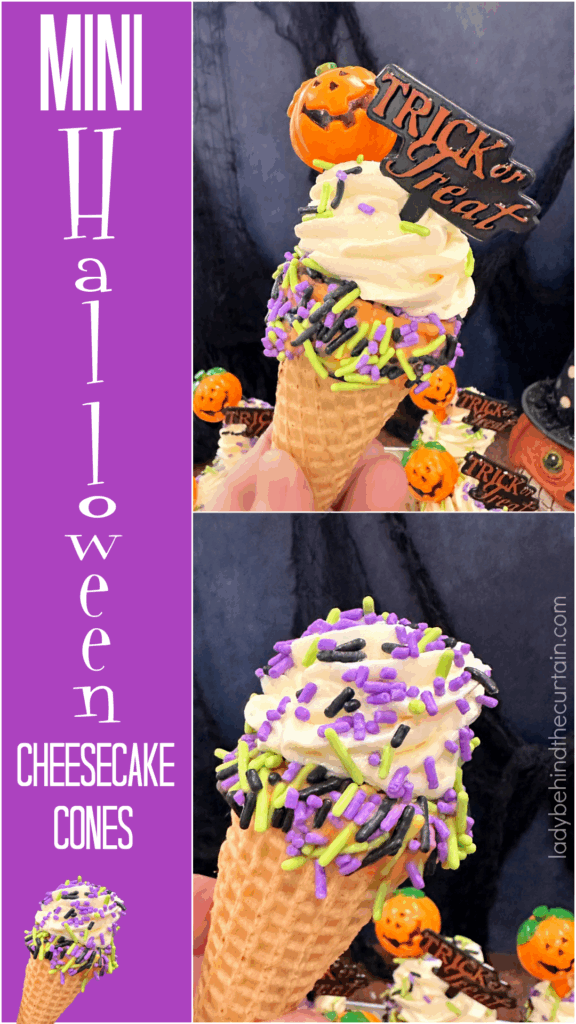
Mini Halloween Cheesecake Filled Sugar Cones
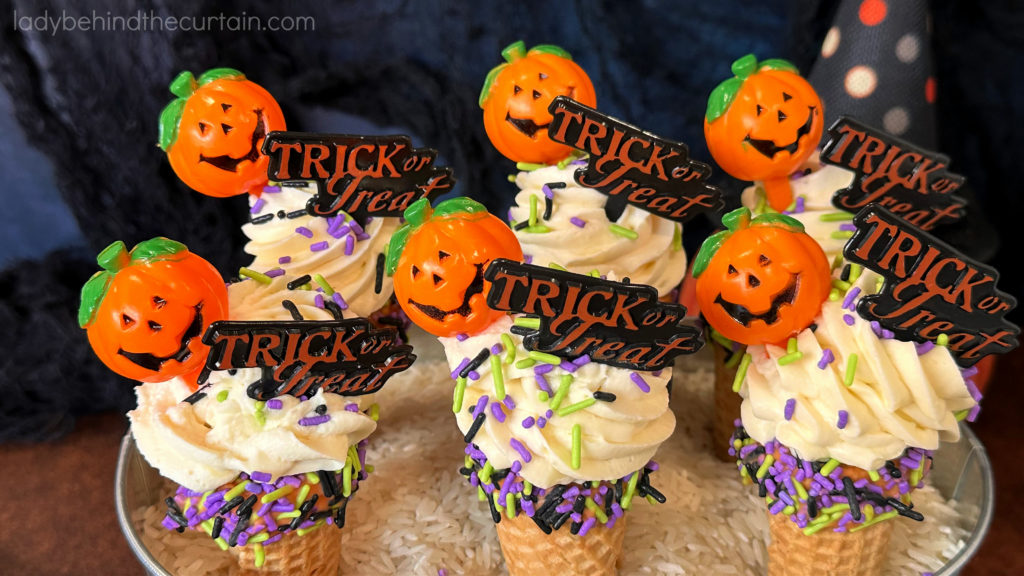
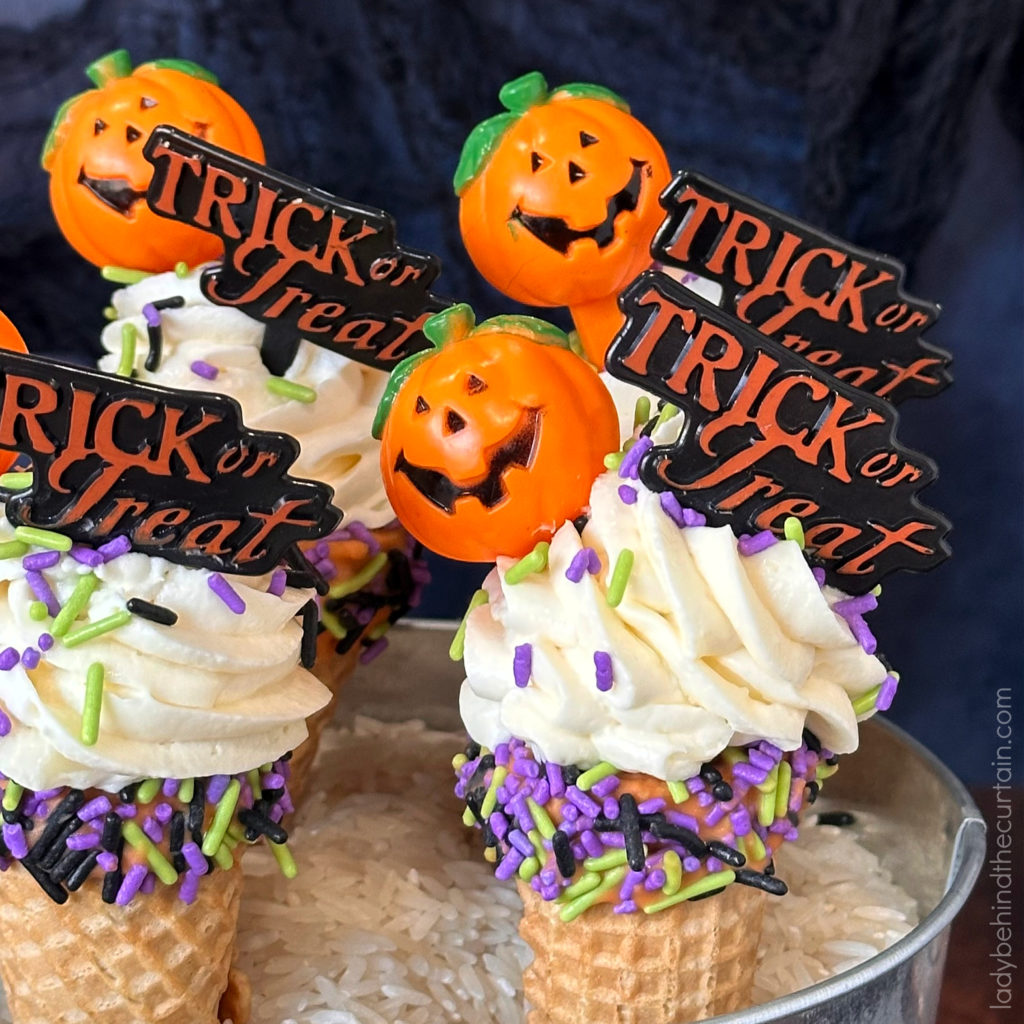
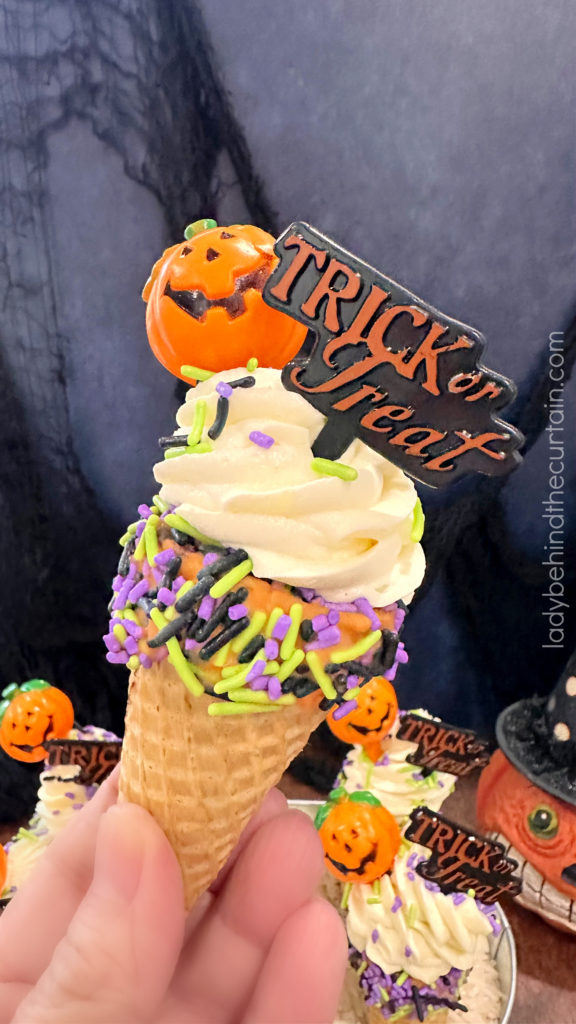
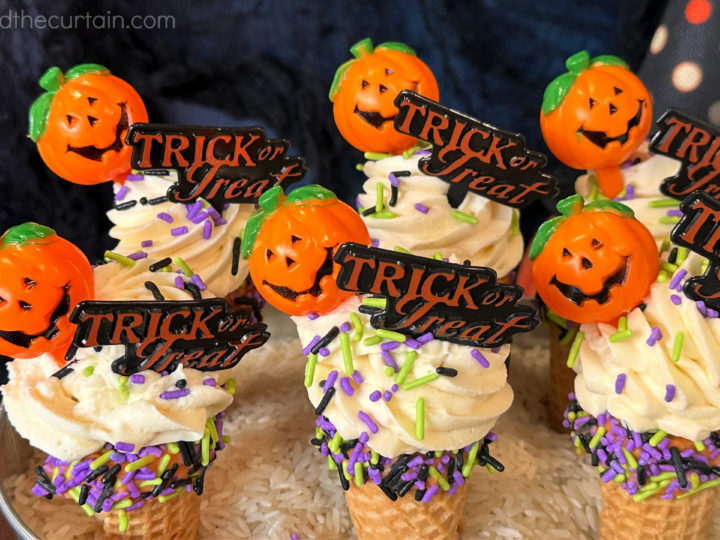
Get ready to wow your guests with these Mini Halloween Cheesecake Filled Sugar Cones-a spooky-sweet treat that’s as fun to make as it is to eat! Each mini sugar cone is lined with rich melted chocolate, filled with a creamy no-bake cheesecake filling, and topped with festive candy pumpkins and a mix of purple, green, and black sprinkles. Every bite is a perfect balance of creamy, crunchy, and chocolatey goodness!
These bite-sized cheesecake cones are a showstopper dessert for any Halloween party or spooky celebration. They’re mess-free, easy to serve, and totally customizable, the perfect combination of adorable and delicious.
How to Make Festive Cheesecake-Filled Ice Cream Cones
These Mini Halloween Cheesecake Filled Sugar Cones are the ultimate bite-sized Halloween dessert! Each mini sugar cone is lined with rich chocolate, filled with creamy no-bake cheesecake, and topped with chocolate pumpkins and a festive mix of purple, green, and black sprinkles. They’re fun, colorful, and perfectly spooky, an easy no-bake treat that’s sure to impress at any Halloween party or celebration! The cutest Halloween party treats around.
MINI HALLOWEEN CHEESECAKE FILLED SUGAR CONES INGREDIENTS LIST- full printable recipe below in recipe card
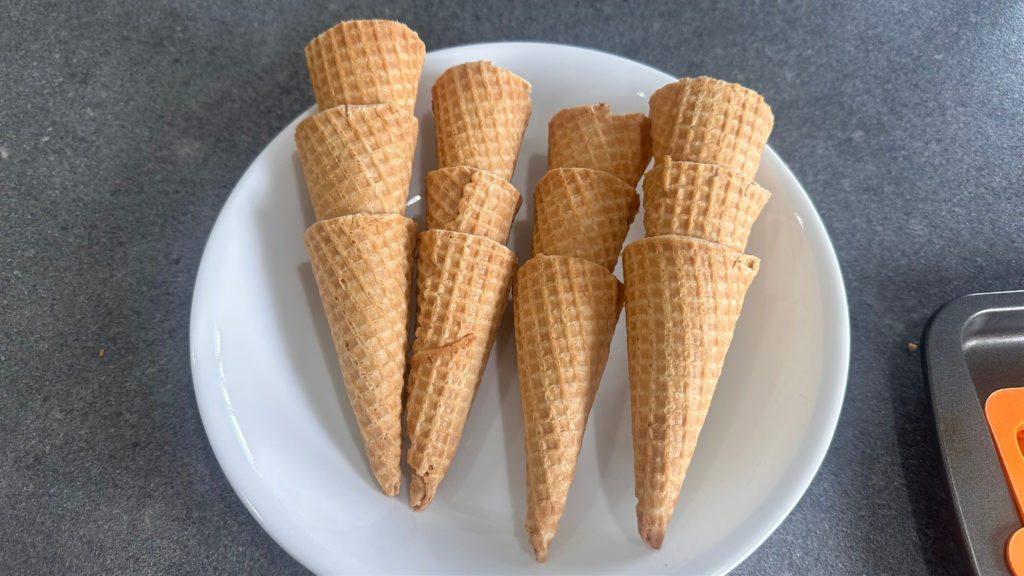
- sugar cones
- dark chocolate
- white candy wafers
- assorted sprinkles (purple, green, and black)
- orange candy wafers for pumpkins or pumpkin-shaped candy
- 2 ( 8-ounce) cream cheese blocks, softened
- 1 (8-ounce) tub frozen whipped topping, thawed
- 2 cups powdered sugar
MINI HALLOWEEN PARTY TREAT INSTRUCTIONS-FOR THE SUGAR CONES
- Wrap a sugar cone in a damp paper towel.
- Microwaved on high for 20-30 seconds.
- If the cone is still too hard, microwave for another 10-15 seconds.
- Carefully remove the hot cone and trim it with kitchen shears immediately while it’s still pliable.
- Be aware that the cones can be fragile, so handle them gently.
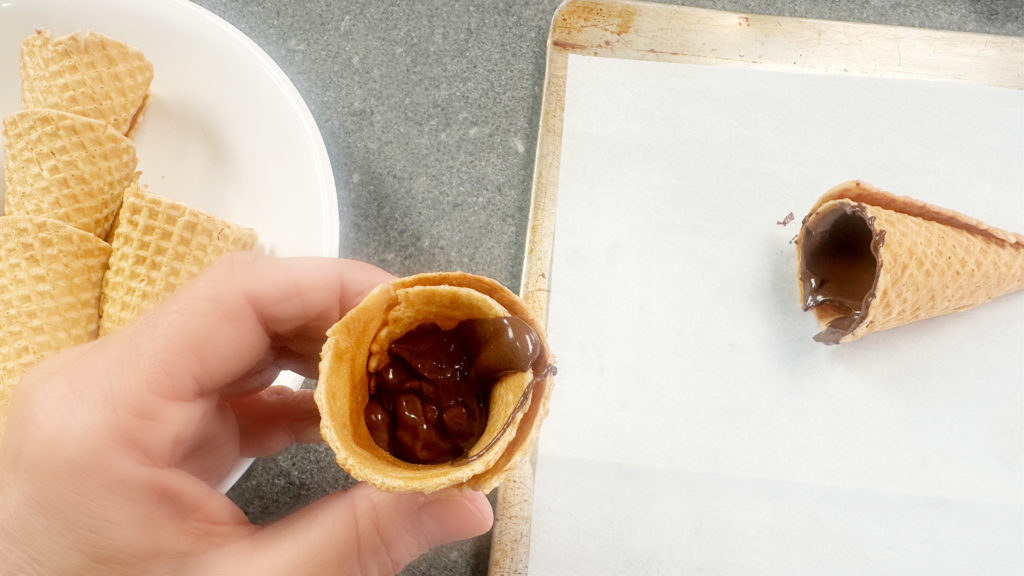
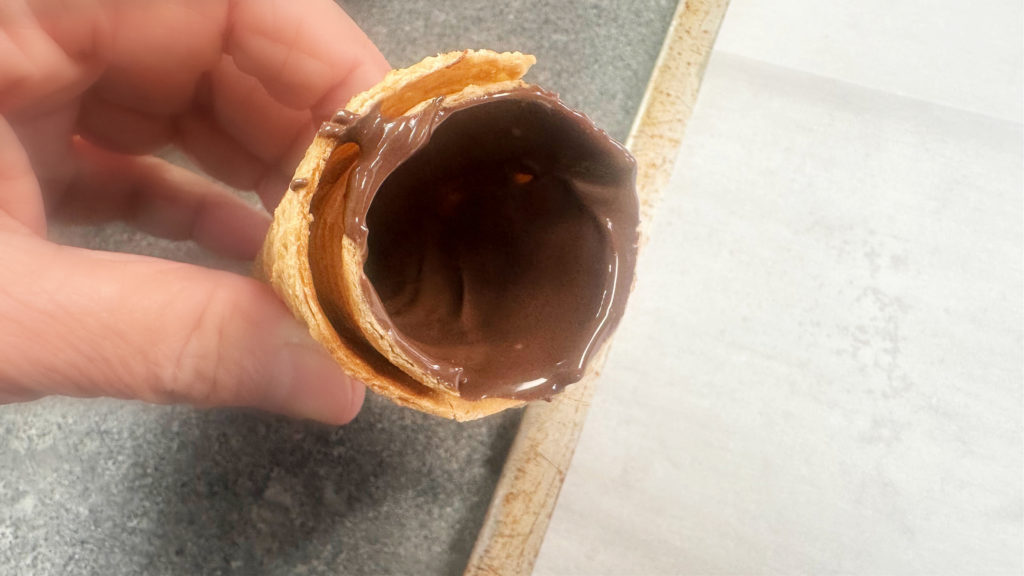
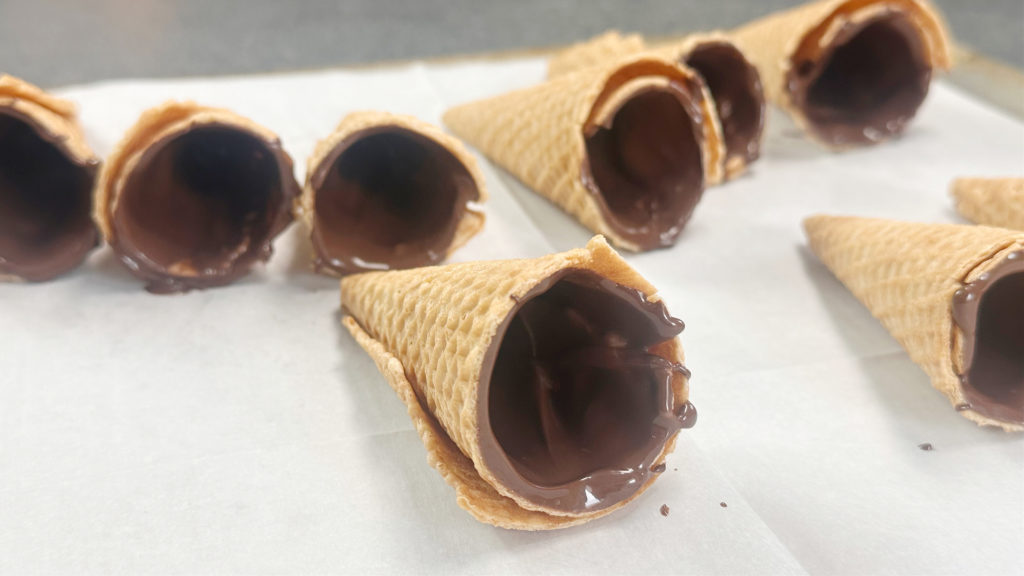
- In a medium-size microwave-safe bowl, heat the chocolate for 1 minute, stirring until it’s creamy and smooth. If the chocolate still has lumps, continue heating for an additional 15 seconds.
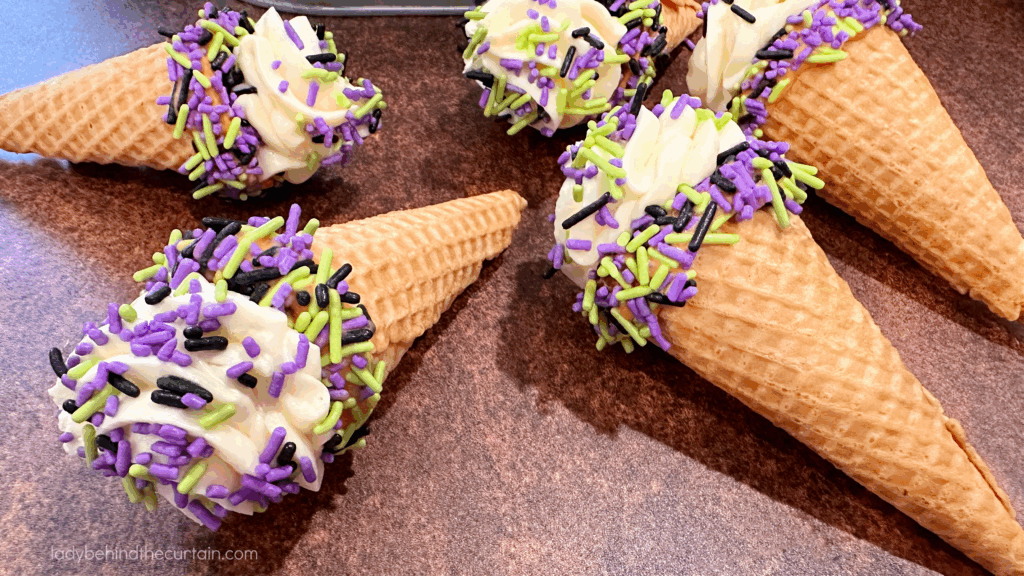
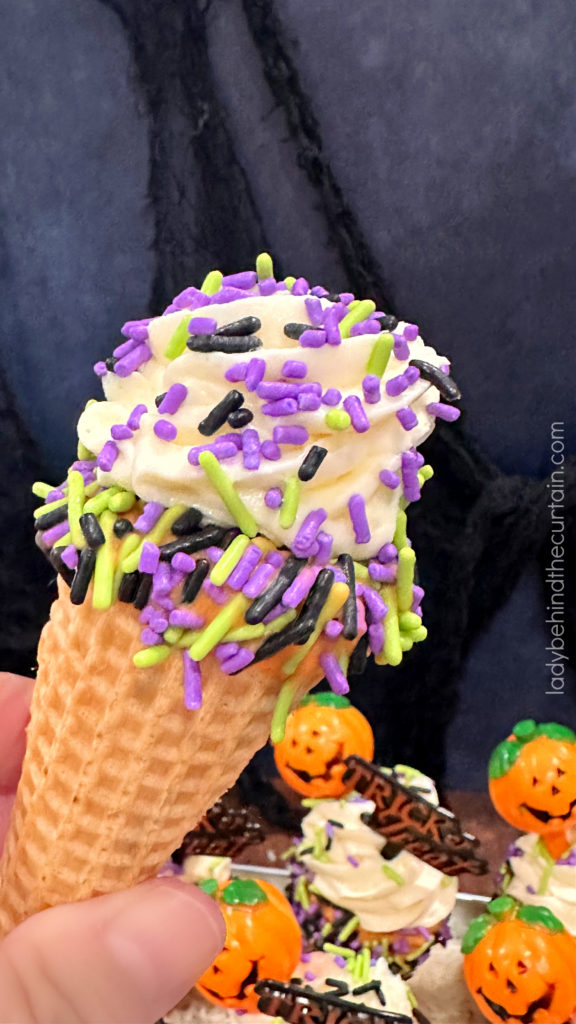
- Pour 1 tablespoon of the melted chocolate into a prepared cone, roll the chocolate around the inside of the cone until it is coated, and shake upside down to release any extra chocolate. Set aside to harden.
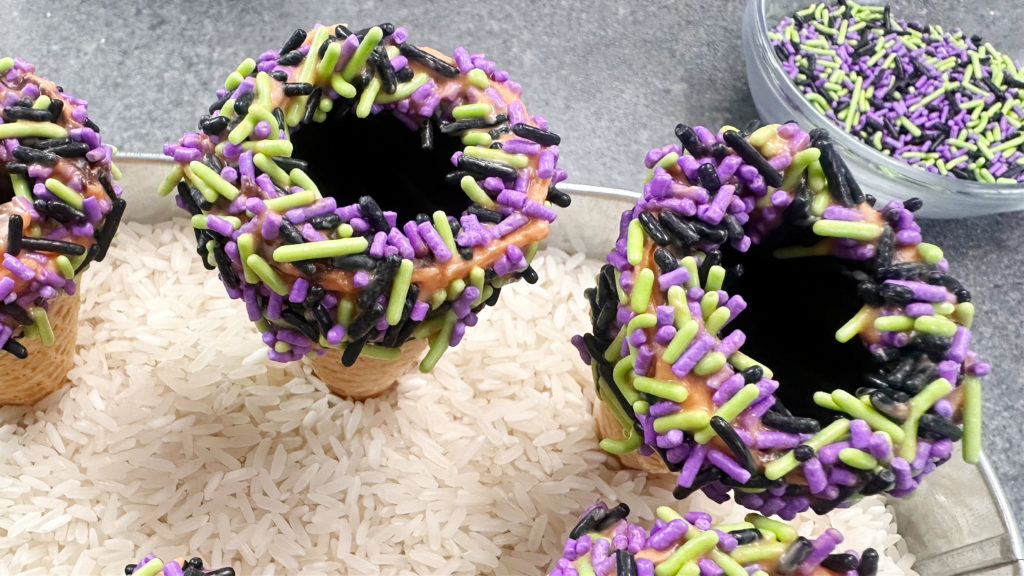
- Pour assorted colored sprinkles into a small bowl. I used jimmies in the colors purple, orange, and green.
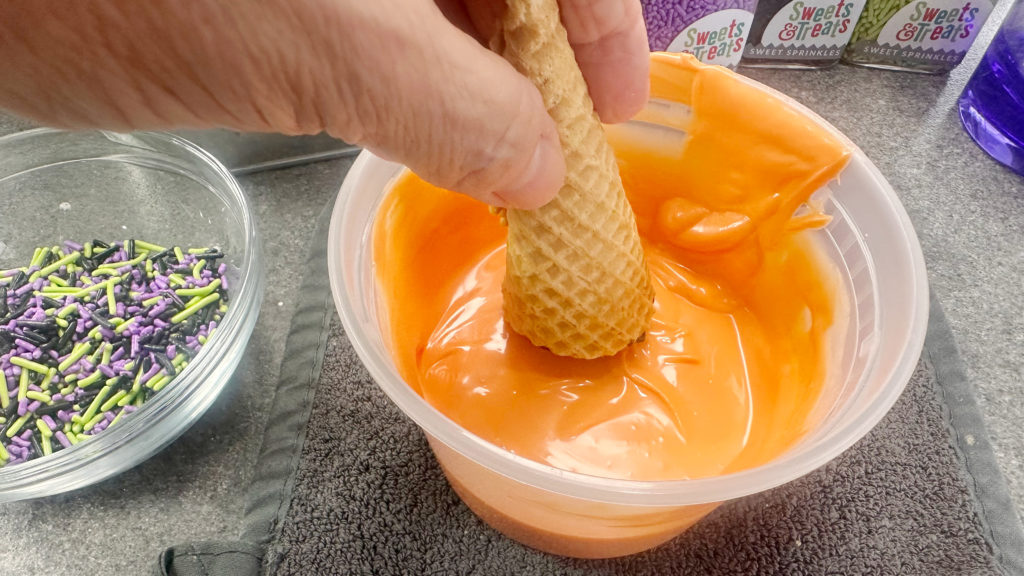
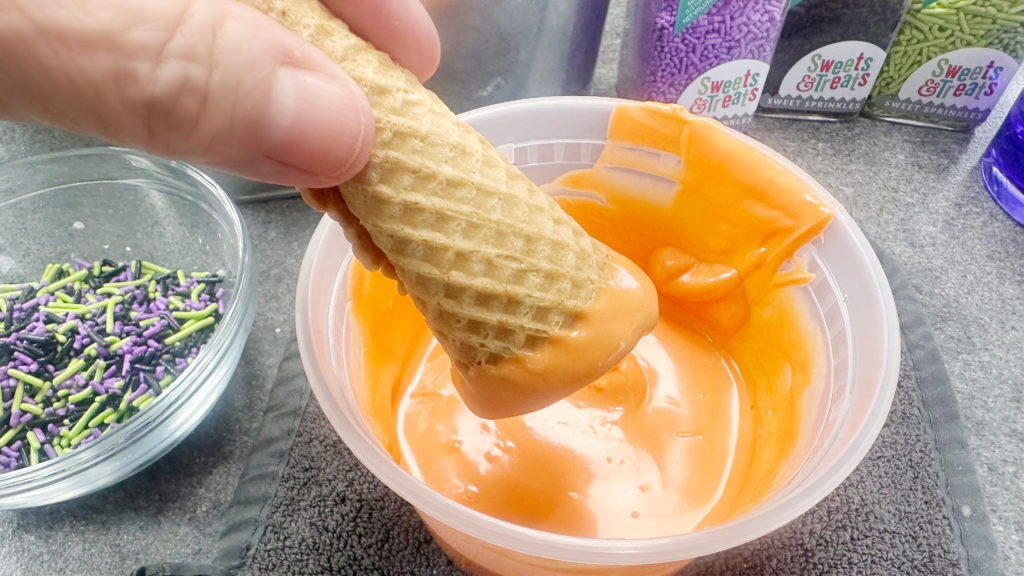
- Once the chocolate on the side of the cone has hardened, melt the black candy in a medium microwave-safe bowl for 1 minute. Stir the candy until it is melted and creamy. If there are still lumps in the candy, heat for an additional 15 seconds.
- Dip the top (wide portion) of the cone in the melted candy, shake to release the excess, and dip it in the sprinkles. Set aside to harden, preferably in a suitable container that the cone can stand in. Like a container of rice.
- Leave the cones in the container; this will help with the filling of the cones.
MINI HALLOWEEN PARTY TREAT INSTRUCTIONS-FOR THE CHEESECAKE FILLING
- Blend the cream cheese until creamy, add the Cool Whip, vanilla, and powdered sugar. Blend until combined.
- Spoon cheesecake filling into a piping bag fitted with a star tip.
- Fill sugar cones with the cheesecake filling, and add a few more sprinkles.
Watch How to Make Mini Halloween Cheesecake Filled Sugar Cones Video
CUTE, CREAMY, AND PERFECT FOR ANY HALLOWEEN PARTY! Big smiles start with fun, unexpected treats.
Why You’ll Love These Mini Cheesecake Cones
- Festive & Colorful: The bright purple, green, and black sprinkles make them pop on any dessert table.
- Rich Chocolate Lining: The chocolate-coated inside keeps the cones crisp while adding irresistible flavor.
- No-Bake Perfection: The cheesecake filling is light, creamy, and comes together in minutes.
- Party-Ready Size: Mini cones are perfect for kids and adults alike, a fun, handheld dessert for any Halloween gathering.
The Perfect Halloween Party Dessert
These Mini Halloween Cheesecake Filled Sugar Cones are everything you want in a Halloween treat: festive, flavorful, and fun to make. With their colorful sprinkles, rich chocolate lining, and creamy cheesecake filling, they’re guaranteed to be the first dessert to disappear from your party table.
Whether you’re hosting a spooky bash or just want a fun dessert to enjoy at home, these cones are a must-try for the season!
Recipe Alternatives for Mini Halloween Cheesecake-Filled Sugar Cones
1. Candy Corn Cheesecake Cones
Tint the cheesecake filling with orange and yellow food coloring, layering the colors inside each cone to mimic classic candy corn. Top with white sprinkles or a mini candy corn for a festive finish.
2. Monster Eye Cheesecake Cones
Add green or purple food coloring to the cheesecake filling and top each cone with a candy eyeball. Scatter extra candy eyes over the sprinkles for a spooky “monster mash” vibe.
3. Cookies & Cream Cheesecake Cones
Mix crushed chocolate sandwich cookies into the cheesecake filling and line the cones with melted white chocolate instead of dark for a cookies-and-cream twist.
4. Pumpkin Spice Cheesecake Cones
Blend a few tablespoons of pumpkin puree and a pinch of pumpkin pie spice into the cheesecake mixture. Top with mini pumpkin candies or a sprinkle of crushed graham crackers for cozy fall flavor.
5. Chocolate Lovers’ Cheesecake Cones
Use chocolate cheesecake filling and double-dip the cones, once inside and once around the rim, in melted chocolate. Garnish with chocolate curls or mini chocolate chips for an indulgent version.
6. Witch’s Brew Cheesecake Cones
Add a few drops of neon green food coloring to the filling and top with purple sprinkles, gummy worms, or candy frogs for a fun, whimsical Halloween twist.
Serving & Display Ideas for Mini Halloween Cheesecake-Filled Sugar Cones
1. Serve in a Halloween Cone Holder or Cupcake Stand
Display your mini cones upright in an ice cream cone stand or a cupcake holder, and line them with fake cobwebs or spooky lights. This keeps them steady and makes them look picture-perfect on your dessert table.
2. Create a Spooky Dessert Board
Arrange your cheesecake cones alongside Halloween cookies, chocolate-covered pretzels, candy corn, and ghost-shaped marshmallows. Add small plastic spiders, skeleton hands, or candy eyeballs for extra spooky fun.
3. Use Themed Wrappers or Mini Cups
Wrap the bottoms of your cones with Halloween-themed paper or place each cone in a festive cupcake liner. Think orange and black stripes, spider webs, or glittery purple wrappers for a magical touch.
4. Add a “Graveyard” Display Effect
Stick the cones into crushed chocolate cookies or brownie crumbs to resemble dirt, then scatter candy bones or tombstone candies around them. Perfect for a chilling (and delicious) Halloween table centerpiece!
5. Make Them To-Go Party Favors
Individually wrap each cone in a clear cellophane bag tied with a black or orange ribbon. Add a fun Halloween tag that says “Wickedly Sweet Treat!” or “Bite If You Dare!” Guests will love taking one home.
6. Chill Before Serving
Keep the cones refrigerated until ready to serve. The cheesecake filling tastes best cold, and the chocolate lining will help keep the cones crisp and delicious.

MORE HALLOWEEN PARTY TREAT IDEAS
LATEST POSTS
- Layered Lemon Cream Shortcake Parfaits (or Push-Up Pops)
- How to Create a Perfect Sprinkle Border with a Clean Center on a Frosted Cake
- Homemade Pistachio Ice Cream Cake
- 50+ Easy Frosting Recipes Every Home Baker Needs in Their Back Pocket
- Easy Focaccia Bread Using Rhodes Frozen Dinner Rolls
FAQ for Mini Halloween Cheesecake Filled Sugar Cones

Yes! You can prepare the cheesecake filling and line the cones with chocolate up to a day in advance. For the best texture, fill the cones a few hours before serving and keep them chilled until ready to enjoy.
Lining the inside of each cone with melted chocolate creates a barrier that keeps moisture from softening the cone. Be sure to let the chocolate fully set before adding the cheesecake filling.
Absolutely! Full-size cones work great for larger servings, just double the filling and decoration amounts. You can even mix both sizes for a fun dessert display.
Use candy melts, baking chocolate, or chocolate chips. Dark or milk chocolate adds a rich flavor, while colored candy melts can make them extra festive.
Keep them refrigerated in an airtight container for up to two days. For best results, store the filling separately and assemble the cones just before serving.
Definitely! Swap the purple, green, and black sprinkles for red and green at Christmas, pink and red for Valentine’s Day, or pastel colors for Easter. These mini cheesecake cones are easy to adapt for any celebration!
These Mini Halloween Cheesecake Filled Sugar Cones are the perfect mix of spooky, sweet, and fun, a no-bake dessert that’s as eye-catching as it is delicious! With their chocolate-lined cones, colorful sprinkles, and creamy cheesecake filling, they bring just the right amount of Halloween magic to any party or family celebration. Whether you serve them on a festive dessert table or wrap them up as party favors, these little cones are sure to disappear fast!
If you love easy Halloween desserts, don’t forget to share your Mini Halloween Cheesecake Cone creations on social media and tag us. We’d love to see your spooky spin!❤️Sheryl
Mini Halloween Cheesecake Filled Sugar Cones
Ingredients
- 15 sugar cones
- 10 ounces of dark chocolate melting wafers
- 7 ounces of orange candy wafers
- 1 tablespoon vegetable shortening
- assorted sprinkles (purple, green, and black), about ½ cup
- 2 ( 8-ounce) cream cheese blocks, softened
- 1 (8-ounce) tub frozen whipped topping, thawed
- 1 teaspoon vanilla extract
- 2 cups powdered sugar
Instructions
!For the Sugar Cones:
- Wrap a sugar cone in a damp paper towel.
- Microwaved on high for 20-30 seconds.
- If the cone is still too hard, microwave for another 10-15 seconds.
- Carefully remove the hot cone and trim it with kitchen shears immediately while it's still pliable.
- Be aware that the cones can be fragile, so handle them gently.
- In a medium-size microwave-safe bowl, heat the chocolate for 1 minute, stirring until it's creamy and smooth. If the chocolate still has lumps, continue heating for an additional 15 seconds.
- Pour 1 tablespoon of the melted chocolate into a prepared cone, roll the chocolate around the inside of the cone until it is coated, and shake upside down to release any extra chocolate. Set aside to harden.
- Pour assorted colored sprinkles into a small bowl. I used jimmies in the colors purple, orange, and green.
- Once the chocolate on the side of the cone has hardened, melt the orange candy in a medium microwave-safe bowl for 1 minute. Stir the candy until it is melted and creamy. If there are still lumps in the candy, heat for an additional 15 seconds.
- Dip the top (wide portion) of the cone in the melted candy, shake to release the excess, and dip it in the sprinkles. Set aside to harden, preferably in a suitable container that the cone can stand in. Like a container of rice.
- Leave the cones in the container; this will help with the filling of the cones.
For the Cheesecake Filling:
- Blend the cream cheese until creamy, add the Cool Whip, vanilla, and powdered sugar. Blend until combined.
- Spoon cheesecake filling into a piping bag fitted with a star tip.
- Fill sugar cones with the cheesecake filling, and add a few more sprinkles.
Decoration Ideas:
- molded candy ( I added Jack-O-Lanterns)
- cupcake picks
- candles

Comments
Mini Halloween Cheesecake Filled Sugar Cones — No Comments
HTML tags allowed in your comment: <a href="" title=""> <abbr title=""> <acronym title=""> <b> <blockquote cite=""> <cite> <code> <del datetime=""> <em> <i> <q cite=""> <s> <strike> <strong>