

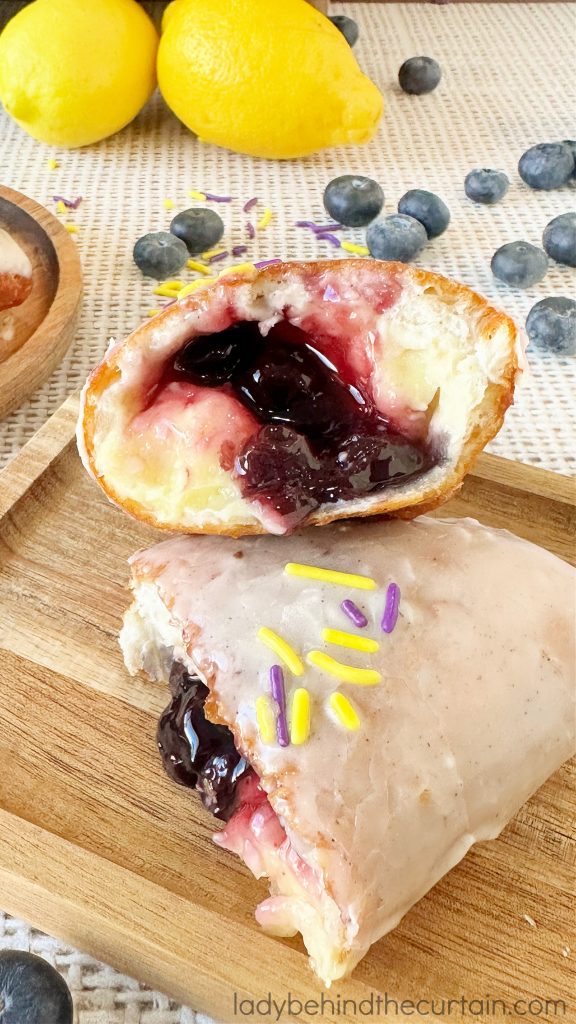
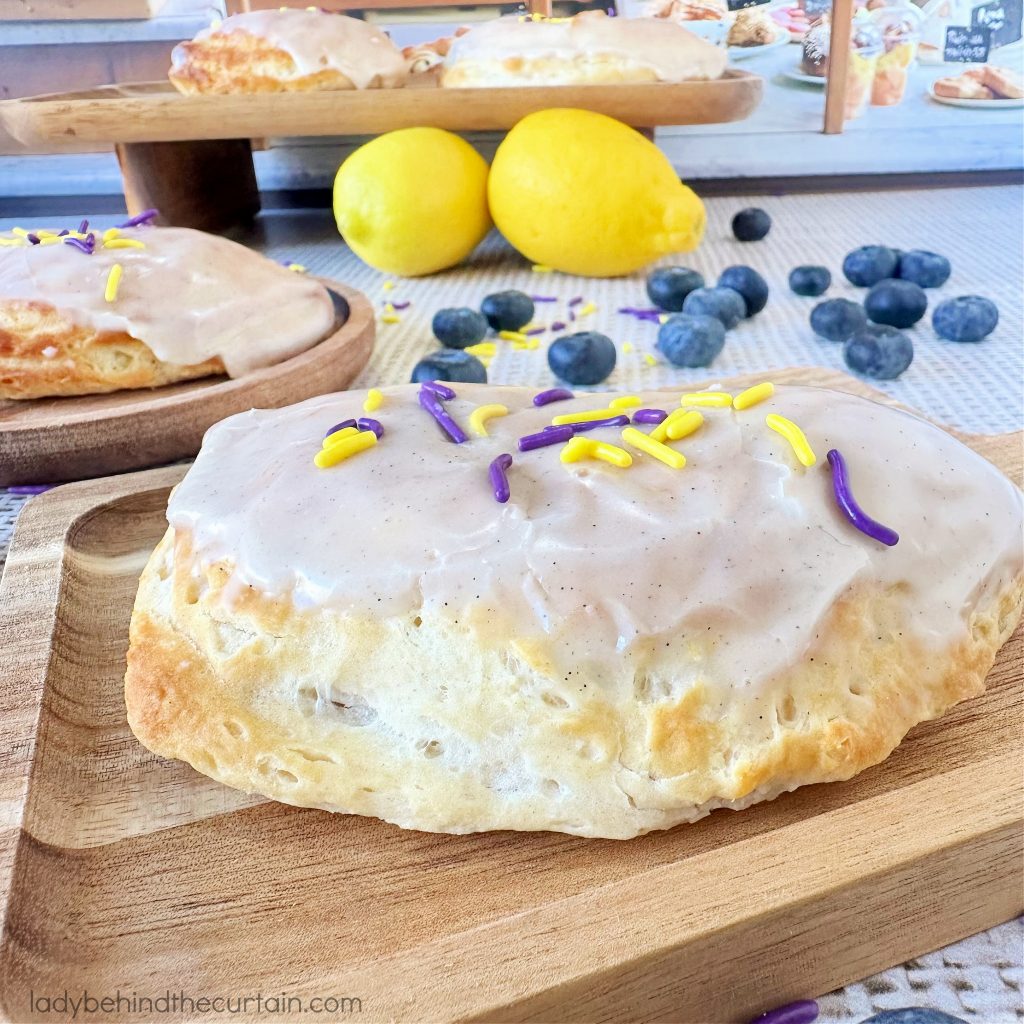
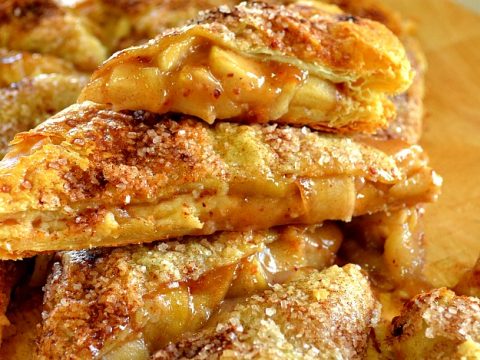
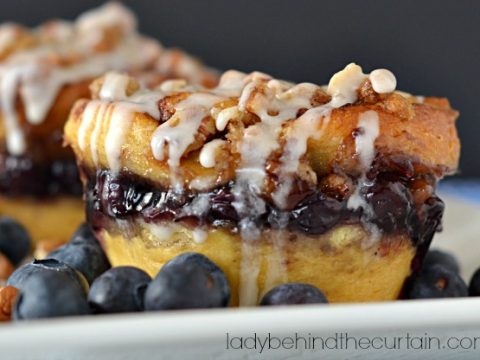
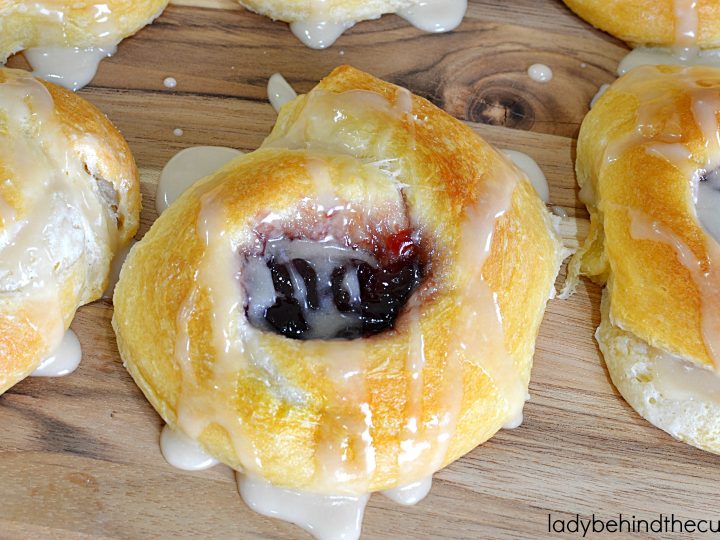
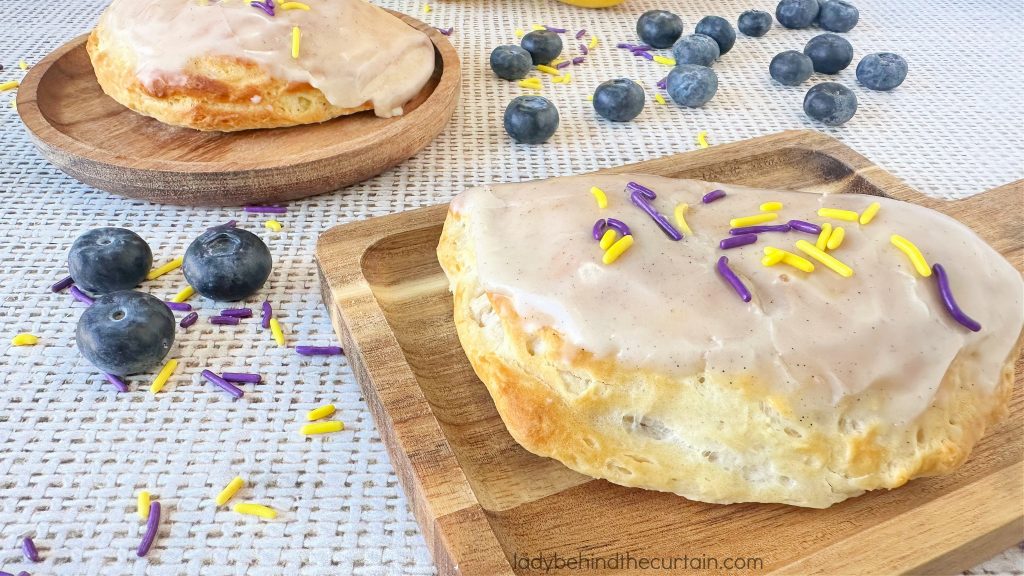
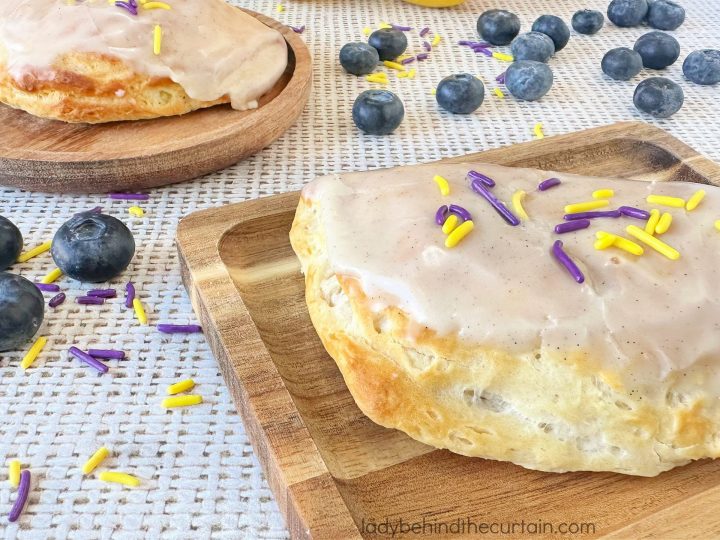
Easy Blueberry Lemon Cream Filled Biscuit Danish
There is something so comforting about a pastry that looks bakery fancy but starts with a humble shortcut. These easy blueberry-lemon cream-filled biscuit danishes are exactly that kind of treat. They feel special enough for a weekend brunch, yet simple enough for a weekday baking craving. Flaky biscuit dough wrapped around a bright lemon cream filling, and sweet blueberry pie filling is hard to resist, especially when it comes together quickly with ingredients you probably already have on hand.
What Makes This Biscuit Danish Special

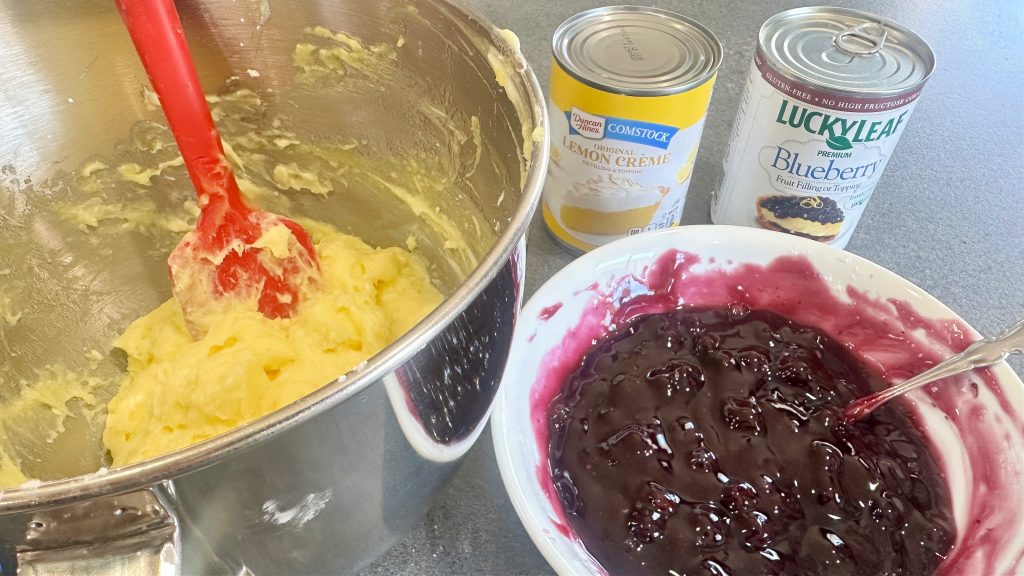
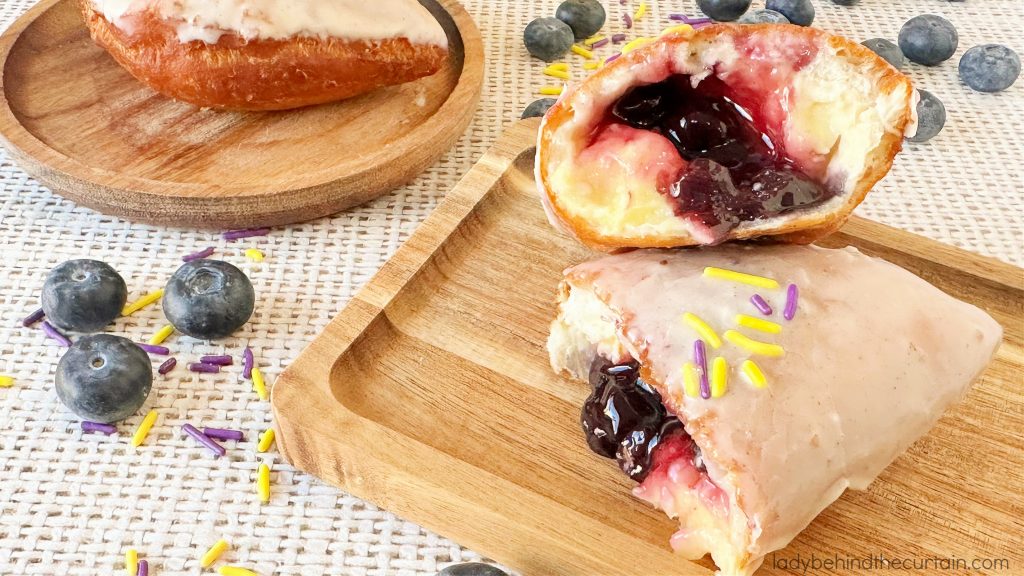
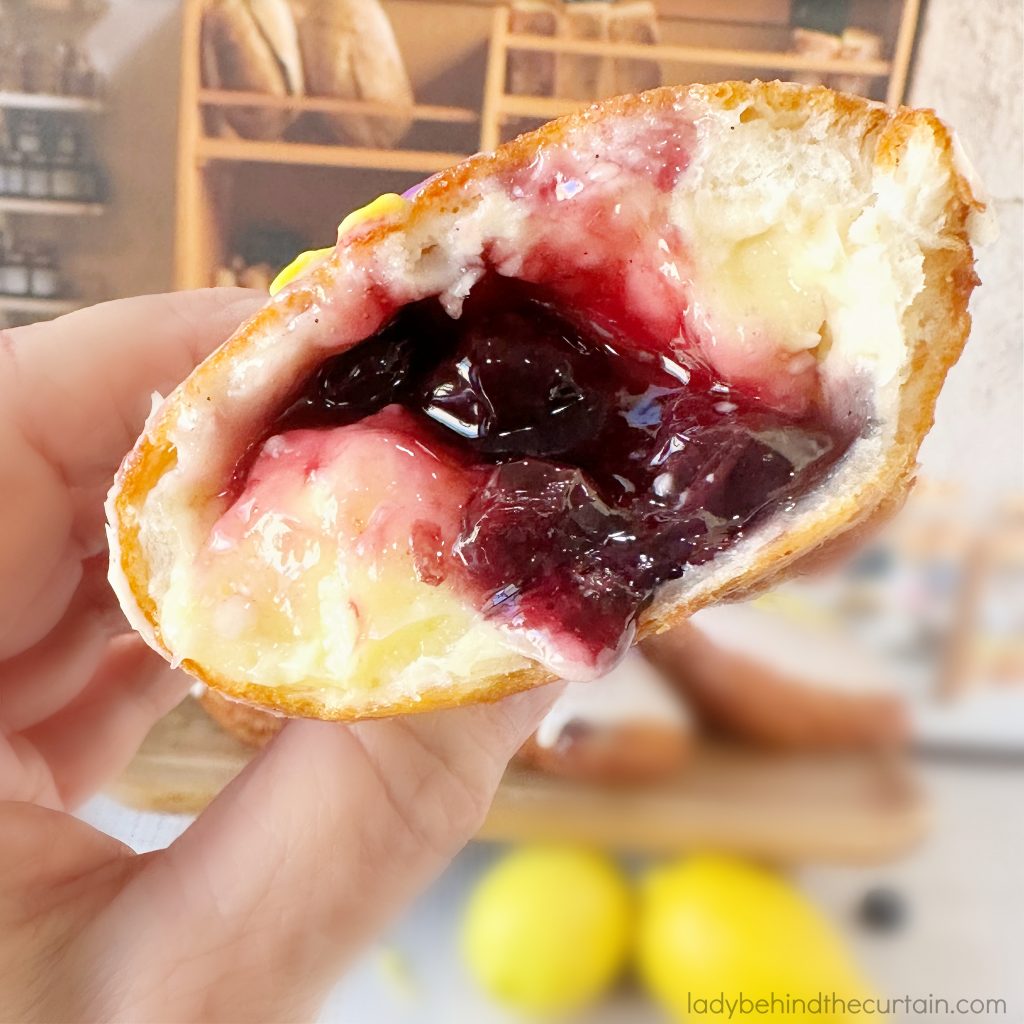
The filling is where the magic really happens. Lemon pie filling mixed with cream cheese, fresh lemon zest, lemon juice, and powdered sugar creates a creamy, bright center that tastes like sunshine. The blueberry filling is simple but perfect. Just blueberry pie filling and powdered sugar. Together, they create a classic bakery-style flavor combo with very little effort.
How to Make Blueberry Lemon Cream Danish
INGREDIENTS YOU’LL NEED- full printable recipe below in recipe card
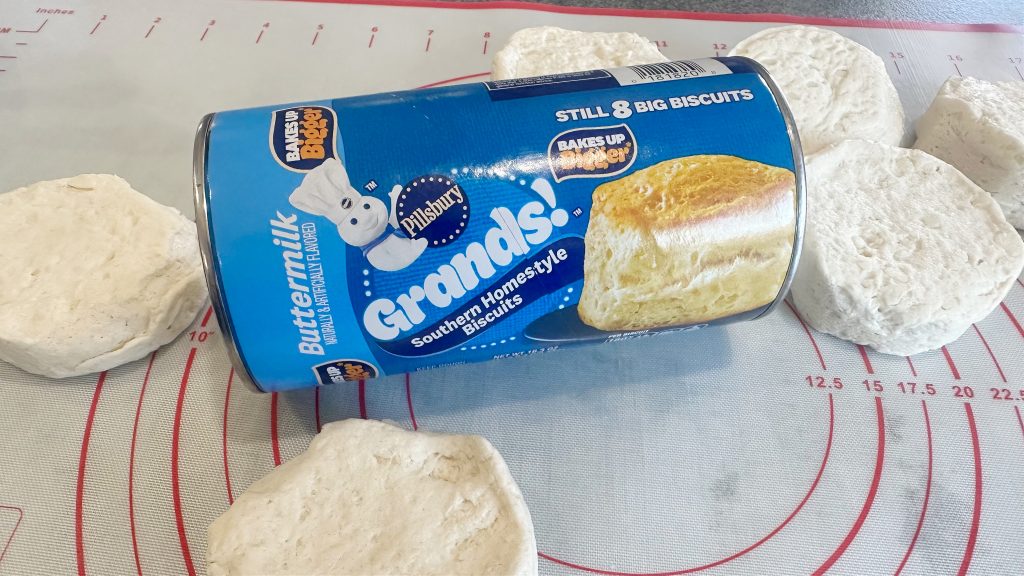
- Refrigerated store-bought biscuits
- Lemon pie filling
- Cream cheese, softened
- Fresh lemon zest
- Fresh lemon juice
- Powdered sugar
- Blueberry pie filling
- Vanilla Paste or Extract
MAKING THE BLUEBERRY LEMON CREAM DANISH
- Line two cookie sheets with parchment paper. Preheat the oven to 375°.
- In a medium mixing bowl, beat the cream cheese until fluffy. Add the lemon pie filling, lemon zest, lemon juice, and powdered sugar. Beat until combined, light, and fluffy (it will have a mousse texture).
- In a medium mixing bowl, whisk together the powdered sugar and blueberry pie filling until the sugar is fully absorbed.
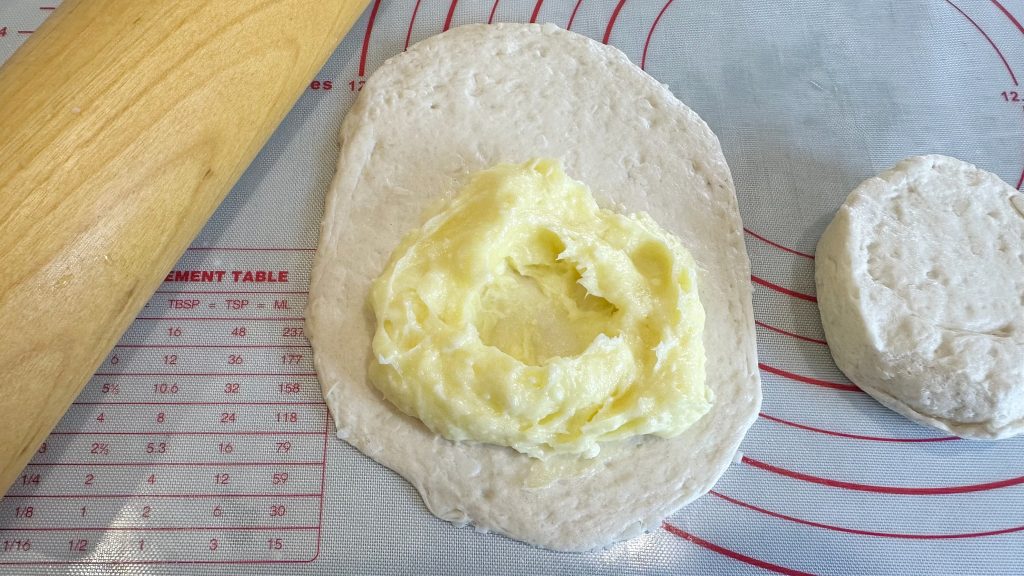
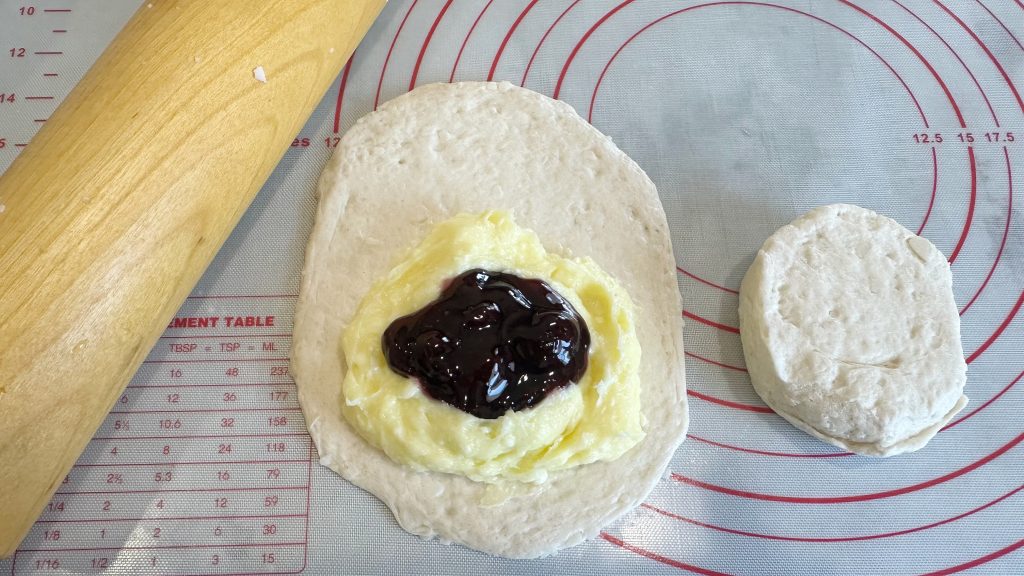
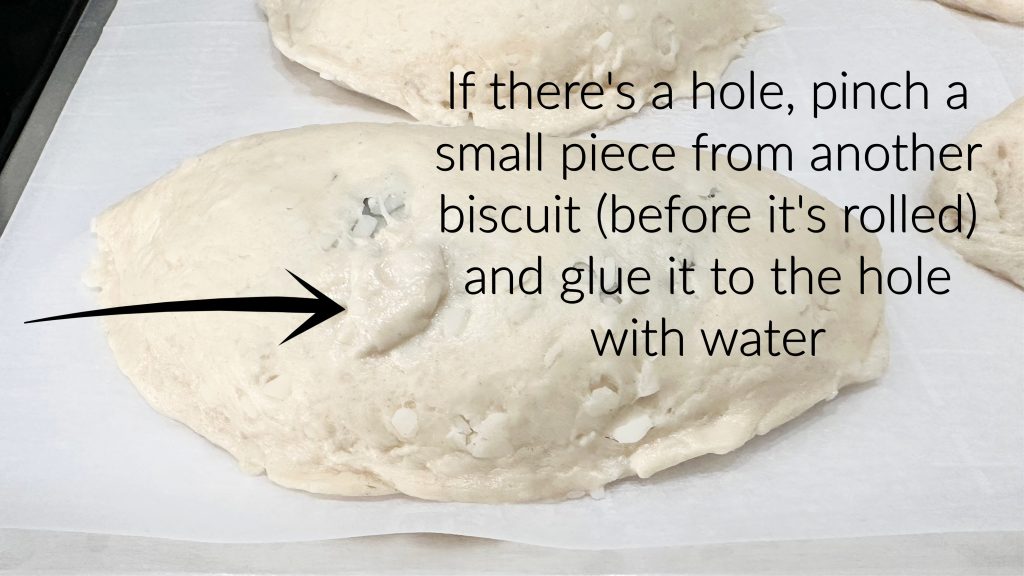
- On a lightly floured surface, roll a biscuit into a 5 x 7-inch rectangle.
- Spoon 3 level tablespoons of the lemon mixture into the center of the rectangle, lightly spreading it, leaving the center empty. Fill the center with ONE level tablespoon of the blueberry pie filling.
- Fill a ramekin with warm water. Dip your finger in the warm water and moisten the outer edges of the biscuit rectangle.
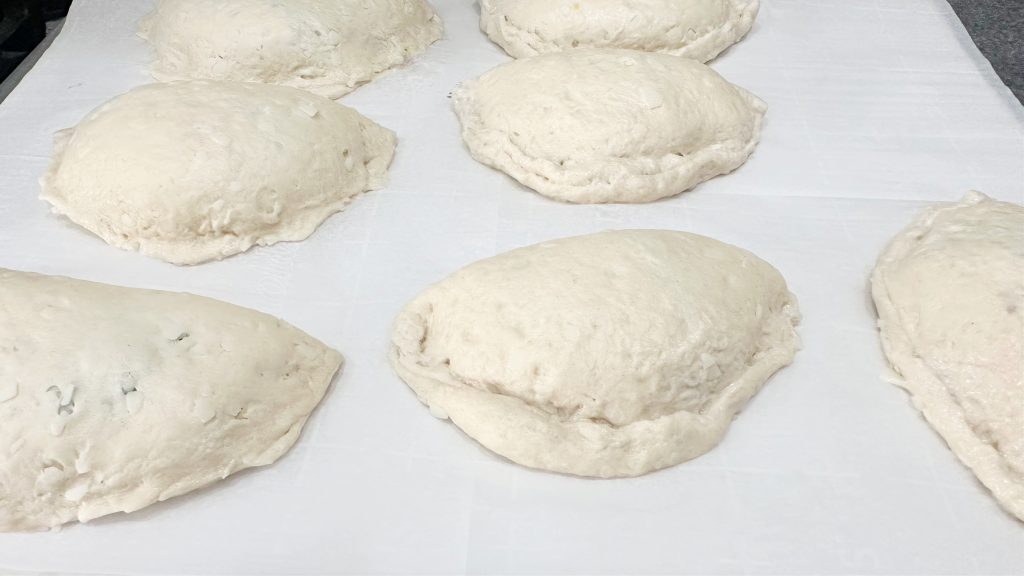
- Fold it in half, crimp to seal. Place on the prepared cookie sheet, then continue with the remaining biscuits.
TWO COOKING OPTIONS
Baking Method: My Preferred Option
- Line two cookie sheets with parchment paper. Preheat the oven to 375°.
- Follow the above instructions from 1-7.
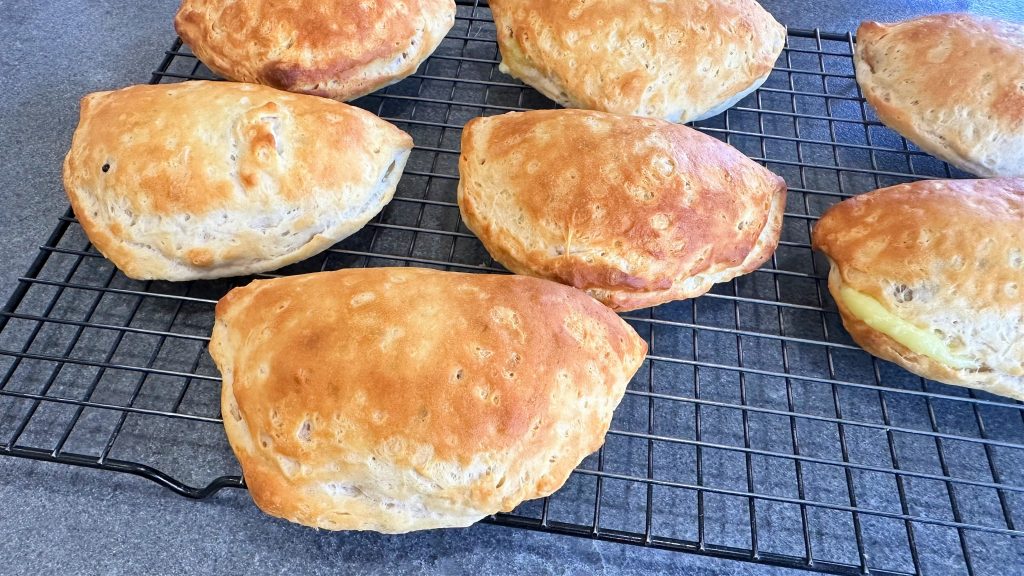
- Bake for 10 minutes, turn the cookie sheets front to back, and continue baking for an additional 5 minutes. NOTE: I use a convection oven. You may need to adjust the baking time.
- As soon as you can handle the Danish, take them off the baking sheet and onto a wire cooling rack. Once they have completely cooled, make the glaze.
- Place a piece of wax paper underneath a wire rack.

Frying Option
FLUFFY DONUT-LIKE TEXTURE

- Follow the above instructions from 1-7, except for preheating the oven. Once all the biscuits have been shaped and filled, they are ready to be fried.
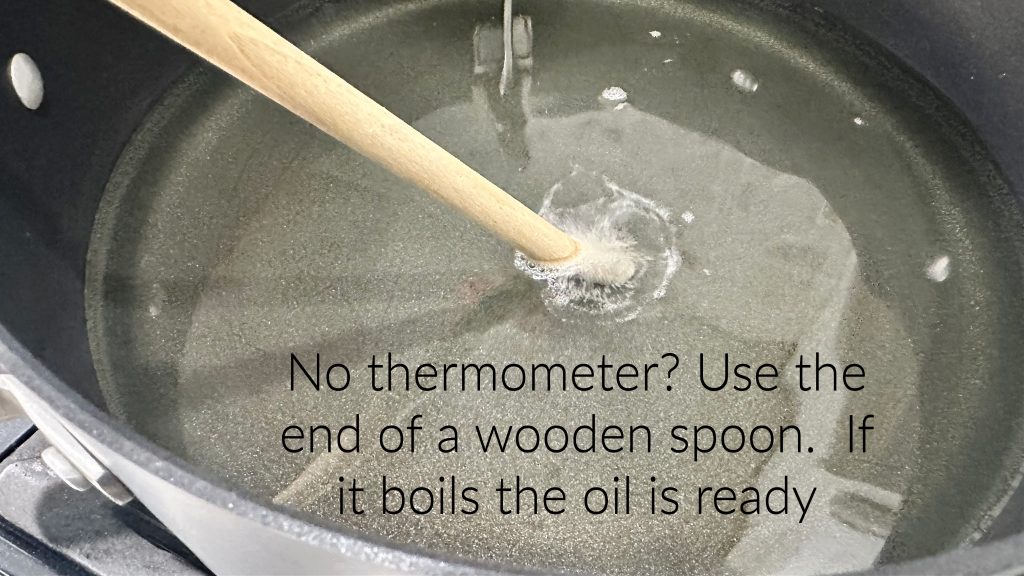
- Pour the oil into the Dutch oven and heat to 350°- 360°.
- TIP #1: If you don’t have a thermometer, there’s an easy way to tell if the oil is hot enough for frying. Dip the end of a wooden spoon into the hot oil; if it bubbles, the oil is ready.
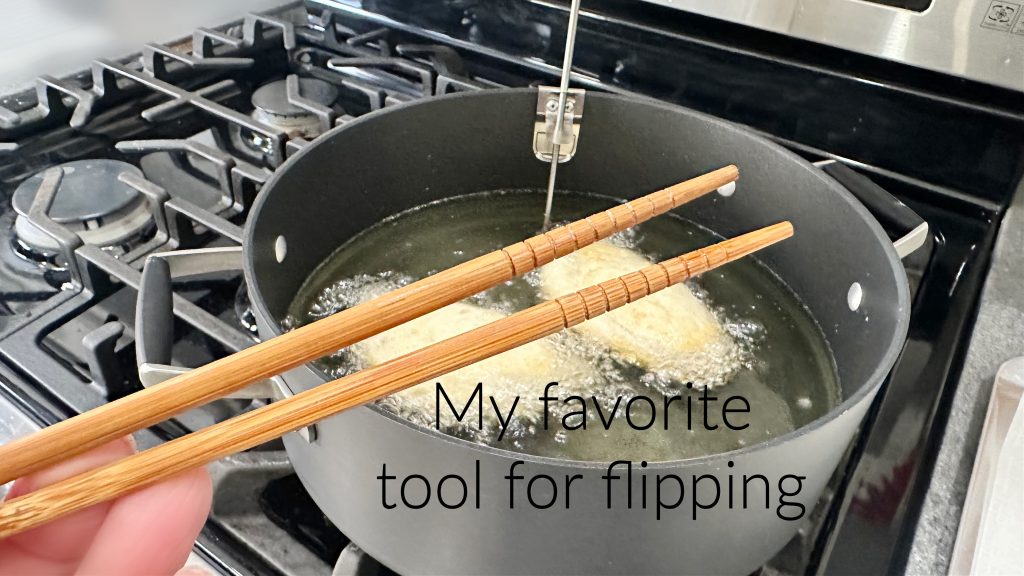
- Once the oil reaches the target temperature, carefully place 3 beignets, one at a time, in the hot oil.
- Turn when the beignet is a dark tan color.
- TIP #2: My tool of choice for turning the hot pastries is chopsticks.
- When both sides are a dark tan color, carefully remove them from the hot oil using a large slotted spoon or spatula, and place them on a wire rack lined with paper towels.
- NOTE: The paper towels are on the counter under the rack, not on the rack. If you put the paper towels on the rack, the moisture will soften the beignets and prevent them from staying crisp.
- Cool completely before adding the glaze.
- Once the fried pastries are cooled, lift the danish from the cookie sheet and dip the top into the vanilla glaze, shaking off any excess.
- Place the Danish on the wire rack on the counter, with wax paper underneath on the counter.
- While the glaze is still soft, add the optional sprinkles.
TIP #3: ONLY GLAZE THE DANISH THAT WILL BE IMMEDIATELY EATEN. STORE THE LEFTOVER DANISHES IN AN AIRTIGHT CONTAINER WITHOUT GLAZE. SAVE THE REMAINING GLAZE IN AN AIRTIGHT CONTAINER WITH THE DANISH. GARNISH WITH GLAZE RIGHT BEFORE EATING.
HOW TO MAKE THE VANILLA GLAZE
- To a medium bowl, add the powdered sugar, vanilla paste, and water.
- Whisk together until no lumps remain and the glaze is smooth.
Recipe Support
Looking for recipe support or want to share your recipes?
Join our RECIPE FACEBOOK COMMUNITY
It’s the perfect place to ask questions, get help, and connect with fellow recipe makers.
Storage
- Room Temperature: Because of the cream cheese filling, I do not recommend leaving them out longer than 2 HOURS.
- Refrigerator: Store baked Danish in an airtight container for up to 3 days. This helps keep the filling fresh and the biscuits from drying out.
- Freezer: Once completely cooled, the baked Danish can be frozen for up to one month. Wrap each Danish individually in plastic wrap, then place them in a freezer-safe container or zip-top bag.
- Reheating: Reheat refrigerated or frozen danish in a 300° oven for 8 to 10 minutes, or until warmed through. I love using the broiler because it caramelizes the icing. I recommend avoiding the microwave, as it can make the biscuit dough too hard or rubbery.
Make Ahead Tips and Timeline
- TWO DAYS BEFORE SERVING: You can prepare the lemon cream up to two days in advance and store it in the refrigerator in a sealed container. The blueberry filling can also be mixed ahead and refrigerated until ready to use.
- THE DAY BEFORE SERVING: The Danish can be fully assembled, covered, and refrigerated before baking. When ready, bake straight from the refrigerator, adding one or two extra minutes to the baking time if needed.
- THE DAY OF SERVING: For best texture and flavor, I recommend baking them fresh rather than baking a day ahead whenever possible.
Baking vs Frying: Which Is Better?
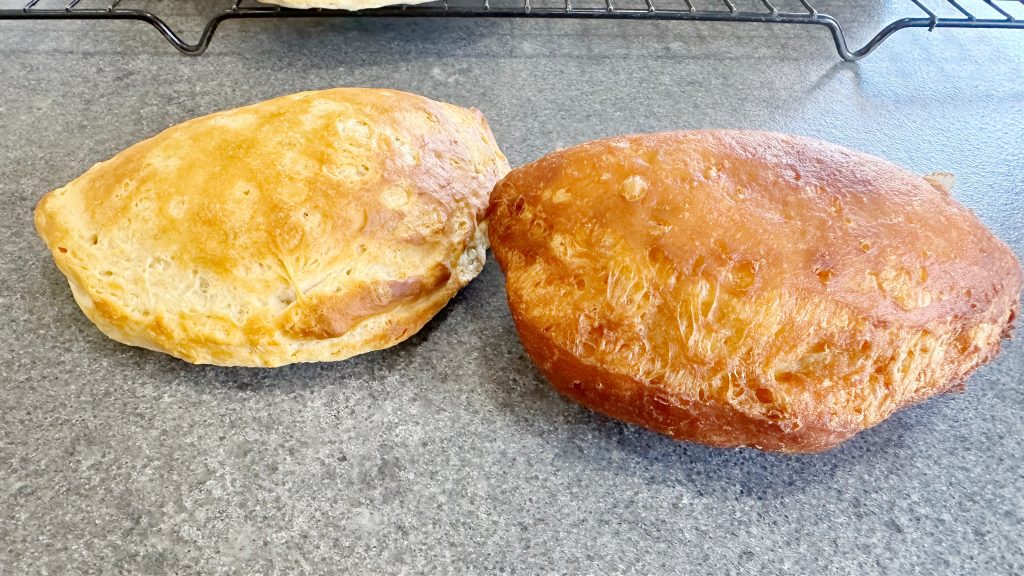
Baking creates a tender, flaky biscuit with lightly crisp edges and a clean, balanced flavor. It allows the lemon and blueberry fillings to shine without feeling heavy, and it is my preferred method for everyday baking and brunch. It also yields a more pronounced Danish flavor.
Frying gives the Danish a crisp, golden exterior with a softer interior. It is more indulgent and closer to a classic fried pastry or donut, making it a fun option for special occasions or when you want something extra decadent.
If you are looking for ease, consistency, and a lighter finish, baking is the way to go. If you want rich, bakery-style indulgence, frying is a delicious alternative.
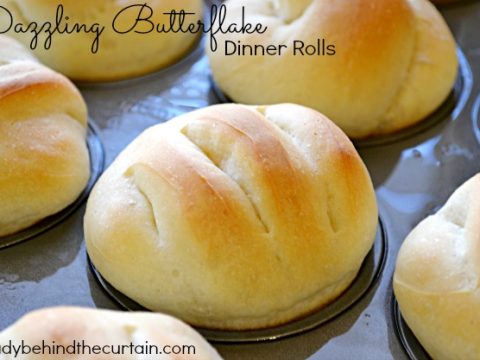
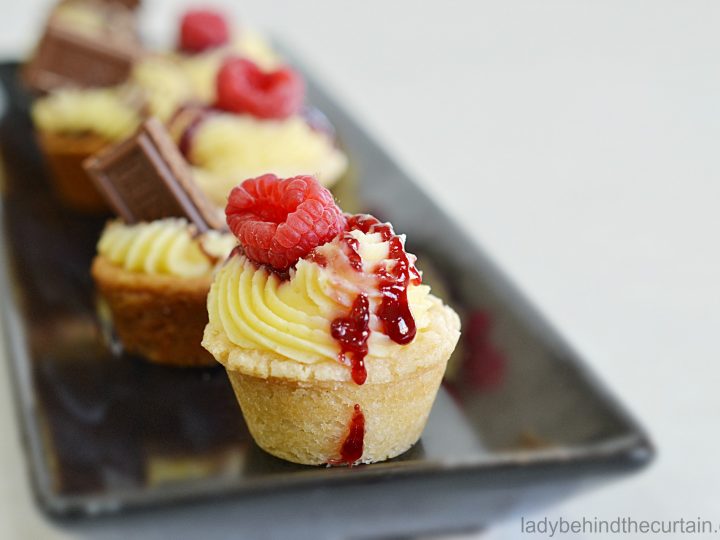
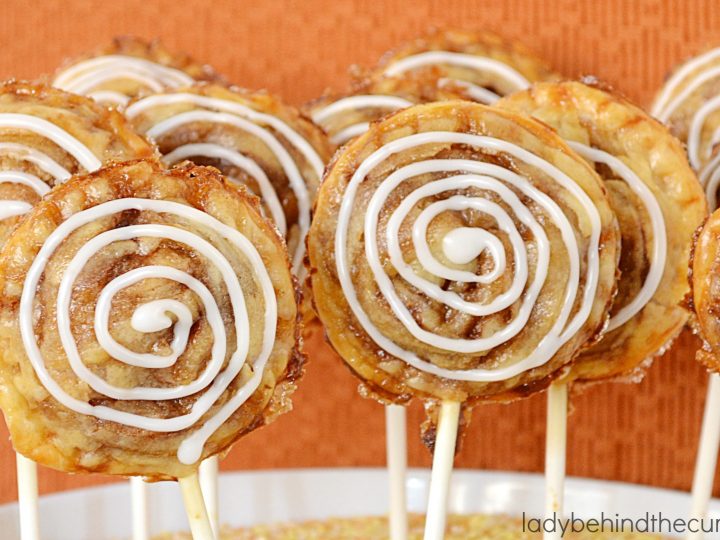
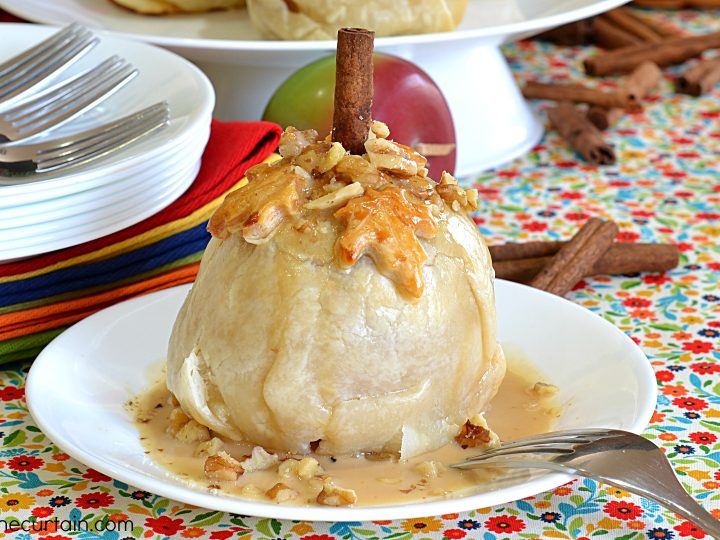
Recipes Using Store Bought Dough
If you love homemade treats but don’t always have the time (or desire) to make dough from scratch, this roundup is for you. Inside, you’ll find easy, irresistible recipes made with store-bought dough. From flaky pie crusts and buttery biscuits to shortcut cinnamon rolls and beyond, these recipes prove that convenience and comfort baking can go hand in hand.
Whether you’re whipping up a last-minute dessert, planning a holiday spread, or just craving something warm and cozy from the oven, these ideas will help you get there faster without sacrificing flavor. Think bakery-style pastries, nostalgic sweets, and clever twists that start with dough you can grab right off the shelf and turn into something truly special.
Let’s roll, fold, bake, and create something delicious the easy way.


LATEST POSTS
- Layered Lemon Cream Shortcake Parfaits (or Push-Up Pops)
- How to Create a Perfect Sprinkle Border with a Clean Center on a Frosted Cake
- Homemade Pistachio Ice Cream Cake
- 50+ Easy Frosting Recipes Every Home Baker Needs in Their Back Pocket
- Easy Focaccia Bread Using Rhodes Frozen Dinner Rolls
These easy blueberry lemon cream-filled biscuit danish are one of those recipes that prove shortcuts can still feel special. Whether you bake them for a cozy breakfast, a weekend brunch, or a simple dessert, they bring bakery-style flavor without the fuss. I hope you enjoy making and sharing them as much as I do.
Thanks for baking along with me,
Sheryl
Blueberry Lemon Filled Biscuit Danish
Ingredients
For the Biscuit Danish:
- 2 (16.3 ounce) cans Grands Biscuits
For the Lemon Cream Filling:
- 1 ( 8 ounce) cream cheese, softened
- 1 ½ cups powdered sugar
- 1 (21 ounce) can lemon pie filling
- lemon zest and juice from one lemon
For the Blueberry Pie Filling:
- 1 (21 ounce) can blueberry pie filling
- 1 cup powdered sugar
For the Vanilla Glaze:
- 4 cups powdered sugar
- 2 tablespoons vanilla paste (or vanilla extract)
- 5 to 6 tablespoons of water 5 tablespoons + extract or 6 tablespoons + paste)
- optional purple and yellow sprinkles
Instructions
For the Biscuit Danish (Baked)
- Line two cookie sheets with parchment paper. Preheat the oven to 375°.
- In a medium mixing bowl, beat the cream cheese until fluffy. Add the lemon pie filling, lemon zest, lemon juice, and powdered sugar. Beat until combined, light, and fluffy (it will have a mousse texture).
- In a medium mixing bowl, whisk together the powdered sugar and blueberry pie filling until all the sugar has been absorbed.
- On a lightly floured surface, roll a biscuit into a 5 x 7-inch rectangle.
- Spoon 3 level tablespoons of the lemon mixture into the center of the rectangle, lightly spreading it, leaving the center empty. Fill the center with ONE level tablespoon of the blueberry pie filling.
- Fill a ramekin with warm water. Dip your finger in the warm water and moisten the outer edges of the biscuit rectangle.
- Fold it in half, crimp to seal. Place on the prepared cookie sheet, then continue with the remaining biscuits.
- Bake for 10 minutes, turn the cookie sheets front to back, and continue baking for an additional 5 minutes. NOTE: I use a convection oven. You may need to adjust the baking time.
- As soon as you can handle the Danish, take them off the baking sheet and onto a wire cooling rack. Once they have completely cooled, make the glaze.
- Place a piece of wax paper underneath a wire rack.
- Carefully lift the Danish from the cookie sheet and dip the top into the vanilla glaze, shaking off any excess.
- Place the Danish on the wire rack, with wax paper underneath, on the counter.
- While the glaze is still soft, add the optional sprinkles.
For the Biscuit Danish (Fried)
- (Follow the above instructions from 1-7 except for preheating the oven) Once all the biscuits have been shaped and filled, they are ready to be fried.
- Pour the oil into the Dutch oven and heat to 350°-360°.
- TIP #1: If you don't have a thermometer, there's an easy way to tell if the oil is hot enough for frying. Dip the end of a wooden spoon into the hot oil; if it bubbles, the oil is ready.
- Once the oil reaches the target temperature, carefully place 3 beignets, one at a time, in the hot oil.
- Turn when the beignet is a dark tan color.
- TIP #2: My tool of choice for turning the hot pastries is chopsticks.
- When both sides are a dark tan color, carefully remove them from the hot oil using a large slotted spoon or spatula, and place them on a wire rack lined with paper towels.
- NOTE: The paper towels are on the counter under the rack, not on the rack. If you put the paper towels on the rack, the moisture will soften the beignets and prevent them from staying crisp.
- Cool completely before adding the glaze.
- Once the fried pastries are cooled, lift the danish from the cookie sheet and dip the top into the vanilla glaze, shaking off any excess.
- Place the Danish on the wire rack on the counter, with wax paper underneath.
- While the glaze is still soft, add the optional sprinkles.
For the Vanilla Glaze:
TIP: ONLY GLAZE THE DANISH THAT WILL BE IMMEDIATELY EATEN. STORE THE LEFTOVER DANISHES IN AN AIRTIGHT CONTAINER WITHOUT GLAZE. SAVE THE REMAINING GLAZE IN AN AIRTIGHT CONTAINER WITH THE DANISH. GARNISH WITH GLAZE RIGHT BEFORE EATING.
- To a medium bowl, add the powdered sugar, vanilla paste, and water.
- Whisk together until no lumps remain and the glaze is smooth.

EASY BLUEBERRY LEMON CREAM FILLED DANISH-FREQUENTLY ASKED QUESTIONS
Yes, homemade biscuit dough works beautifully as long as it rolls easily and is not too thick.
No chilling is required. Just make sure your cream cheese is softened so the filling mixes smoothly.
Do not overfill and make sure to press the edges firmly closed. Placing the seam side down helps seal everything in.
You can assemble the Danish, cover, and refrigerate them the day before baking. Bake just before serving for the best results.
They are balanced and not overly sweet. The lemon adds brightness, keeping everything from tasting heavy.
Yes, it is optional. It simply helps thicken and slightly sweeten the filling.
These are best baked or fried the traditional way. Air frying may cause the filling to leak.
A simple vanilla-powdered-sugar-and-milk glaze or a lemon glaze both work beautifully.
Absolutely. This recipe doubles easily and is perfect for brunch or gatherings.
Yes. Rolling the biscuits and spooning the filling are great kid-friendly steps.

Sheryl, these look fantastic and so easy to make. I love lemon and blueberry…these are definitely going on my to-do. Thanks for sharing! 🙂
Hi Dana,
You are going to love these. They are a bit messy to eat but well worth it. 🙂
I made mine a little different because I dont care for Lemon flavors except for tart Lemon Ade………I have used coconut and Banana instead of lemon…….They were unbelievable……..Thank You so much for posting………
They turned out great .it takes a little extra to do but worth it
I totally agree Candace!