

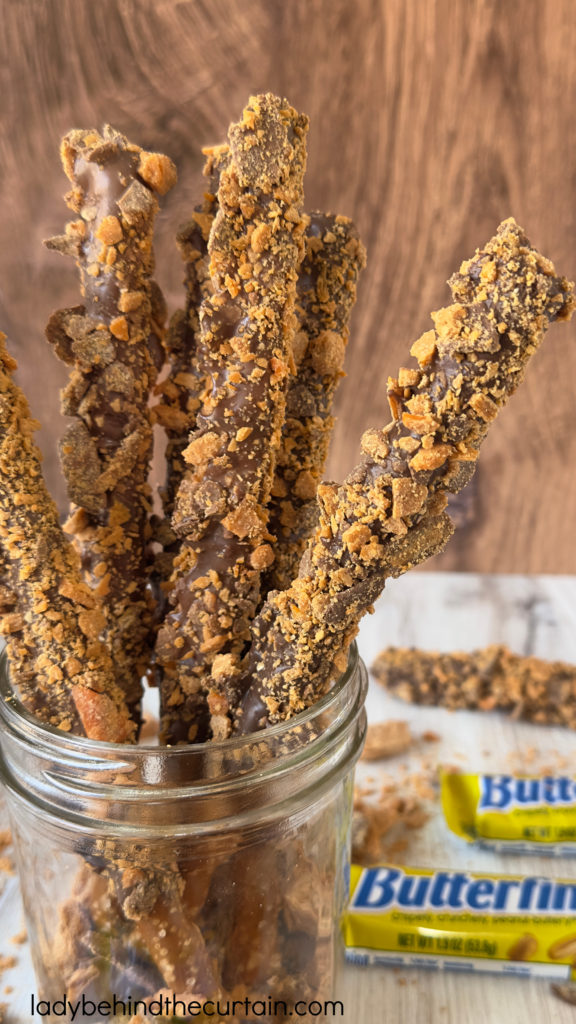
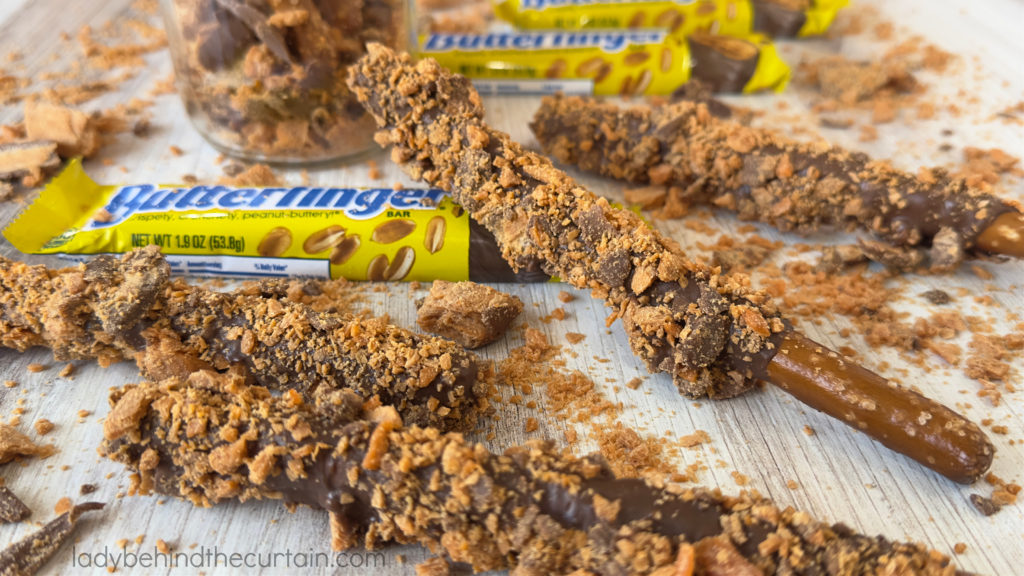
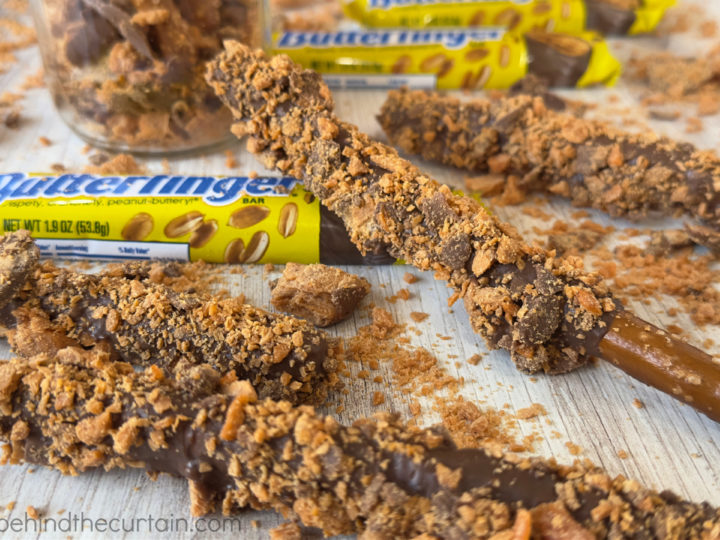
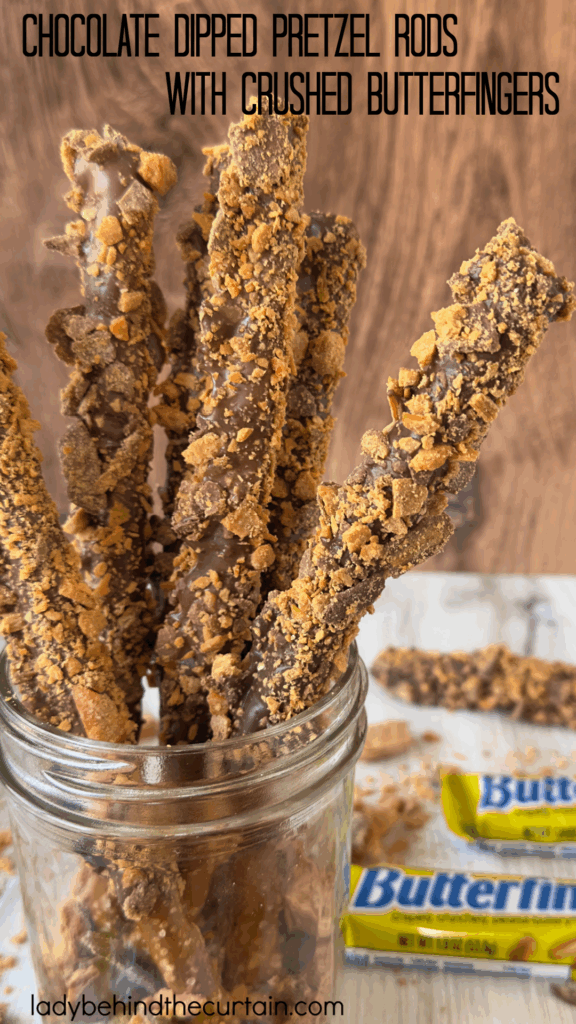
Chocolate-Dipped Pretzel Rods with Crushed Butterfingers (Perfect for Beginners!)
If you’ve ever scrolled past beautifully decorated pretzel rods on Pinterest and thought, “That looks amazing, but I could never do that,” — I’ve got the perfect treat for you. These chocolate-coated pretzel rods with crushed Butterfinger candy bars are not only a delicious sweet-and-salty snack, but they’re also incredibly easy to make—no piping bags, no fancy chocolate tempering, no stress. Just dip, sprinkle, and enjoy!
Whether you’re making treats for a party, a holiday tray, or just craving something a little extra at snack time, these pretzels are a beginner-friendly way to get creative in the kitchen without the pressure.
Why You’ll Love This Recipe:
- Beginner-friendly: No decorating skills required.
- Minimal ingredients: Just three main ones!
- Customizable: Use milk, dark, or white chocolate. Add sprinkles or a chocolate drizzle for a touch of elegance.
- No baking involved: It’s as simple as melt, dip, and set.
How to Make Butterfinger-Coated Pretzels
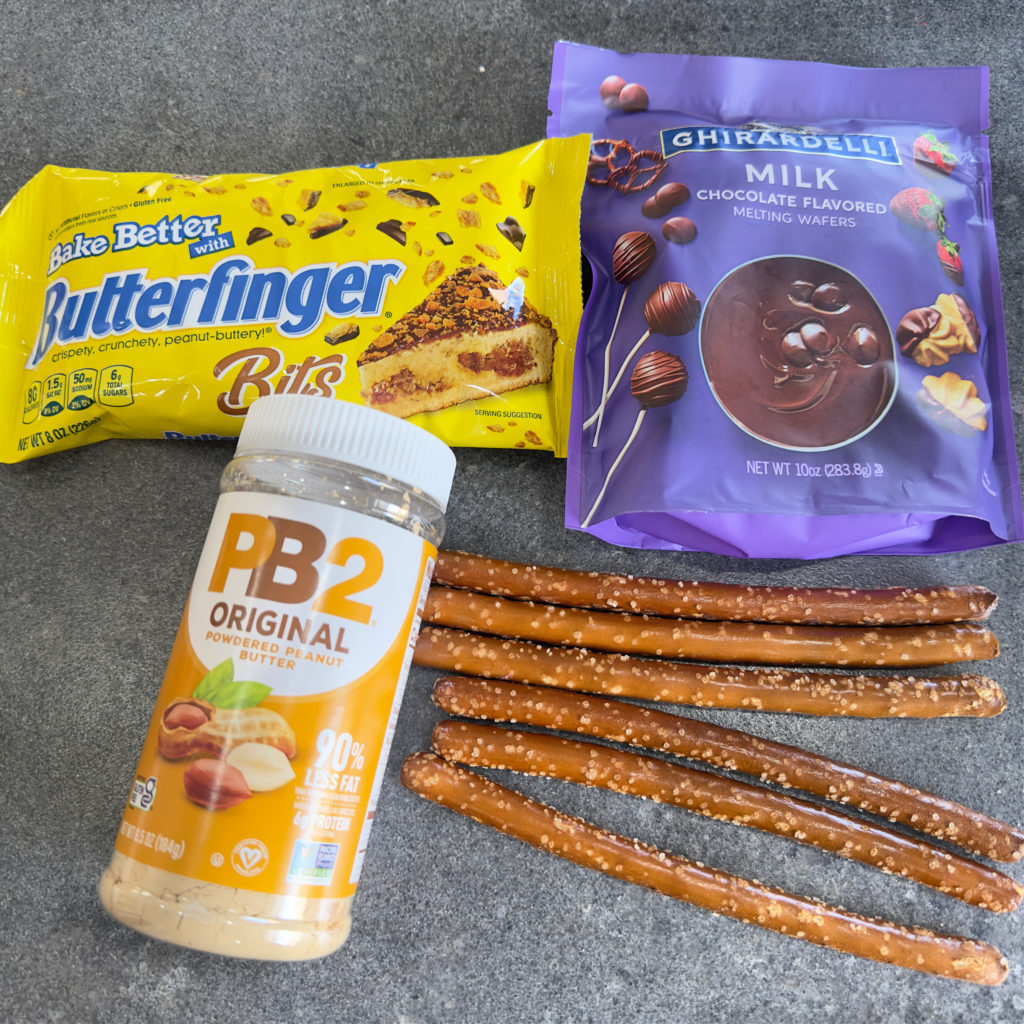

BUTTERFINGER COATED PRETZEL RODS INGREDIENTS LIST- full printable recipe below in recipe card
- ⅓ cup PB powder
- 1 (10-ounce) bag of Ghirardelli Milk chocolate wafers
- 1 (8-ounce) bag Butterfinger bits ice cream topping
- ¼ teaspoon peanut butter flavor LorAnn Oil (optional)
- 1 tablespoon vegetable shortening
EASY TO FOLLOW DECORATED PRETZEL RODS INSTRUCTIONS
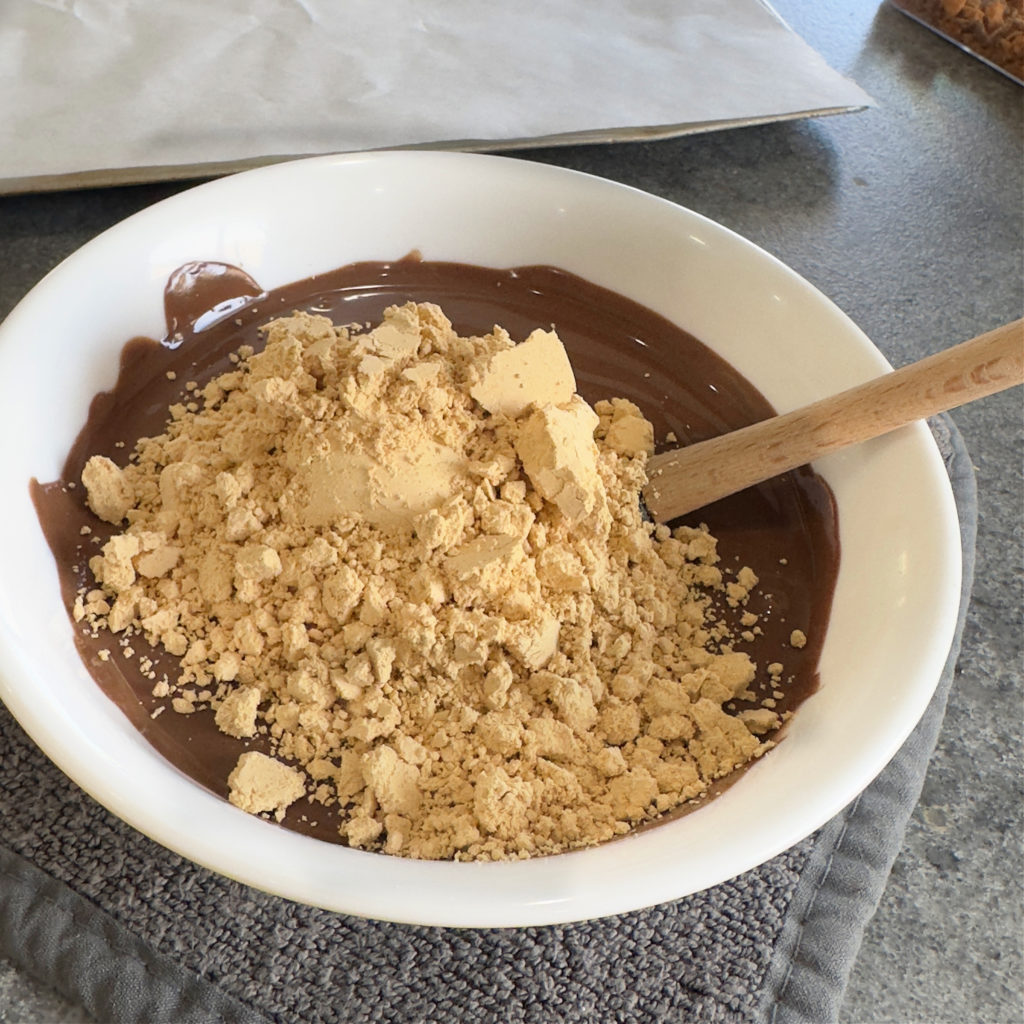
- Add chocolate to a medium microwave-safe bowl, heat 1 minute, and stir until chocolate is melted.
- Stir the PB powder into the melted candy. NOTE: The candy will be thick, similar to cake batter. Add the tablespoon of vegetable shortening and the optional peanut butter flavoring to the chocolate. Stir and microwave for 30 seconds. Stir until the shortening is melted and combined.
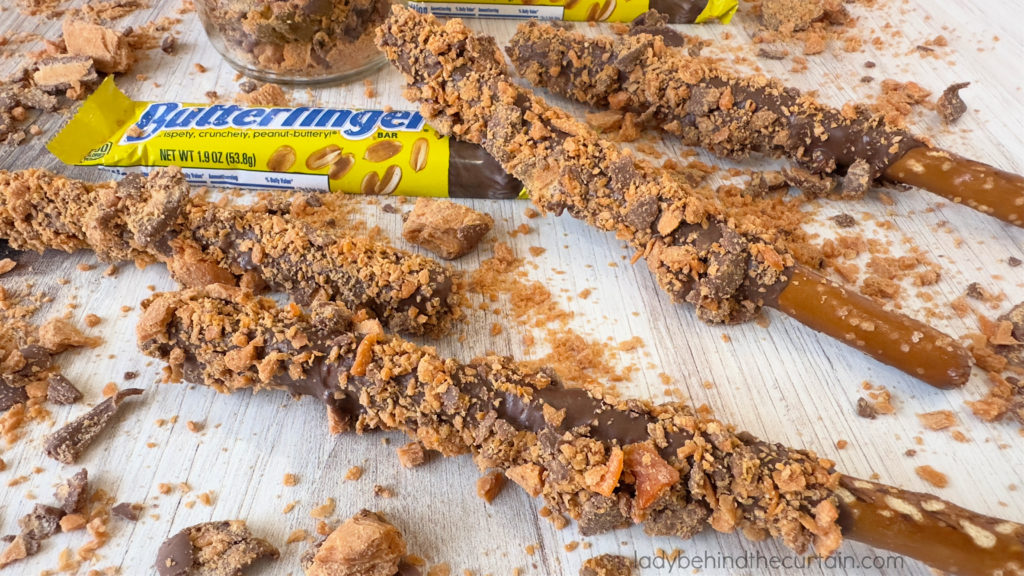
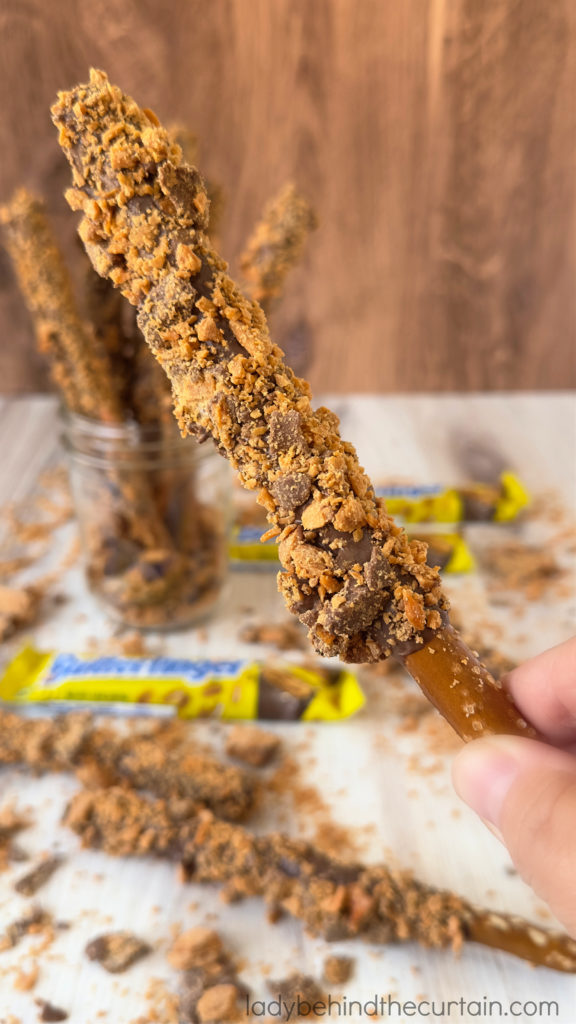
- Pour Butterfinger bits onto a flat surface (tray, cookie sheet, etc.). NOTE: If some of the pieces are too large, transfer them to a bag and smash them. Add the pieces back to the rest of the candy bar pieces.
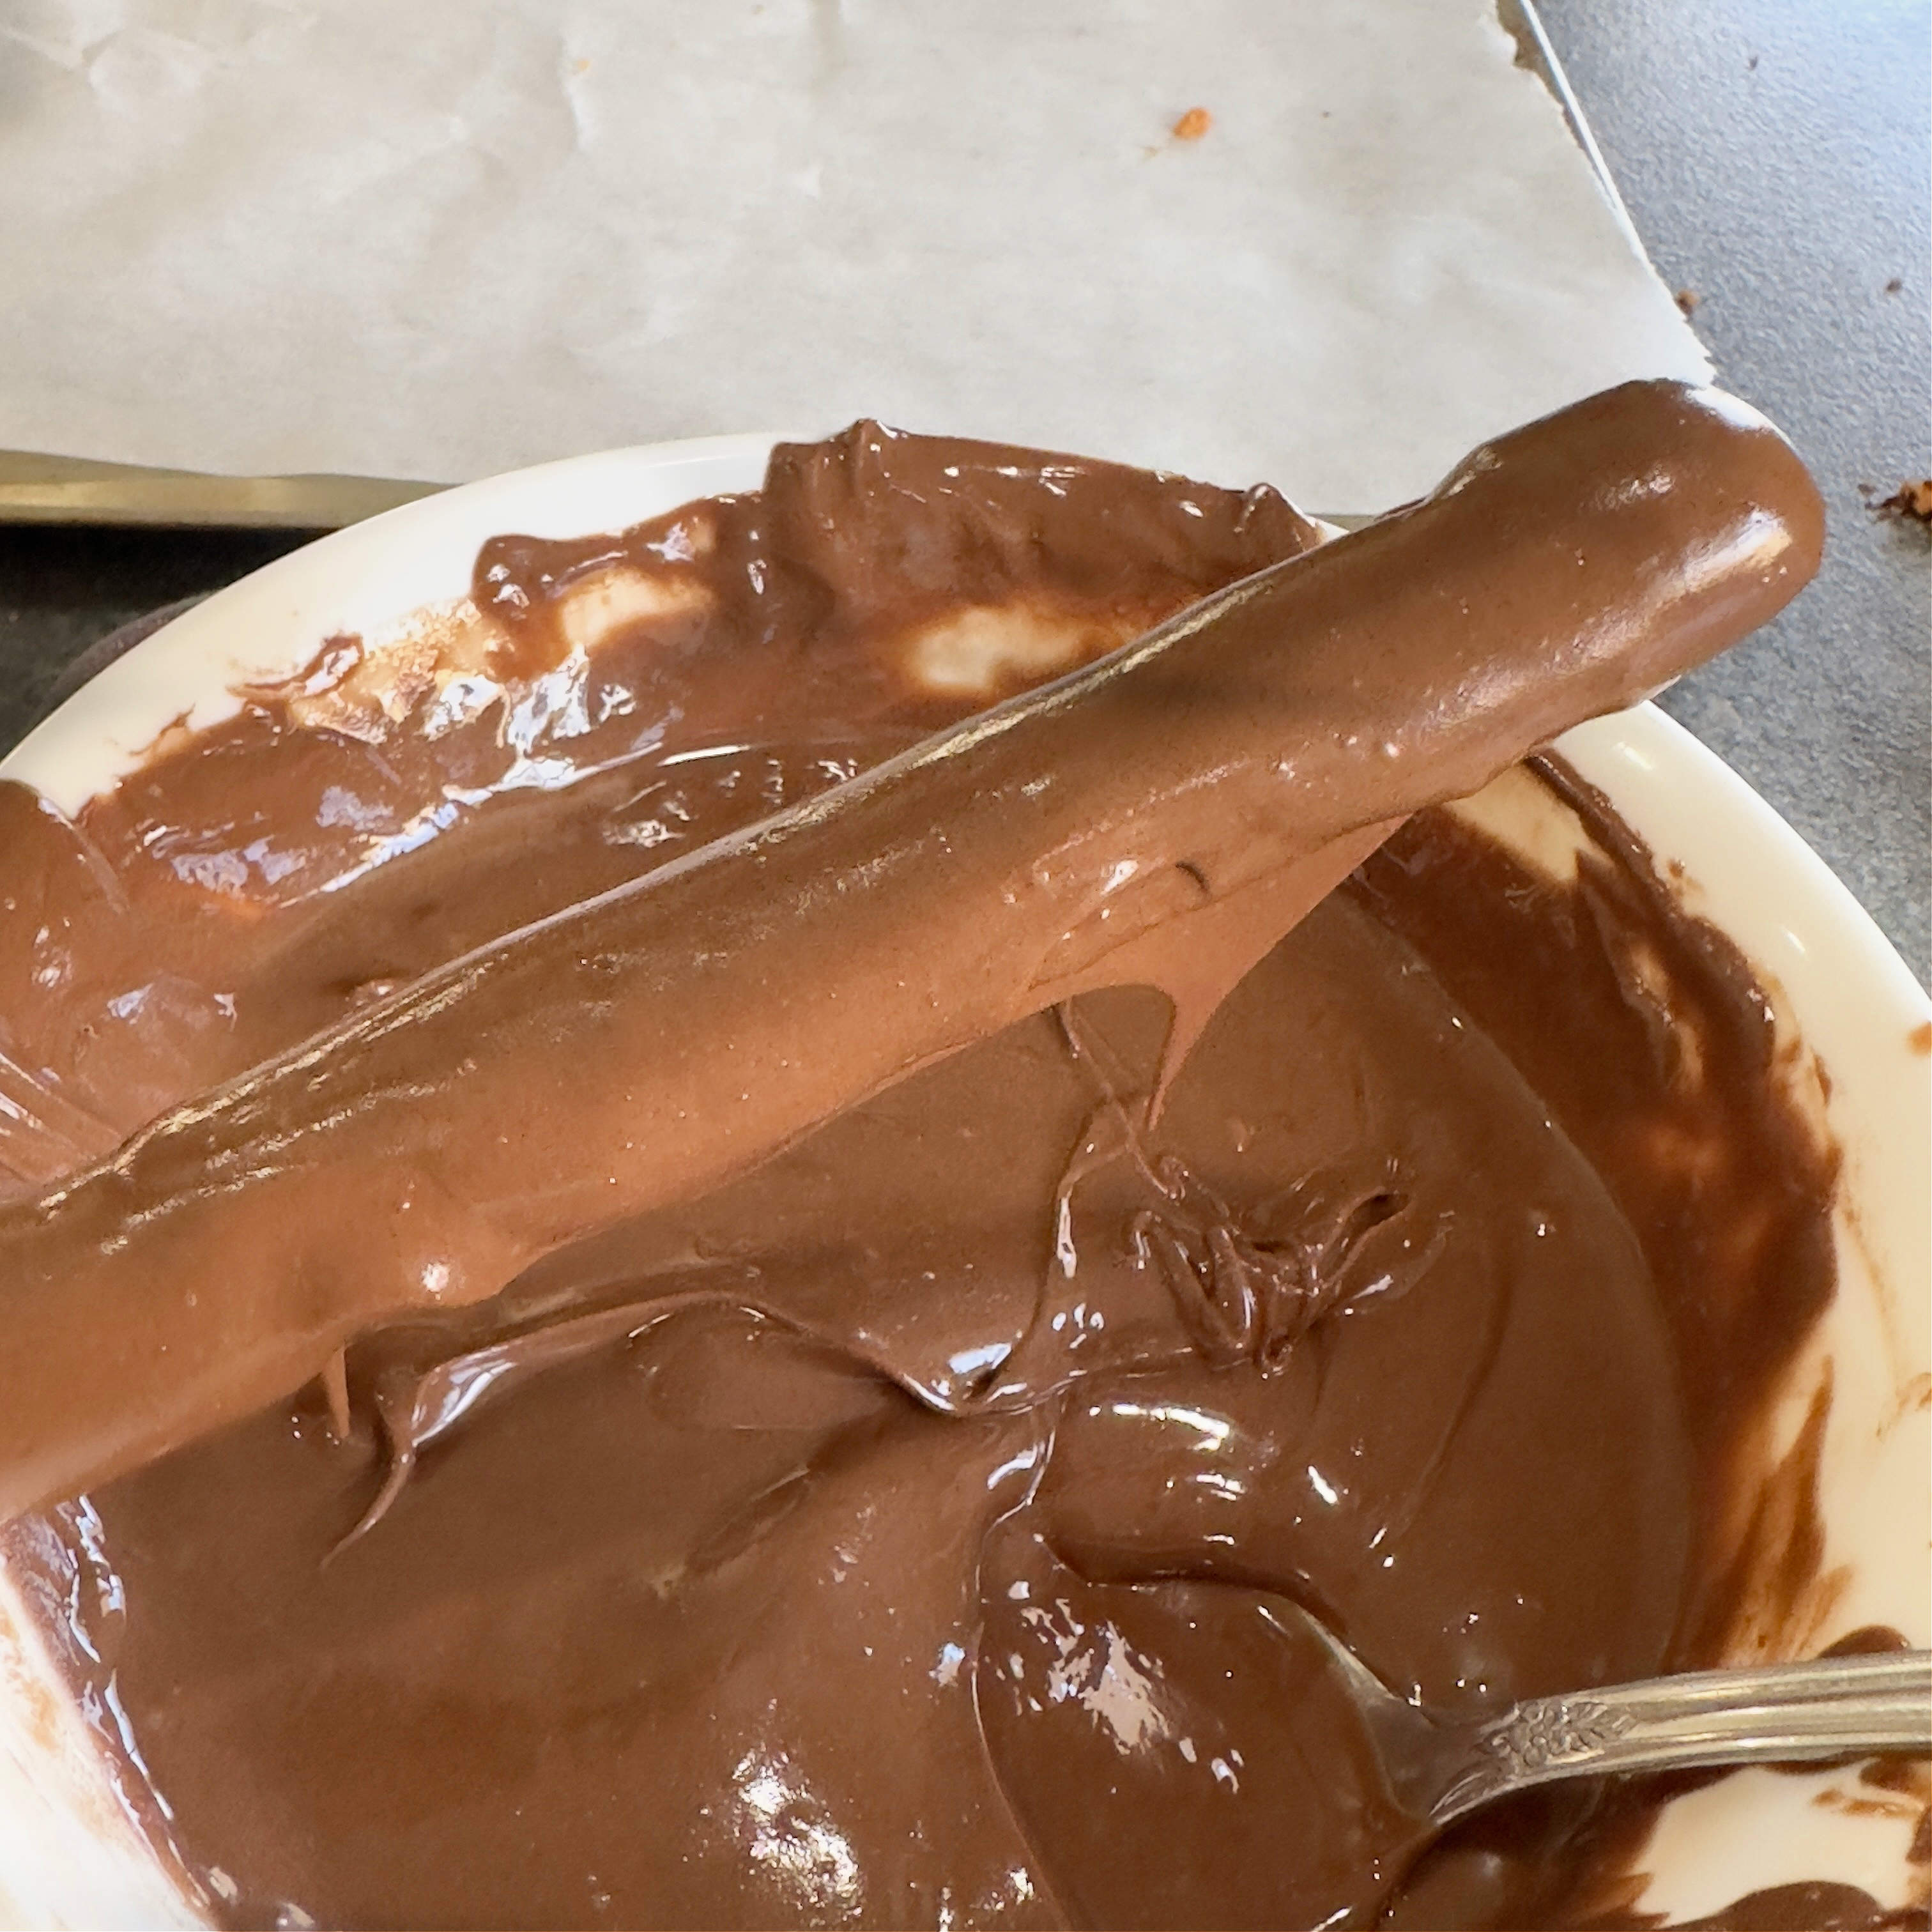
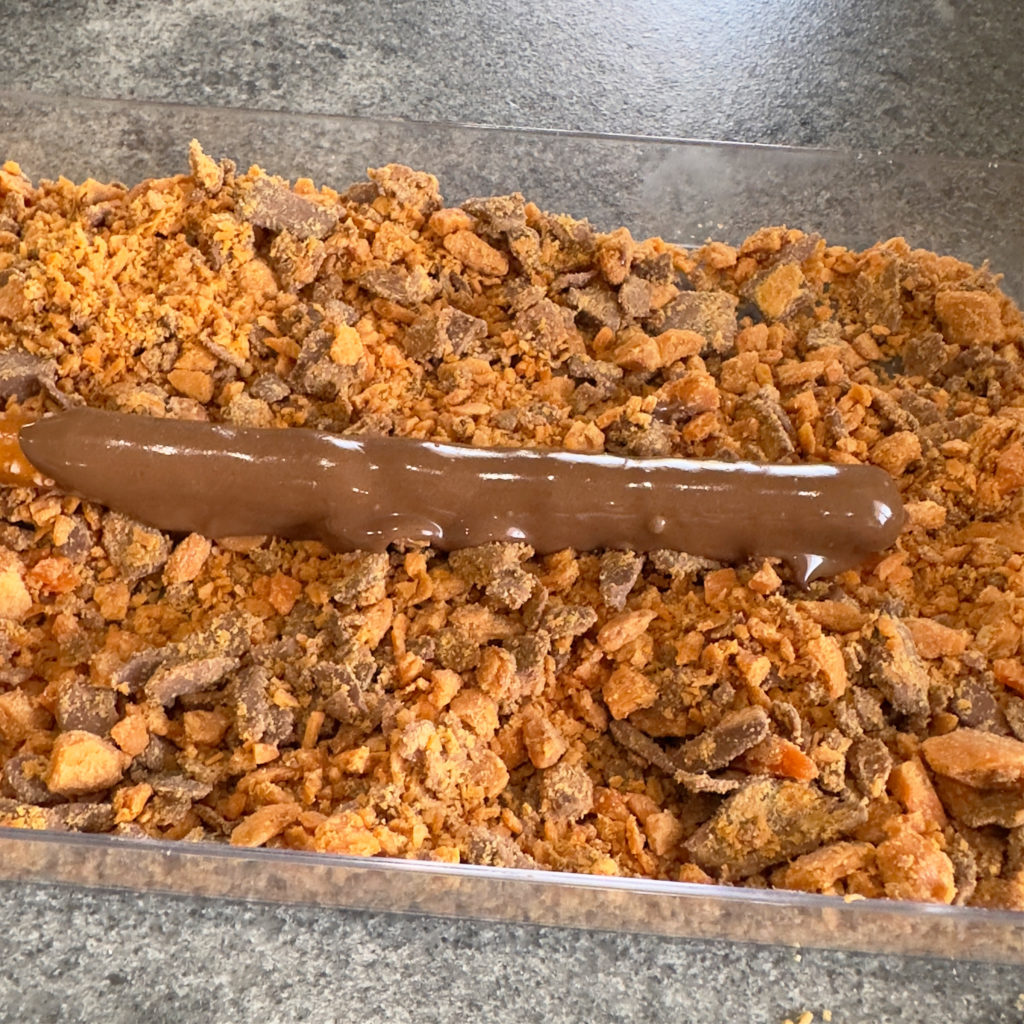
- Spoon the melted candy over the pretzel rods, making sure you leave an area at the end for your guests to hold onto. Tap off any excess candy and immediately transfer the pretzel on top of the candy bar pieces.
- Press the candy bar pieces onto the pretzel and transfer them to a cookie sheet lined with parchment paper.
- To speed up the drying process, you can place the tray of candy-coated pretzels in the refrigerator for 10 minutes.
PB Powder VS Peanut Butter Chips
- PB POWDER: Adding PB Powder to the melted candy adds just the right amount of peanut butter flavor. The result is a thick chocolate coating. The answer is a tablespoon of vegetable shortening.
- PEANUT BUTTER CHIPS: Baking chips contain stabilizers that will prevent the chips from melting smoothly and setting up firmly.
PEANUT BUTTER FLAVORED MELTING WAFERS
Peanut Butter flavored melting wafers used to be easy to find. But not anymore. This flavor is becoming increasingly difficult to find, and for that reason, I chose to add the PB Power.
WHAT IS PB POWDER?: PB powder, or powdered peanut butter, is a low-fat, high-protein alternative to traditional peanut butter. It’s made by removing most of the oil from roasted peanuts and grinding the remaining solids into a powder. This process significantly reduces the fat content, resulting in a product that’s lower in calories but still retains a peanut flavor. It can be used in various ways, including as a spread, in baking, or as an addition to smoothies and other beverages.
THE PERFECT TREAT FOR BEGINNERS

If you’re new to the world of homemade treats, fear not! These peanut butter candy bar-coated pretzel rods are the perfect starting point for beginners. The recipe is straightforward and requires only a few basic ingredients that can be easily found at your local grocery store. By following the simple steps outlined above, you can create a delicious snack that will impress your friends and family at your next gathering. So, grab your ingredients and get ready to enjoy the perfect treat for beginners.
DO I NEED TO ADD PEANUT BUTTER FLAVORING?
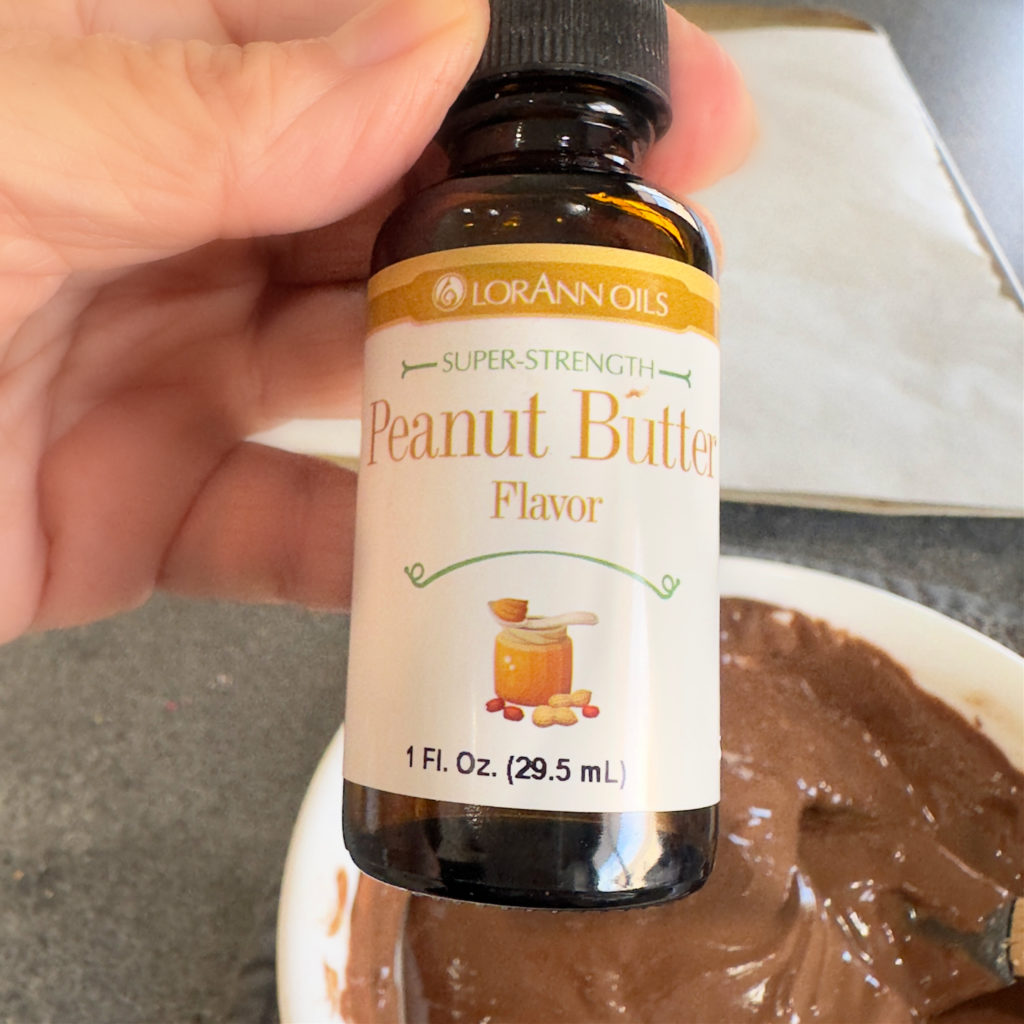
Adding the peanut butter-flavored oil to your candy wafers adds another layer of peanut butter flavor. Is it a game-changer if you don’t add it? No. But it is DELICIOUS!
Here’s a guide to adding peanut butter flavoring from LorAnn Oils to melted candy wafers:
- Ensure Proper Melting: Melt your candy wafers slowly, preferably in a microwave using 30-second intervals and stirring between each interval. Avoid overheating, as this can affect the texture of the finished product. The ideal temperature for melted wafers when dipping is between 93°F and 95°F.
- Choose the Right Flavoring: LorAnn’s Super-Strength Peanut Butter Flavoring is an oil-based flavoring, making it suitable for use with melted candy wafers. Avoid using water-based extracts or emulsions, as these can cause the candy melts to seize.
- Start Small: LorAnn Oils are concentrated, so a little goes a long way. Begin by adding a small amount of the peanut butter flavoring, such as ¼ to ½ teaspoon per pound of melted candy wafers, and adjust to taste. You can always add more if you desire a stronger flavor.
- Mix Thoroughly: Stir the flavoring into the melted candy wafers until it is fully incorporated and the mixture is smooth.
- Adjust Consistency (if needed): Adding the flavoring may slightly thicken the candy melts. If this happens, you can thin them out by adding vegetable shortening one teaspoon at a time, until you reach the desired consistency. Vegetable shortening is the same fat found in many candy coatings and won’t affect the flavor or setting of your candy.
- Cool and Enjoy: Once the flavoring is incorporated and the consistency is correct, you can use the peanut butter-flavored candy melts for dipping, molding, or other confectionery creations. Chill the finished products in the refrigerator to help them set quickly. THIS IS NOT SPONSORED. I LOVE THEIR PRODUCTS AND USE THEM ALL THE TIME. Click here to see all the options plus peanut butter→ LORANN OILS – PEANUT BUTTER
TIPS FOR SUCCESS
- Use Good-Quality Melting Chocolate: Using low-quality melting chocolate will make your job more challenging. A nicer candy will coat better and taste better.
- Work in Small Batches: Depending on the temperature of your kitchen, the candy can harden quickly. That’s why I recommend only coating one pretzel at a time before adding the chopped candy bar coating.
- Store in an Airtight Container: When coated pretzels are stored properly, they can remain fresh for approximately two weeks. Which is perfect for planning parties.
How to Keep Your Candy Coating Smooth, Glossy, and Ready for Decorating
- Use a Candy Melting Pot: A candy melting pot or mini slow cooker is ideal for maintaining a steady, warm temperature for melts. Most have a “warm” setting that prevents overheating or burning. The one I have is made from Wilton.
- Electric Mug Warmer: Place your bowl of melted candy on a mug warmer plate to keep it fluid without further cooking. It’s a compact and affordable option.
- Microwave Briefly as Needed: If the candy starts to thicken, microwave in 10–15-second bursts at 50% power, stirring each time until smooth again.
- Work in Small Batches: Melt small amounts at a time so it doesn’t sit too long and harden before use. This also reduces waste.
- Cover When Not in Use: Cover the bowl with a lid or plastic wrap between uses to help retain warmth and prevent a skin from forming on top.
How to Store Leftover Melted Candy

If you have melted too much candy for your project, don’t worry; melted candy can be stored for future use. STORAGE: Pour the melted candy into a zip-top bag, remove all the air from the bag, zip it closed, and set it aside until hardened. OR….Place a piece of parchment paper on the counter, pour the leftover candy onto the paper, and let it harden before breaking it into manageable pieces. Then, place the pieces into a zip-top bag. USE AGAIN: Remove the hardened candy from the bag, chop it, and put it in a microwave-safe bowl. Heat for 30 seconds, then stir. Continue heating in 30-second intervals until the candy is melted and creamy. NOTE: Reheated candy melts will heat faster than the first time they were melted.
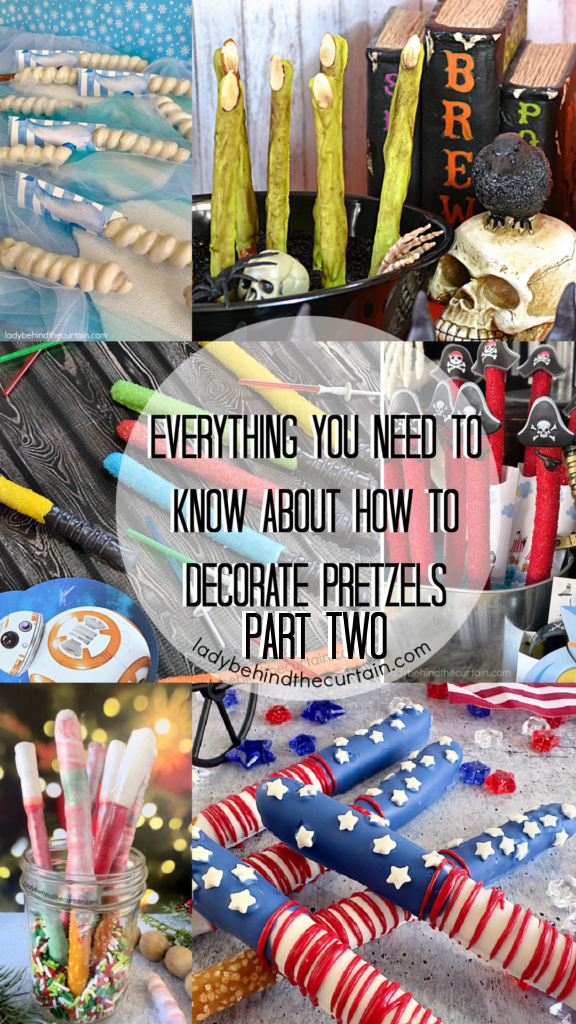
FOR MORE INFORMATION ABOUT DECORATED PRETZELS, VISIT THESE POSTS


NOT ALL CANDY IS CREATED EQUAL – TOP CHOICES
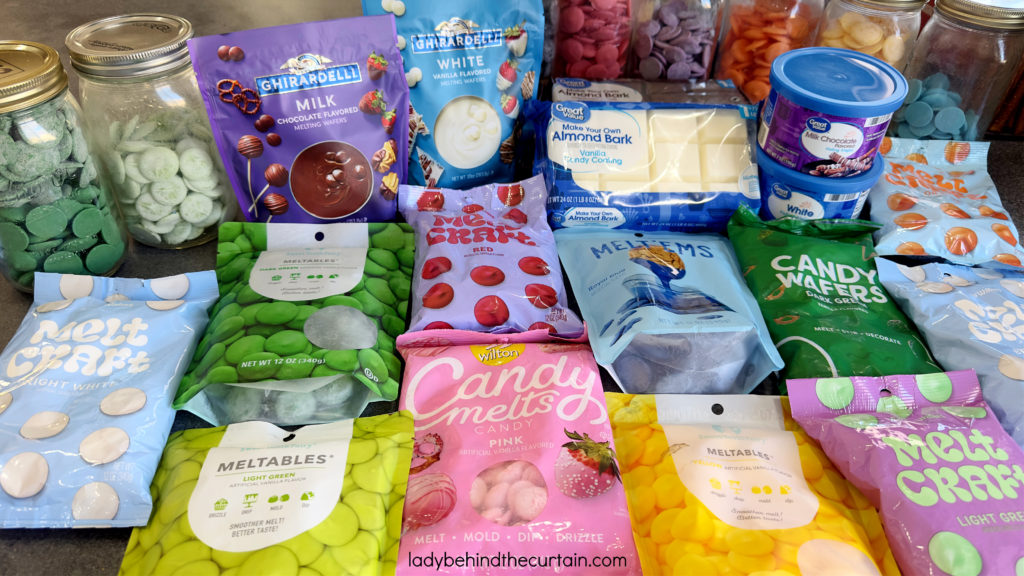
My list is based on brands I can find locally. I have heard great things about popular candy-making brands on Amazon, specifically Merkens.
- GHIRARDELLI: I rate this melting candy the best. The candy melts beautifully and has excellent flavor.
- MELT CRAFT: The newest addition to Michaels, these candy wafers are the best brand they’ve carried. They have a decent flavor and melt beautifully.
- SWEET TOOTH FAIRY: No longer available at Michaels, these candy wafers were good and far better than Wilton Candy Melts, which they carried before this brand.
- GREAT VALUE: Cheap melting candy from Walmart.
- CHOC MAKER: Not bad, a step up for Candy Melts.
- CANDY MELTS: The melting process of Wilton candy melts is not consistent. Whether shortening is needed depends on the color; unlike Ghirardelli or Melt Craft, which don’t need any shortening added to be creamy.
- ALMOND BARK: Cheap but melts beautifully.
LATEST POSTS
- Layered Lemon Cream Shortcake Parfaits (or Push-Up Pops)
- How to Create a Perfect Sprinkle Border with a Clean Center on a Frosted Cake
- Homemade Pistachio Ice Cream Cake
- 50+ Easy Frosting Recipes Every Home Baker Needs in Their Back Pocket
- Easy Focaccia Bread Using Rhodes Frozen Dinner Rolls
If the idea of “decorating” intimidates you, this is the recipe that will change your mind. These pretzel rods are playful, simple, and look amazing with barely any effort. The contrast of salty crunch, creamy chocolate, and that signature Butterfinger crisp is pure magic. So go ahead — melt, dip, and sprinkle your way to an easy treat that feels impressive, even if you’re a total beginner. Give them a try and let your inner chocolatier shine (without the pressure of perfection)! ❤️ Sheryl
Butterfinger Pretzels
Ingredients
- ⅓ cup PB powder
- 1 (10 ounce) bag of Ghirardelli Milk chocolate wafers
- 1 ( 8 ounce) bag Butterfinger bits ice cream topping
- ¼ teaspoon peanut butter flavor LorAnn Oil (optional)
- 1 tablespoon vegetable shortening
Instructions
- Add chocolate to a medium microwave-safe bowl, heat 1 minute, and stir until chocolate is melted.
- Stir the PB powder into the melted candy. NOTE: The candy will be thick, similar to cake batter. Add the tablespoon of vegetable shortening and the optional peanut butter flavoring to the chocolate. Stir and microwave for 30 seconds. Stir until the shortening is melted and combined.
- Pour Butterfinger bits onto a flat surface (tray, cookie sheet, etc.). NOTE: If some of the pieces are too large, transfer them to a bag and smash them. Add the pieces back to the rest of the candy bar pieces.
- Spoon the melted candy over the pretzel rods, making sure you leave an area at the end for your guests to hold onto. Tap off any excess candy and immediately transfer the pretzel on top of the candy bar pieces.
- Press the candy bar pieces onto the pretzel and transfer them to a cookie sheet lined with parchment paper.
- To speed up the drying process, you can place the tray of candy-coated pretzels in the refrigerator for 10 minutes.
HOW TO STORE CANDY COATED PRETZEL RODS:
- Slide each pretzel into a pretzel bag and tightly secure it with a twist tie.
- OR...Store in an airtight container.

Comments
Chocolate-Dipped Pretzel Rods with Crushed Butterfingers (Perfect for Beginners!) — No Comments
HTML tags allowed in your comment: <a href="" title=""> <abbr title=""> <acronym title=""> <b> <blockquote cite=""> <cite> <code> <del datetime=""> <em> <i> <q cite=""> <s> <strike> <strong>