





How to Make Honeycomb Ball Decorations with Cupcake Liners
There’s something magical about transforming an everyday item into a beautiful decoration. That’s exactly what happens with these cupcake liner honeycomb ball decorations. What starts as a simple stack of paper baking cups becomes an elegant, lightweight ornament that can be used for Christmas, birthday parties, baby showers, weddings, bridal showers, classroom celebrations, and just about any event you can imagine.
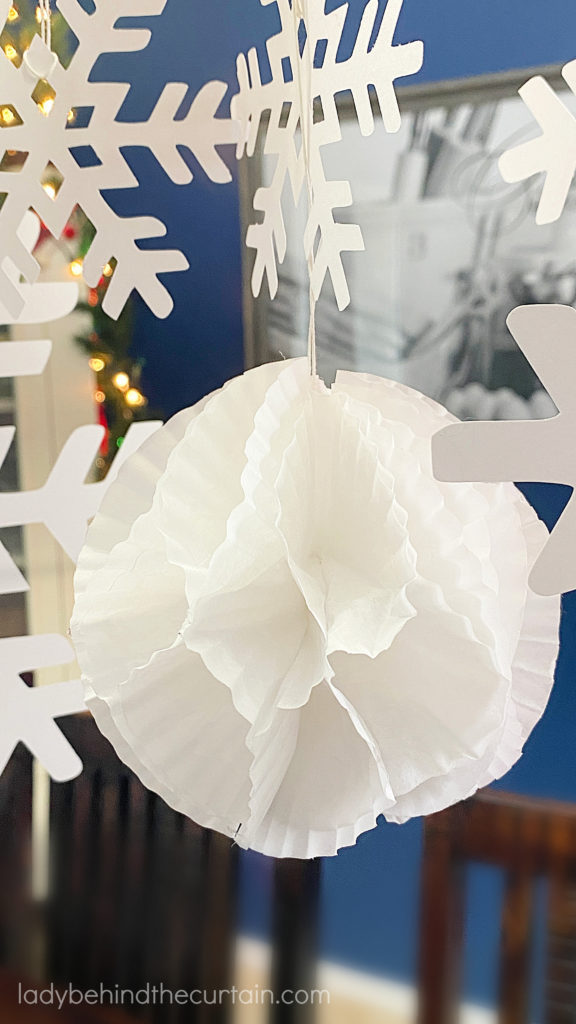
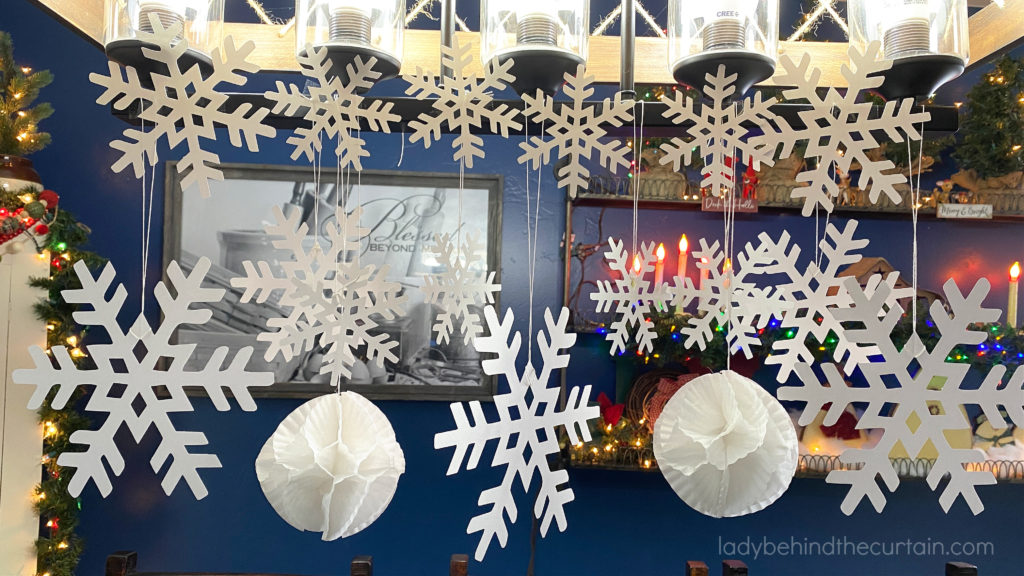
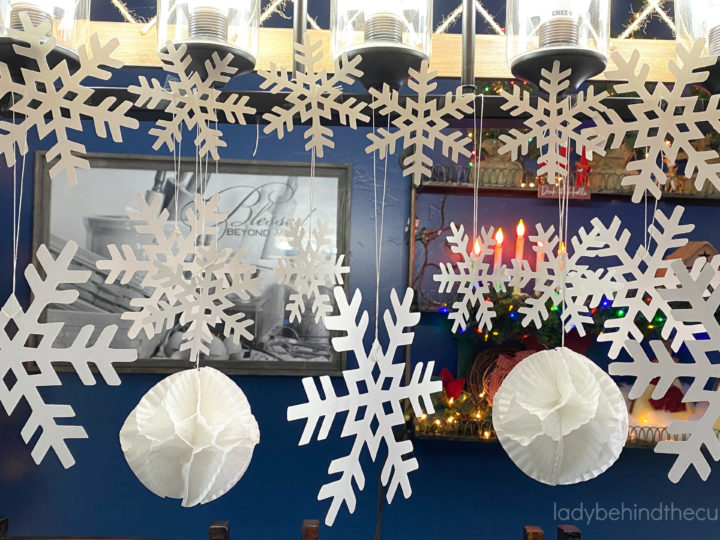
I first made these using plain white cupcake liners for my Christmas decorating. Hung from white crochet thread and paired with delicate paper snowflakes, they looked like little snowballs floating through the room. They were inexpensive to make, incredibly lightweight, and added so much texture without overwhelming the space.
The best part? Once you learn this simple technique, you’ll never look at a package of cupcake liners the same way again. Every color, pattern, and season becomes an opportunity to create something unique.
Whether you’re decorating a holiday tree, planning a party, or simply looking for an easy afternoon craft, these honeycomb balls are among the projects that deliver beautiful results without requiring expensive supplies or years of crafting experience.
Why You’ll Love Making These Honeycomb Ball Decorations
Some crafts are fun to make but difficult to use once they’re finished. This isn’t one of them. These paper honeycomb balls are as practical as they are beautiful, making them a decoration you’ll find yourself reaching for year after year.
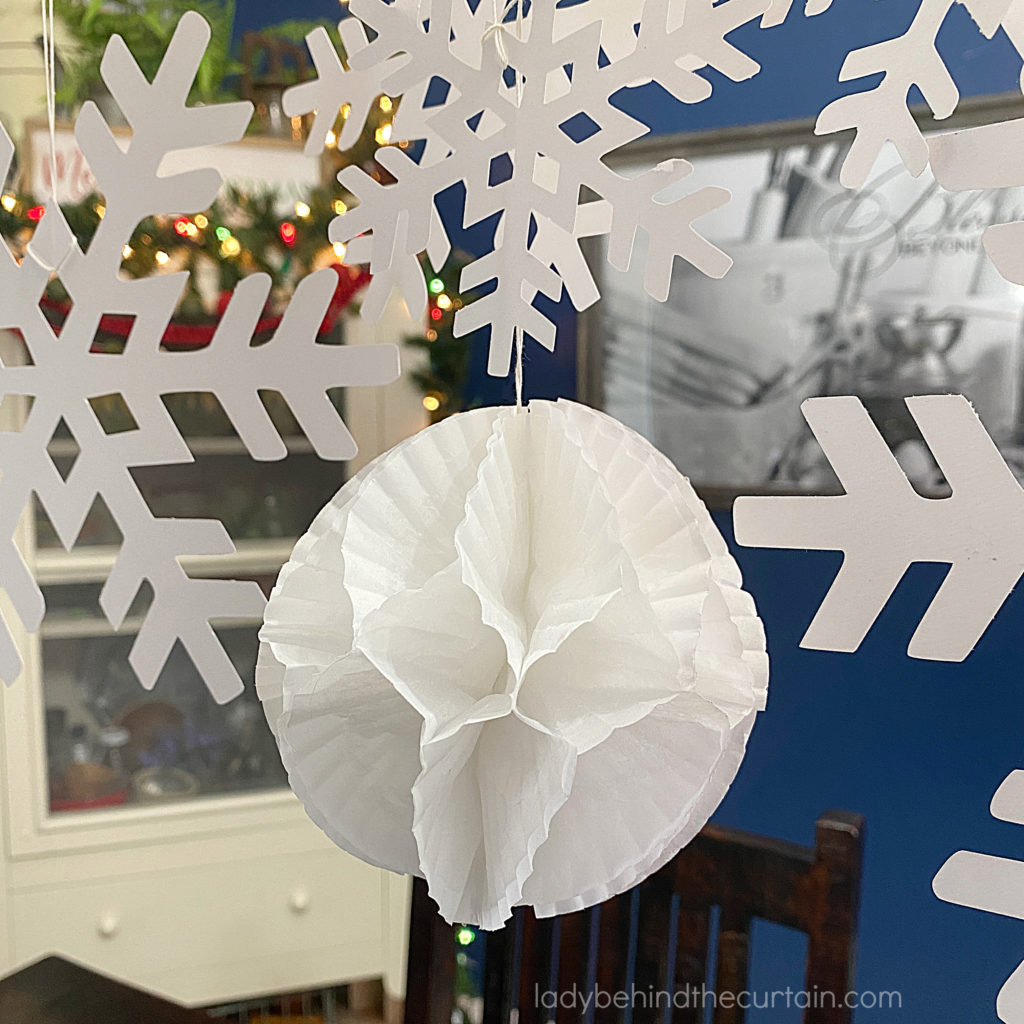
Instead of spending money on store-bought paper decorations that often come in limited colors and sizes, you can create custom decorations that perfectly match your style. Here are just a few reasons this project has become one of my favorites.
| Why You’ll Love Them | What It Means for You |
|---|---|
| Budget-friendly | Create beautiful decorations for just a few dollars. |
| Beginner-friendly | Perfect even if you’re new to crafting. |
| Lightweight | Easy to hang from ceilings, trees, chandeliers, and garlands. |
| Endless color choices | Match any holiday, party, or decorating theme. |
| Easy to store | Fold flat and tuck away for future celebrations. |
| Beautiful in groups | One is lovely, but several together create a stunning display. |
Unlike many seasonal decorations that only work for one holiday, these can easily become an all-year decorating favorite simply by changing the color of the cupcake liners.
Behind the Curtain: One of my favorite decorating tricks is to make several sizes and hang them in small clusters instead of using just one. The grouped decorations create movement and make a room feel professionally decorated without looking overdone. For this project, use mini, regular, and large cupcake liners.
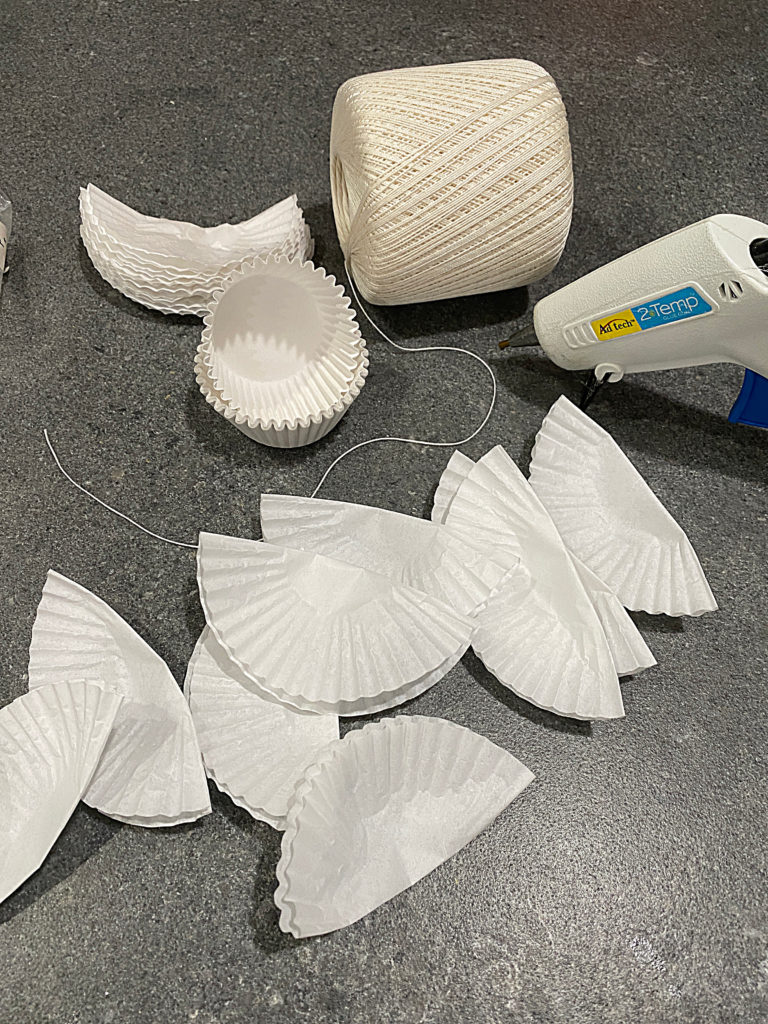
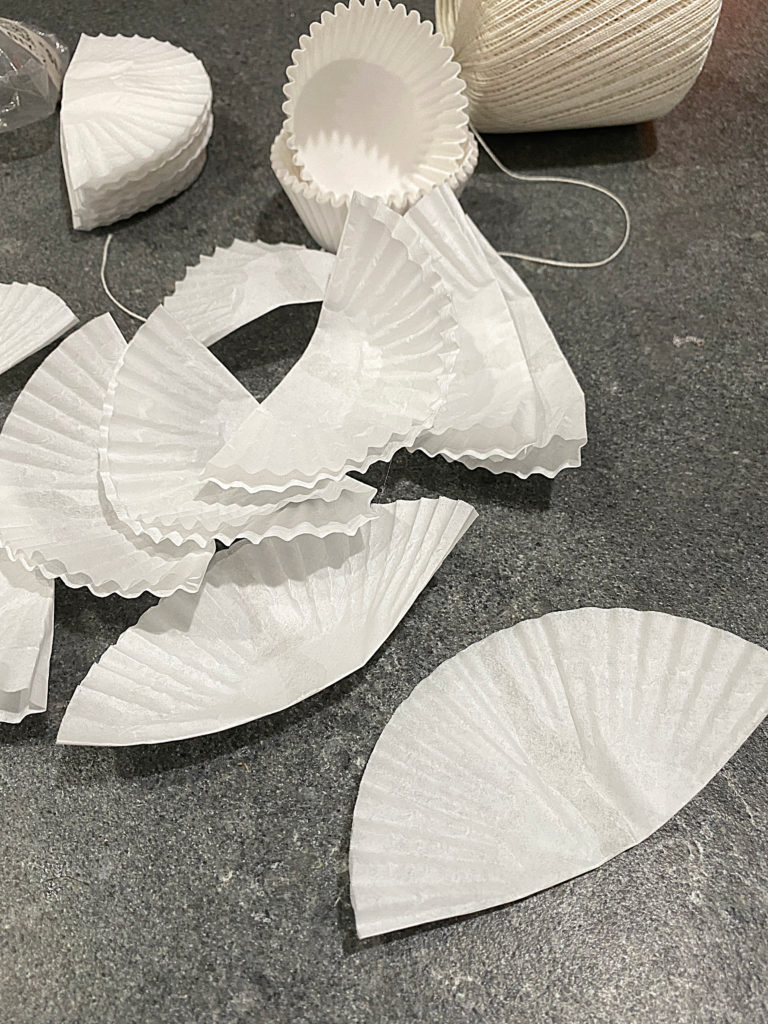
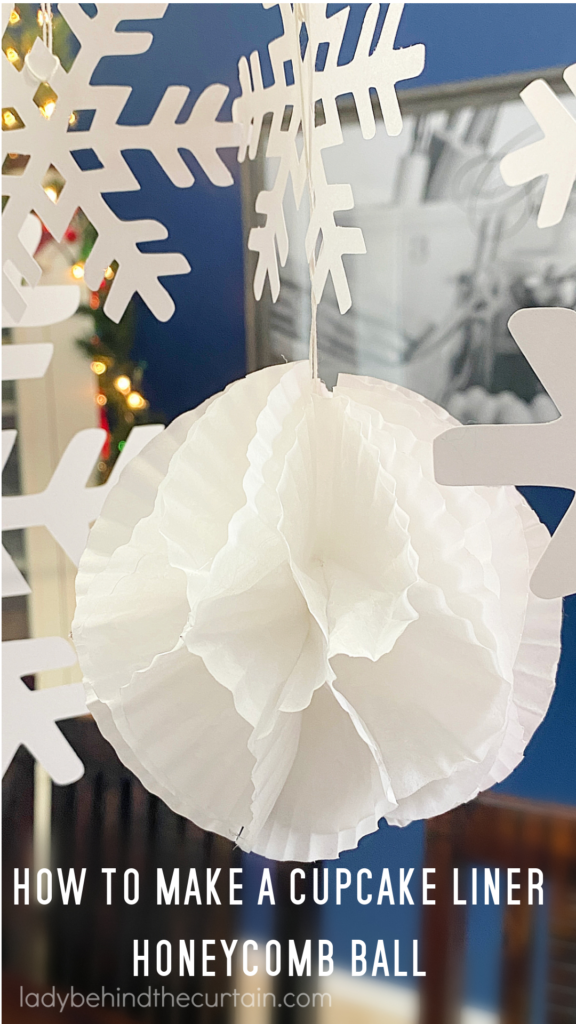
- FOLD TEN CUPCAKE LINERS IN HALF
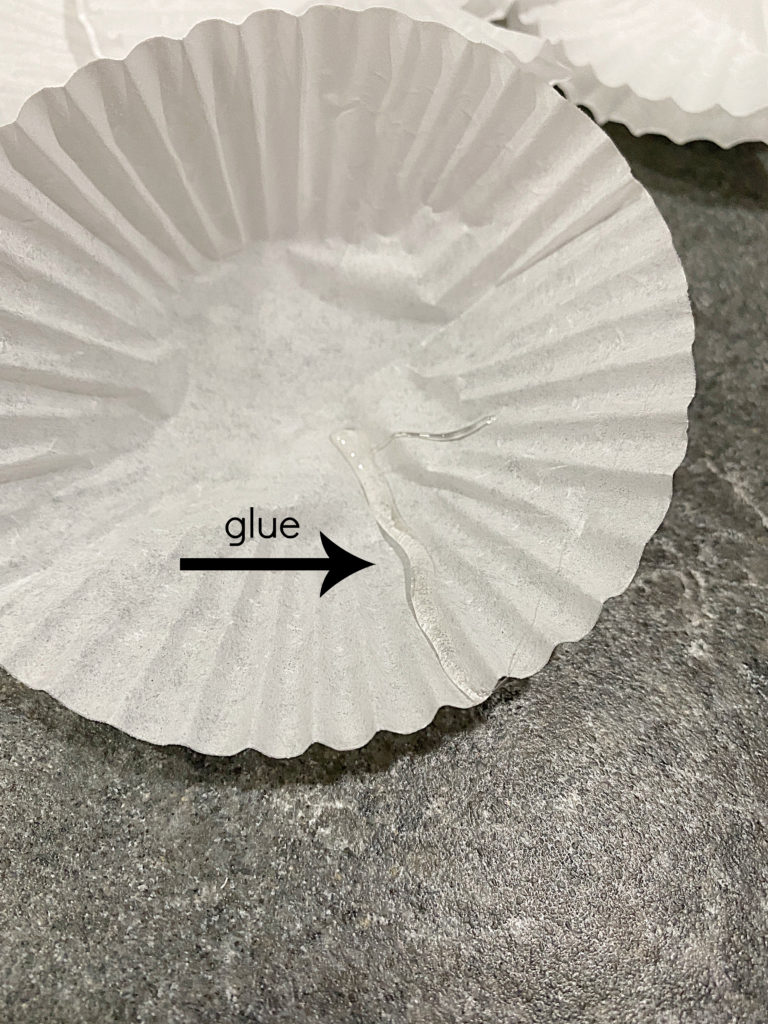
- ADD A BEAD OF GLUE DOWN THE CENTER OF THE BOTTOM SIDE OF THE LINER
- PRESS THE TOP HALF ON TOP OF THE BOTTOM HALF WITH THE GLUE. DO THIS FOR ALL TEN LINERS.
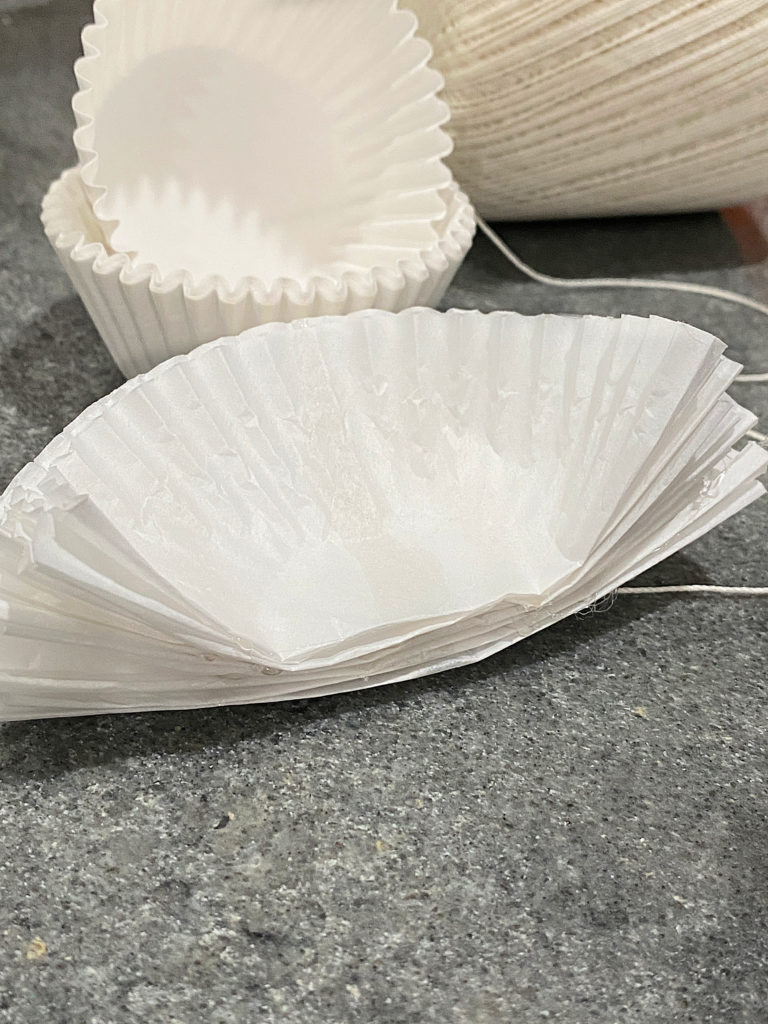
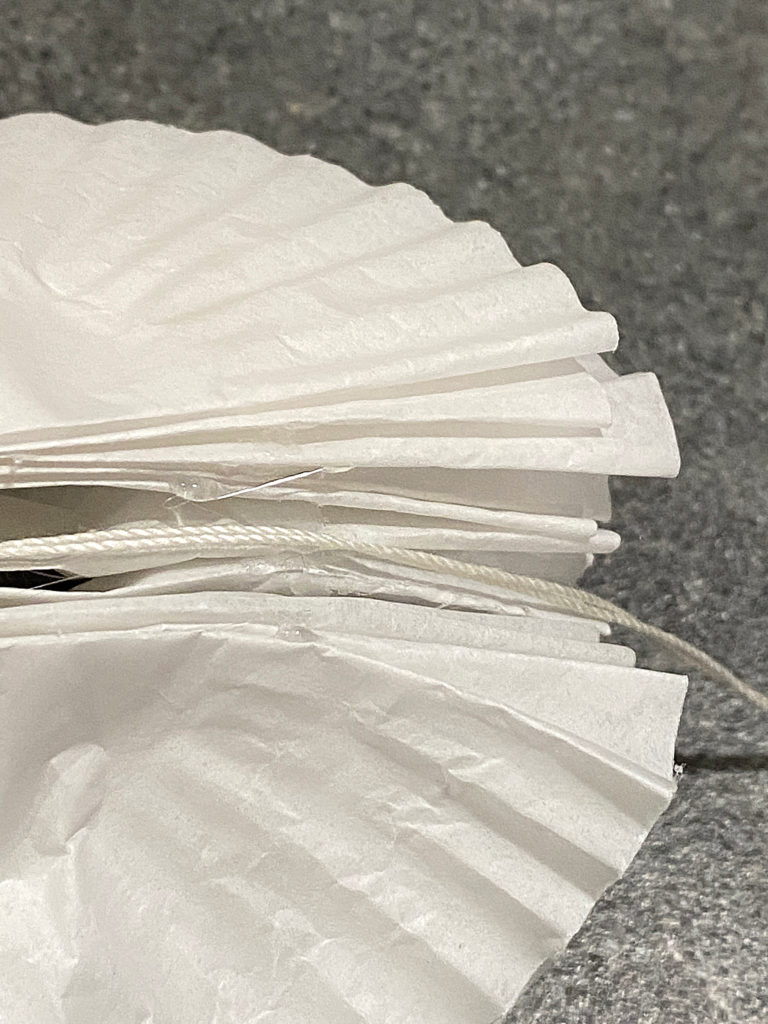
- PUT ANOTHER CUPCAKE LINER ON TOP, PRESS TO ADHERE. CONTINUE THIS STEP UNTIL ALL THE LINERS HAVE BEEN GLUED. YOU WILL END UP WITH A FLAT STACK OF CUPCAKE LINERS.
- CUT A PIECE OF STRING AND LAY IT ON THE FOLDED PART OF THE CUPCAKE LINERS.
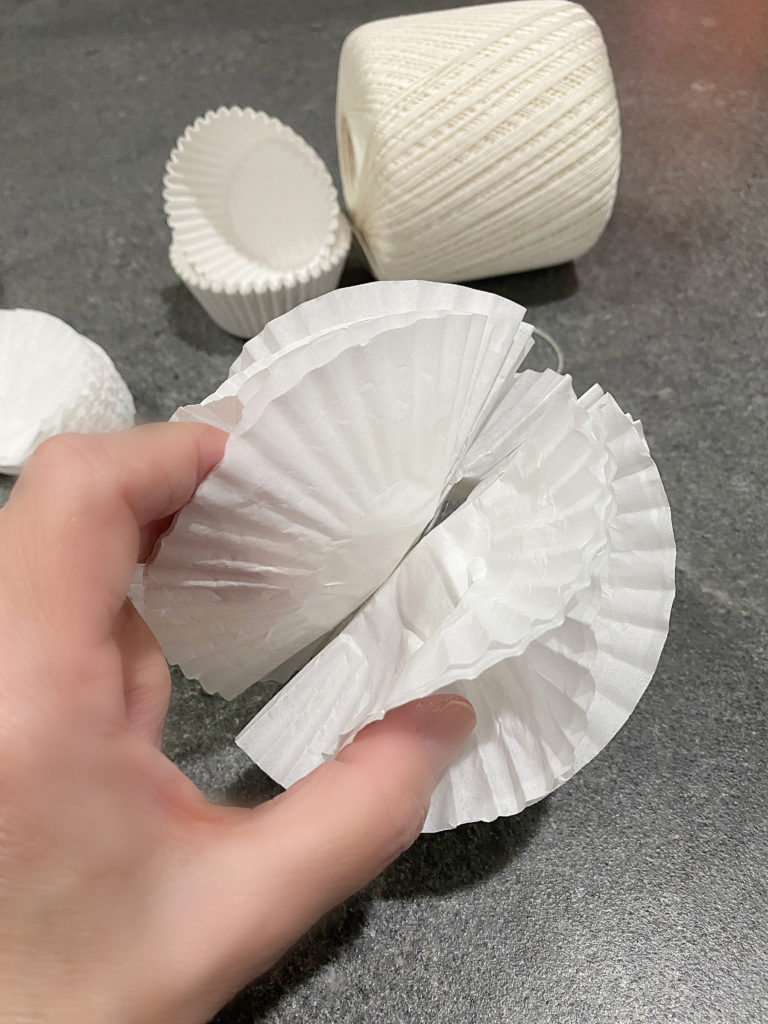
- BRING SIDES TOGETHER.
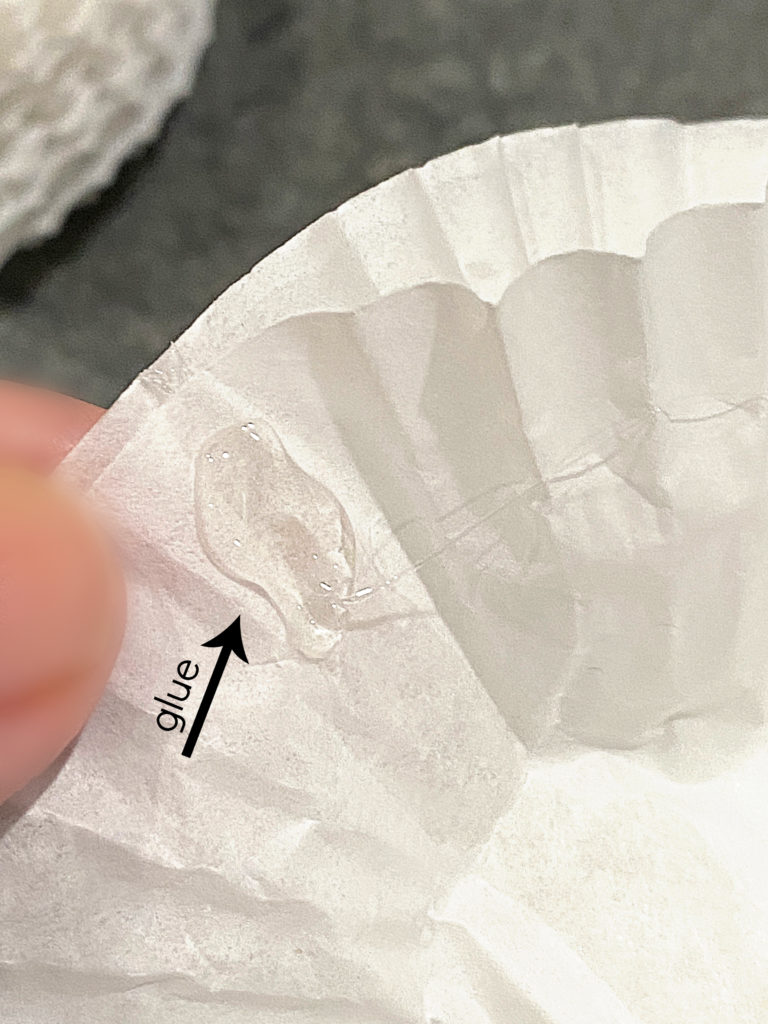
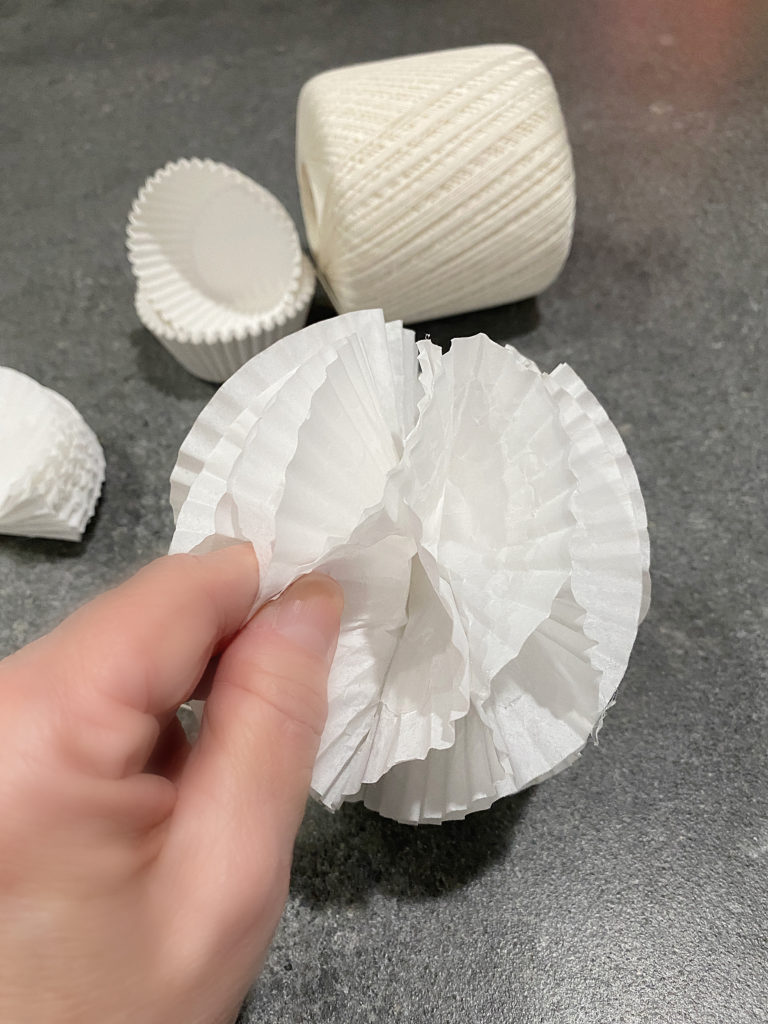
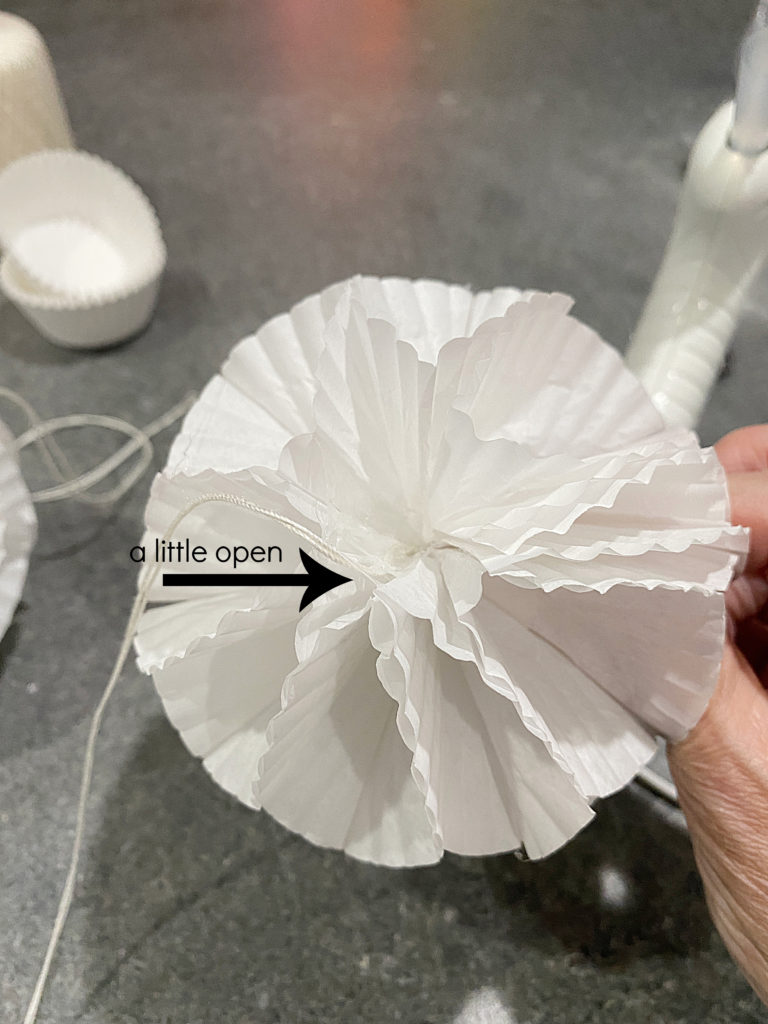
- ADD GLUE
- PINCH TOGETHER
- IF THE ENDS ARE SEPARATED, ADD A BEAD OF GLUE
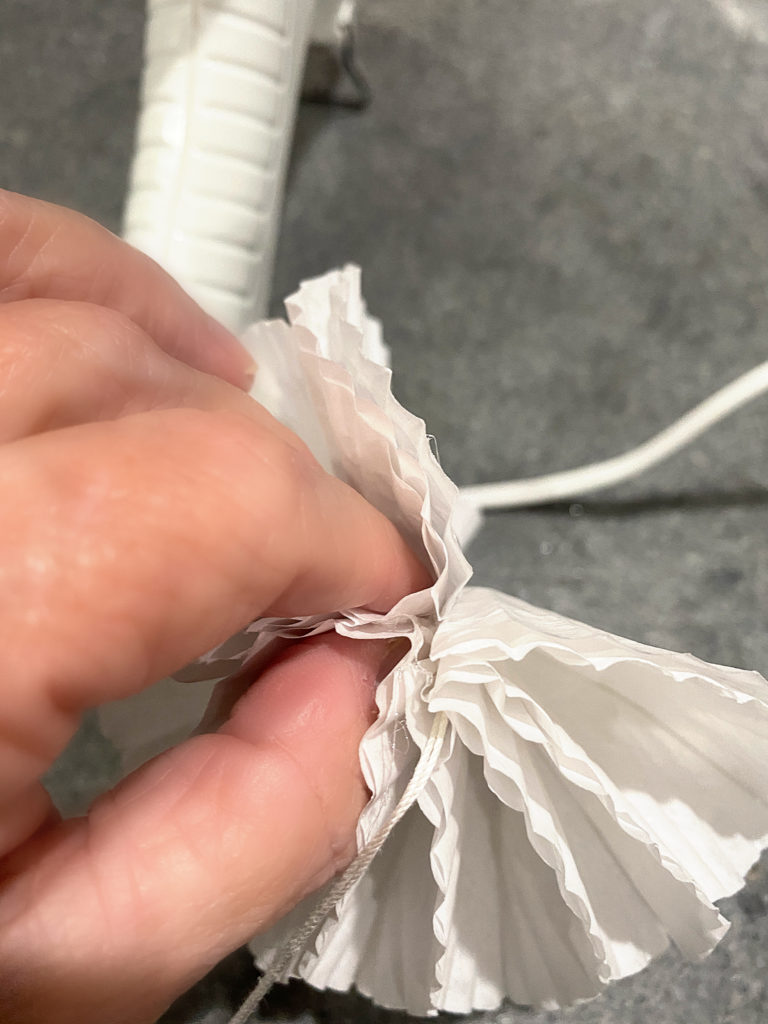
- HOLD
- HANG!
Why the Honeycomb Design Works So Well
Have you ever wondered why honeycomb decorations instantly catch your eye? It’s all about dimension.
Flat decorations blend into the background, but honeycomb shapes create shadows and texture that naturally draw attention. Even though these decorations are made from simple paper cupcake liners, the folded layers reflect light differently from every angle, giving them a surprisingly elegant appearance.
That’s why decorators often use honeycomb decorations to soften a room. They’re round instead of square, lightweight instead of bulky, and add visual interest without making a space feel crowded. Think of them as the finishing touch that pulls everything together.
Where These Decorations Really Shine
One of the biggest surprises about this project is just how versatile it is. Although I originally made mine for Christmas, I’ve since realized they work beautifully for almost every celebration. Changing nothing more than the color of the cupcake liners completely transforms the look.
| Occasion | Cupcake Liner Colors | Decorating Ideas |
|---|---|---|
| Christmas | White, silver, gold, red, green | Hang with paper snowflakes, ornaments, or evergreen garland. |
| Baby Shower | Soft pink, blue, sage, cream | Float above the dessert table or gift area. |
| Wedding | White, ivory, metallic gold | Suspend over the cake table or dance floor. |
| Birthday Party | Bright rainbow colors | Hang in clusters behind the birthday cake. |
| Valentine’s Day | Pink, red, white | Add to a romantic mantel or party backdrop. |
| Halloween | Orange, black, purple | Mix with paper bats or ghosts. |
| Fourth of July | Red, white, and blue | Decorate patios, picnic tables, or porches. |
| Graduation | School colors | Celebrate your graduate with a personalized display. |
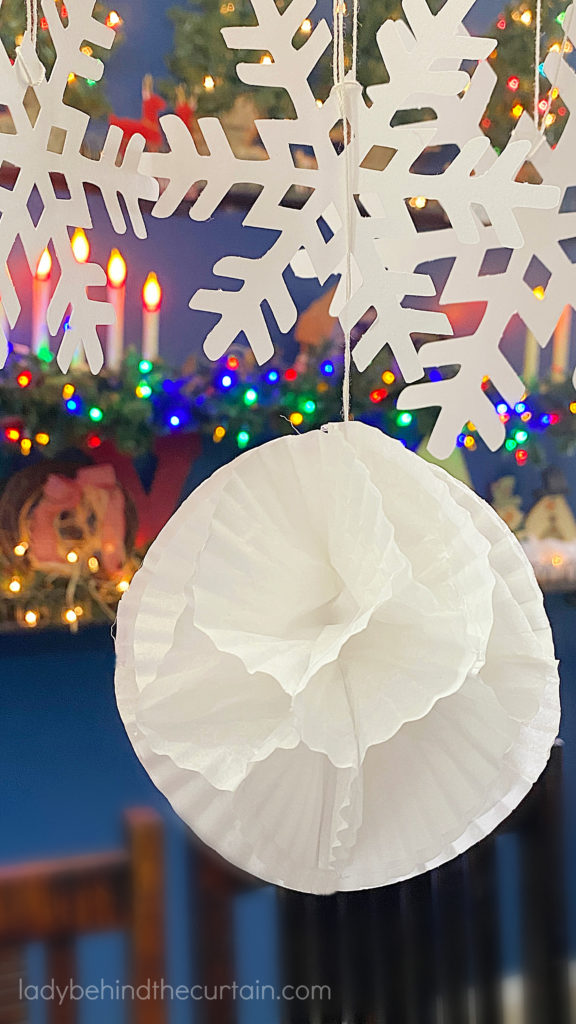
Decorating with Confidence
One question I hear often is, “How many decorations should I make?” The answer depends less on the size of the room and more on how you display them. Instead of scattering a dozen decorations evenly throughout a space, try grouping them together. Designers call this creating a visual focal point. Your eyes naturally move toward collections rather than individual items. Here’s a simple guide.
| Decorating Space | Suggested Number of Honeycomb Balls |
|---|---|
| Christmas Tree | 6–12 mixed throughout the branches |
| Dessert Table | 3–5 grouped at varying heights |
| Party Backdrop | 8–15 depending on the size of the backdrop |
| Mantel | 3–7 mixed with garland or candles |
| Chandelier | 5–9 suspended at different lengths |
| Window Display | 3–5 hanging at staggered heights |
Notice a pattern? Most displays use odd-numbered groupings. That’s because odd numbers naturally create a more balanced, relaxed look than perfectly even arrangements. It’s one of those simple decorating tricks that makes a surprisingly big difference.
MORE DIY DECORATIONS
EASY HOMEMADE JAPANESE GLASS FLOATS 2. MINI PINATA PARTY FAVORS 3. DIY RIBBON GARLAND 4. AND MORE→DIY DECORATION AND PROJECT IDEAS
Beautiful Ways to Display Your Honeycomb Ball Decorations
One of the reasons I continue to make these honeycomb balls year after year is because they’re so adaptable. The same decoration can look whimsical, elegant, rustic, or modern depending on how you display it. Instead of thinking of them as ornaments, think of them as decorating accents. They’re the little finishing touch that helps pull an entire room together.
- LET THEM FLOAT ABOVE A DESSERT TABLE: Dessert tables naturally draw everyone’s attention, so don’t stop decorating at table level. Hanging honeycomb balls above the display creates height and gives the entire table a more polished look. Try hanging them at different lengths, so they appear to float. This simple trick adds movement without blocking the view of your desserts.
- FILL EMPTY SPACES ON A CHRISTMAS TREE: Most of us hang ornaments on the tips of the branches, but professional decorators know that’s only part of the story. Place a few honeycomb balls farther inside the tree. This fills visual gaps and creates depth, making the entire tree look fuller. If you’re using white cupcake liners, tuck them among white lights and snowflakes for a soft winter look that’s elegant without feeling overdone.
- CREATE A FLOATING WINDOW DISPLAY: Windows often become forgotten decorating spaces. Suspend several honeycomb balls at different heights using clear fishing line or thread. During the day, they’ll catch the natural light, and at night, they’ll create beautiful silhouettes against your indoor lighting.
- DRESS UP A CHANDELIER: If you’re hosting a bridal shower, baby shower, birthday party, or holiday dinner, try hanging several honeycomb balls from your dining room chandelier. It’s a quick way to make the room feel festive without adding anything to the table itself. Because they’re lightweight, they won’t weigh down the fixture, and guests can still easily see one another across the table.
- ADD TEXTURE TO A MANTEL: Garland is beautiful on its own, but adding paper decorations introduces another layer of texture. Mix honeycomb balls with greenery, candles, ornaments, ribbon, or seasonal florals for a display that feels collected rather than crowded.
Behind the Curtain Tip: Whenever I decorate above a dessert table, I stand back every few minutes and look at the display from across the room. It’s amazing how quickly you notice if one decoration needs to move just a few inches. Decorating isn’t about perfection; it’s about creating balance.
Choosing Colors That Tell a Story
Color is one of the easiest ways to change the personality of these decorations. Instead of simply choosing your favorite color, think about the feeling you want to create. When decorating, don’t feel limited to one color. Mixing two or three coordinating shades often creates a more interesting display than using a single color throughout.
| Color Palette | Feeling It Creates | Perfect For |
|---|---|---|
| White & Ivory | Soft, peaceful, elegant | Christmas, weddings, winter decorating |
| Red & Pink | Cheerful and romantic | Valentine’s Day, anniversaries |
| Bright Rainbow | Fun and playful | Children’s birthdays, summer parties |
| Navy, Red & White | Classic Americana | Memorial Day, Fourth of July |
| Orange, Mustard & Brown | Warm and cozy | Fall decorating, Thanksgiving |
| Black, Gold & White | Sophisticated | New Year’s Eve, milestone birthdays |
| Pastels | Sweet and delicate | Baby showers, spring celebrations |
Behind the Curtain Tip: When I decorate, I like to repeat the same color across different textures instead of introducing lots of new colors. White cupcake liners, white snowflakes, white ribbon, and white lights each reflect light differently, giving the room depth without making it feel busy.
Little Details That Make a Big Difference
Sometimes the smallest changes have the biggest impact. Here are a few decorating tricks I’ve learned over the years.
VARY THE HANGING HEIGHTS: When every decoration hangs at exactly the same level, the display can feel flat. Instead, stagger the heights by just a few inches. This creates movement and encourages your eye to travel around the display naturally.
MIX SIZES: If you’re making several honeycomb balls, consider using both standard and mini cupcake liners. The different sizes create depth and make your decorations look collected rather than copied.
REPEAT THE DESIGN: Professional decorators often repeat an element throughout a room. Instead of placing all of your honeycomb balls in one location, sprinkle them throughout the space in the tree, on the mantel, hanging in a window, or above the dessert table. Repeating the same decoration ties everything together without making the room feel overly themed.
GIVE DECORATIONS ROOM TO SHINE: One common mistake is trying to fill every empty space. Don’t be afraid to leave breathing room between decorations. Empty space allows each honeycomb ball to stand out and keeps the overall display from feeling cluttered.
Avoid These Common Mistakes
Even simple crafts can have a few learning curves. Fortunately, they’re easy to avoid once you know what to watch for.
| Mistake | Why It Happens | Easy Solution |
|---|---|---|
| Decorations look flat | The folds weren’t fully opened | Gently fluff each section before hanging. |
| They don’t look round | The liners weren’t lined up evenly | Take your time aligning each layer before gluing. |
| Display feels crowded | Too many decorations in one area | Spread them throughout the room. |
| Decorations disappear | Hung against a similar background | Add contrast with greenery, ribbon, or lights. |
| Everything feels too symmetrical | Decorations are evenly spaced | Vary the height and placement for a more natural look. |
Behind the Curtain: I’ve learned that decorating doesn’t happen in one pass. I’ll hang everything, leave the room, make a Diet Coke, and come back with fresh eyes. Almost every time I’ll move one or two decorations, and those tiny adjustments make all the difference.
Making Your Decorations Last for Years
One of the nicest surprises about these honeycomb balls is that they’re not just a one-season craft. With a little care, they can become part of your holiday decorating year after year.
- Store them in a sturdy box where they won’t be crushed under heavier decorations. If you make several colors for different seasons, consider placing each color in its own labeled container so decorating next year is quick and easy.
- If any edges begin to separate after several seasons, a tiny touch of hot glue is usually all it takes to make them look like new again. Remember, handmade decorations often become favorites because of the memories attached to them. A small repair is simply part of their story.
Behind the Curtain Tip: I always store delicate paper decorations near the top of my Christmas storage shelves rather than under heavier bins. It only takes a few extra seconds when packing everything away, but it saves me from remaking decorations the following year.
More Creative Ways to Use Cupcake Liners
Once you’ve finished your first honeycomb ball, you may find yourself looking at every package of cupcake liners with fresh eyes. They’re one of my favorite craft supplies because they’re inexpensive, easy to find, and available in so many colors and patterns. Sometimes the simplest supplies become the most versatile.
Here are a few more ideas to inspire your next project:
| Create | Perfect For |
|---|---|
| Cupcake liner flowers | Wreaths, gift toppers, spring décor |
| Layered paper ornaments | Christmas trees and garlands |
| Party cupcake toppers | Birthdays and showers |
| Paper gift embellishments | Handmade gifts |
| Seasonal wreath accents | Holidays throughout the year |
| Table centerpieces | Weddings and celebrations |
Behind the Curtain: I’ve never been able to resist pretty cupcake liners. Even when I’m not baking, I’ll pick up a package if I love the color or pattern because I know I’ll eventually find a craft or decorating project that puts them to good use.
Continue Your Creative Journey
If you enjoyed making these honeycomb ball decorations, here are a few more ideas to inspire your next project:
- BUILD A SNOWMAN KIT
- SEA SHORE CHRISTMAS ORNAMENTS
- CLOTHESPIN ORNAMENTS
- SECRET SANTA GIFT IN A CAN
- HOLIDAY CITRUS VOTIVE HOLDERS
- FESTIVE COOKIE CUTTER ORNAMENTS
Whether you’re decorating for Christmas or planning your next celebration, there’s always another creative project waiting just behind the curtain.
Helpful Resources
To make this project even easier, don’t forget to print the DIY instruction card. It includes the complete materials list, tools, and step-by-step directions in a convenient format you can print and keep with your craft supplies.
It’s the perfect companion to this article, allowing you to return to the instructions anytime while keeping this guide handy for decorating inspiration, color ideas, and creative ways to display your finished honeycomb balls.
A Little Note from My Craft Room
One of the things I love most about decorating is that it doesn’t have to be expensive to be beautiful.
Some of my favorite holiday memories aren’t tied to decorations I bought in a store they’re connected to the ones I made myself. There’s something special about sitting down with a simple stack of supplies, turning on your favorite Christmas music, and creating something with your own hands.
These honeycomb balls are one of those projects for me.
Every time I hang them on my Christmas tree, over the dinning room table, or mix them with paper snowflakes around the house, I’m reminded that decorating isn’t about filling every corner with expensive things. It’s about creating a home that feels warm, welcoming, and filled with little details that make people smile.
I hope these decorations inspire you to look at everyday supplies a little differently. You never know what beautiful idea is waiting inside something as simple as a cupcake liner.
Thank you for spending a little time with me today. I truly hope this project brings as much joy to your home as it has to mine.
Happy decorating,
Sheryl
How to Make Honeycomb Ball Decorations with Cupcake Liners
Create your own party decorations for pennies!
Materials
- 10 cupcake liners
- string ( I used thin crochet thread)
Tools
- hot glue gun ( I used a low temp)
- glue sticks
- scissors
Instructions
- Fold 10 cupcake liners in half.
- Add a bead of hot glue down the center of the bottom side of the liner.
- Press the top half onto the bottom half with the glue.
- Do this step for all 10 liners.
- Place two beads of glue about an inch in from each side.
- Put another cupcake liner on top, and press to adhere.
- Continue this step until all the liners have been glued.
- You will end up with a flat stack of cupcake liners.
- Cut a piece of string and lay it on the folded part of the cupcake liners.
- Place a bead of hot glue over the string.
- Grab the top cupcake liner on each side and bring them together.
- Glue together.
- If the ends are separated, add a bead of glue and hold.
Bringing It All Together
Beautiful decorating doesn’t have to begin with expensive supplies or complicated techniques. Sometimes it starts with something as ordinary as a cupcake liner and a little imagination.
Whether you’re creating a winter wonderland filled with snowy white decorations, decorating for a birthday party bursting with color, or adding a handmade touch to a bridal shower, these honeycomb ball decorations prove that the simplest projects often have the biggest impact.
So gather your favorite cupcake liners, download the printable tutorial, and enjoy creating decorations that will become part of your celebrations for years to come.
And remember…Sometimes the most memorable decorations aren’t the ones you buy.
They’re the ones you make with love.

Frequently Asked Questions About Cupcake Liner Honeycomb Ball Decorations
Whenever I share one of my favorite DIY projects, I know the directions are only part of the story. Over the years, I’ve learned that the little questions are often the ones that make the biggest difference. Here are some of the most common questions readers ask about these honeycomb ball decorations.
- Can I use mini cupcake liners? Yes! Mini cupcake liners create adorable miniature honeycomb balls that are perfect for decorating small Christmas trees, wreaths, gift packages, or party favors. Mixing mini and standard sizes also creates a more interesting display.
- Can I use jumbo cupcake liners? Absolutely. Jumbo liners make larger statement decorations that work beautifully over dessert tables, entryways, or party backdrops.
- Do patterned cupcake liners work? They certainly do. Polka dots, florals, stripes, holiday prints, and metallic liners all create unique looks. Just remember that busy patterns tend to stand out more, while solid colors create a softer, more elegant appearance.
- What’s the best string for hanging them? I used white crochet thread because it almost disappears against my white Christmas decorations. Fishing line creates the illusion that they’re floating, while ribbon or baker’s twine can become part of the design itself.
- Can I hang them outdoors? These decorations are best enjoyed indoors. Paper cupcake liners aren’t designed to withstand rain, wind, or excessive humidity.
- How many should I make? It depends on your decorating style. Three to five create a beautiful accent, while a dozen or more can transform an entire room. I like making extras because I always find another place to use them!
- Are these suitable for children’s parties? Yes! They’re lightweight, colorful, and make wonderful party decorations. If children are helping make them, an adult should handle the hot glue.
- Can I make these ahead of time? Definitely. In fact, they’re a wonderful craft to make well in advance of a holiday or special event. Store them carefully, and they’ll be ready whenever you’re decorating.
- Will they lose their shape over time? If they’re stored properly, they’ll hold their shape for years. Keeping them in a sturdy box where they won’t be crushed is the key.
- Can I mix different colors together? Absolutely! Combining coordinating colors often creates a richer, more custom look than using just one color.
- Are they only for holidays? Not at all. These decorations are perfect for birthdays, weddings, showers, graduations, classroom parties, nursery décor, and even everyday home decorating.
- Where can I find the complete instructions? I’ve created a printable DIY tutorial card with the complete supply list and step-by-step directions. It’s perfect for printing and keeping with your craft supplies, so you can make these decorations whenever inspiration strikes.
Comments
How to Make Honeycomb Ball Decorations with Cupcake Liners — No Comments
HTML tags allowed in your comment: <a href="" title=""> <abbr title=""> <acronym title=""> <b> <blockquote cite=""> <cite> <code> <del datetime=""> <em> <i> <q cite=""> <s> <strike> <strong>