




Halloween Witches’ Wart Juice Punch
A DELIGHTFULLY DISGUSTING DRINK THAT WILL CAST A SPELL ON YOUR HALLOWEEN PARTY: Every Halloween party has that one recipe guests can’t stop talking about. Sometimes it’s the over-the-top dessert. Sometimes it’s an eerie centerpiece. And sometimes it’s something as wonderfully ridiculous as a bowl filled with floating witch’s warts. That’s exactly what makes this Halloween Witches’ Wart Juice Punch so much fun.

With only two simple ingredients, this spooky party drink transforms an ordinary bottle of Mountain Dew into a bubbling green potion worthy of any witch’s kitchen. The secret is a handful of tiny brown tapioca pearls that float throughout the drink, creating the unmistakable look of little warts suspended inside a magical brew. It’s creepy, it’s silly, and it’s guaranteed to make both kids and adults smile before they ever take their first sip.
One of my favorite things about Halloween entertaining is discovering ways to make everyday food feel magical. It doesn’t always require elaborate decorations or complicated recipes. Sometimes all it takes is looking at an ordinary ingredient from a completely different perspective. That’s exactly what happened with this punch. Once the tapioca pearls were tinted brown and dropped into the bright green soda, there was no turning back. They didn’t look like dessert anymore. They looked exactly like something a witch would proudly serve from her bubbling cauldron.
The best part is how incredibly versatile this recipe can be. Fill clear plastic test tubes for individual servings that look like spooky science experiments. Arrange flower vials in wooden crates for an old apothecary display. Serve baby food jars tied with black-and-orange ribbon for a rustic Halloween gathering. Or simply pour everything into a large punch bowl and let guests help themselves to what may be the funniest beverage on the party table.
A bowl of wart juice. I still laugh every time I say it.
Whether you’re planning a classroom party, a neighborhood Halloween gathering, a haunted pumpkin patch celebration, or simply looking for a playful addition to your Halloween dessert table, this recipe proves that sometimes the easiest ideas become the most memorable. After all, every witch deserves a signature drink.
Two Ingredients, Endless Halloween Fun
Some Halloween recipes require a shopping cart full of specialty ingredients, hours of decorating, and plenty of patience. Those recipes certainly have their place, but sometimes it’s refreshing to have one that delivers maximum impact with almost no effort.

That’s exactly why this punch has become such a favorite.
At first glance, it doesn’t seem possible that two simple ingredients could create such a dramatic effect. Mountain Dew provides the perfect eerie green color without requiring extra food coloring, flavored syrups, or complicated mixing. The vibrant shade already looks like something bubbling inside a witch’s cauldron, making it an ideal shortcut for Halloween entertaining.
The second ingredient is where the magic happens.
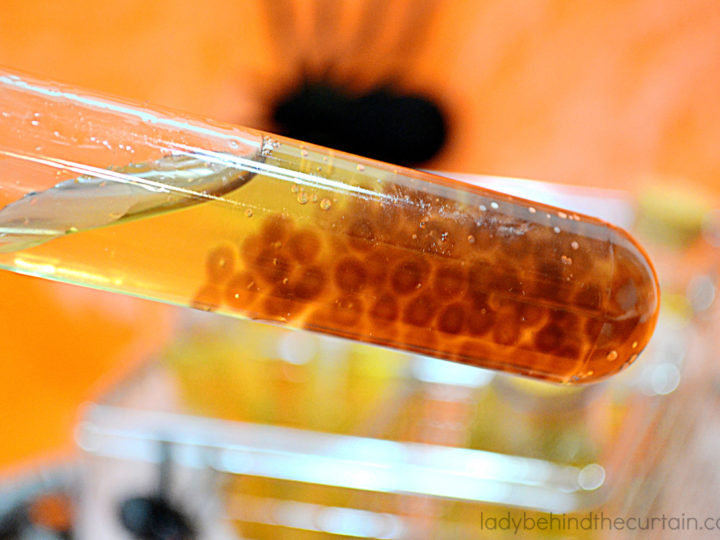
Cooked small pearl tapioca transforms from tiny white pearls into soft, chewy little spheres that eagerly absorb color. Once they’re tinted brown, they become surprisingly realistic “warts” floating throughout the punch. It’s one of those simple visual tricks that instantly captures everyone’s attention.
- Children usually giggle before pointing them out.
- Adults lean in for a closer look.
- Everyone wants to know what they are.
That moment of curiosity is part of what makes this recipe so successful. Halloween food isn’t supposed to be elegant. It’s supposed to surprise people. It should make them laugh, wrinkle their nose, and immediately call someone else over to see what they’ve discovered.
Another reason this recipe works so well is that it adapts to almost any Halloween theme. Hosting a mad scientist party? Serve the punch in laboratory test tubes. Planning a vintage witch’s gathering? Display it inside old-fashioned apothecary bottles and baby food jars. Decorating a haunted pumpkin patch bake sale? Arrange flower vials and jars inside wooden crates alongside pumpkins, moss, and black candles. Even a simple punch bowl becomes something extraordinary once it’s filled with bright green potion and dozens of floating “warts.”
One of the best things about this recipe is that guests remember it long after the party ends. They may forget which cookies were served or what candy filled the treat bowls, but they’ll almost certainly remember the bowl of wart juice. And isn’t that exactly what Halloween should be?
Behind the Curtain Tip: Refrigerate both the Mountain Dew and the cooked tapioca pearls before assembling the punch. Starting with everything cold helps preserve the soda’s fizz while keeping the pearls evenly suspended longer.
Tiny Pearls, Big Halloween Magic


At first glance, small pearl tapioca doesn’t look like much. Straight from the package, the tiny white beads are hard, dry, and almost resemble little seeds. They certainly don’t hint at becoming the star of a Halloween party drink. Once they’re cooked, however, they take on an entirely different personality, transforming into soft, chewy pearls that are perfect for creating a creepy potion worthy of any witch’s recipe book.
Tapioca is made from the starch of the cassava root, a tropical plant that has been cultivated for centuries throughout South America, Africa, and parts of Asia. Cassava is naturally gluten-free and has long been used to make everything from breads and flatbreads to puddings and desserts. When the starch is formed into tiny pearls, it becomes the familiar ingredient many people recognize from old-fashioned tapioca pudding.
Although tapioca pearls have become famous because of bubble tea, those oversized black pearls are very different from the small pearl tapioca used in this recipe. Bubble tea pearls are much larger and often contain added ingredients that make them darker and firmer. Small pearl tapioca is delicate, cooks more quickly, and creates a much more believable “wart” once it’s colored.
Size really matters here.
Large pearls would look more like marbles floating in the punch. Small pearls create dozens of tiny bumps that scatter throughout the drink, making the illusion much more convincing. The result is a punch that makes guests do a double take before they realize they’re looking at harmless tapioca.
One reason tapioca works so well for Halloween recipes is its unique texture. Unlike pasta or rice, tapioca becomes pleasantly chewy while still holding its round shape. That means each little pearl stays intact even after sitting in the punch, creating the same spooky appearance from the first glass to the last.
WOW! I NEVER KNEW THAT: Tapioca pearls have almost no flavor of their own. Instead, they’re prized for their texture. That neutral flavor makes them incredibly versatile because they happily take on the colors and flavors around them without competing with the drink itself. It’s one of the reasons they’re used in everything from puddings and fruit desserts to bubble tea and creative party recipes like this one.
Another benefit is that small pearl tapioca is surprisingly budget-friendly. A single package goes a long way and can be used in several batches of punch, making this one of the least expensive Halloween drinks you’ll ever serve. When you’re planning a party for a crowd, finding recipes that create a big visual impact without stretching the budget is always a win.
Behind the Curtain Tip: After coloring the tapioca pearls, let them rest in the refrigerator for about 30 minutes before assembling the punch. This gives the color time to fully develop while chilling the pearls for serving.
Giving Tapioca Pearls Their Creepy Halloween Makeover

One of the things that makes this punch so much fun is watching ordinary white tapioca pearls transform into creepy little “warts.” The process couldn’t be easier, but a few simple techniques will give you the best color and texture.
Start by bringing 6 cups of water to a rolling boil in a medium saucepan. Once the water is boiling, slowly stir in the small pearl tapioca. Reducing the heat to a gentle simmer keeps the pearls from bouncing around too much and helps them cook evenly.
Allow the tapioca to simmer for 20 to 25 minutes, stirring occasionally to prevent the pearls from sticking together or settling on the bottom of the pan. As they cook, you’ll notice them changing from solid white to soft and translucent. This transformation is exactly what you want before adding the color.
Remove the saucepan from the heat and immediately add the brown food coloring. Stir until every pearl is evenly coated, then leave the saucepan uncovered for 20 minutes. During this resting time, the pearls continue to absorb both the color and the remaining heat, creating a richer, more even shade than if they were rinsed immediately.
Once the resting time is over, the tapioca pearls are ready to use in your Halloween punch.
Behind the Curtain Tip: Start with a few drops of brown food coloring and add more as needed. It’s much easier to darken the pearls than it is to lighten them, and different brands of food coloring can vary in intensity.
Wow! I Never Knew That: Adding the food coloring after the pearls have finished cooking produces a much richer color than coloring the cooking water. As the cooked tapioca rests, the starch on the outside of each pearl readily absorbs the coloring, giving every “wart” a more natural, even appearance.
Brewing the Perfect Potion

Presentation is what transforms this simple two-ingredient punch into one of the most memorable drinks on your Halloween party table. By changing the serving container, you can create everything from a mad scientist’s experiment to a witch’s bubbling cauldron without changing the recipe itself.
Clear containers always create the biggest impact because they show off the floating “warts.” As guests walk by, they’ll immediately notice the bright green potion and the mysterious brown pearls suspended inside. Most people won’t realize they’re looking at tapioca until they take a closer look, making the drink an instant conversation piece.
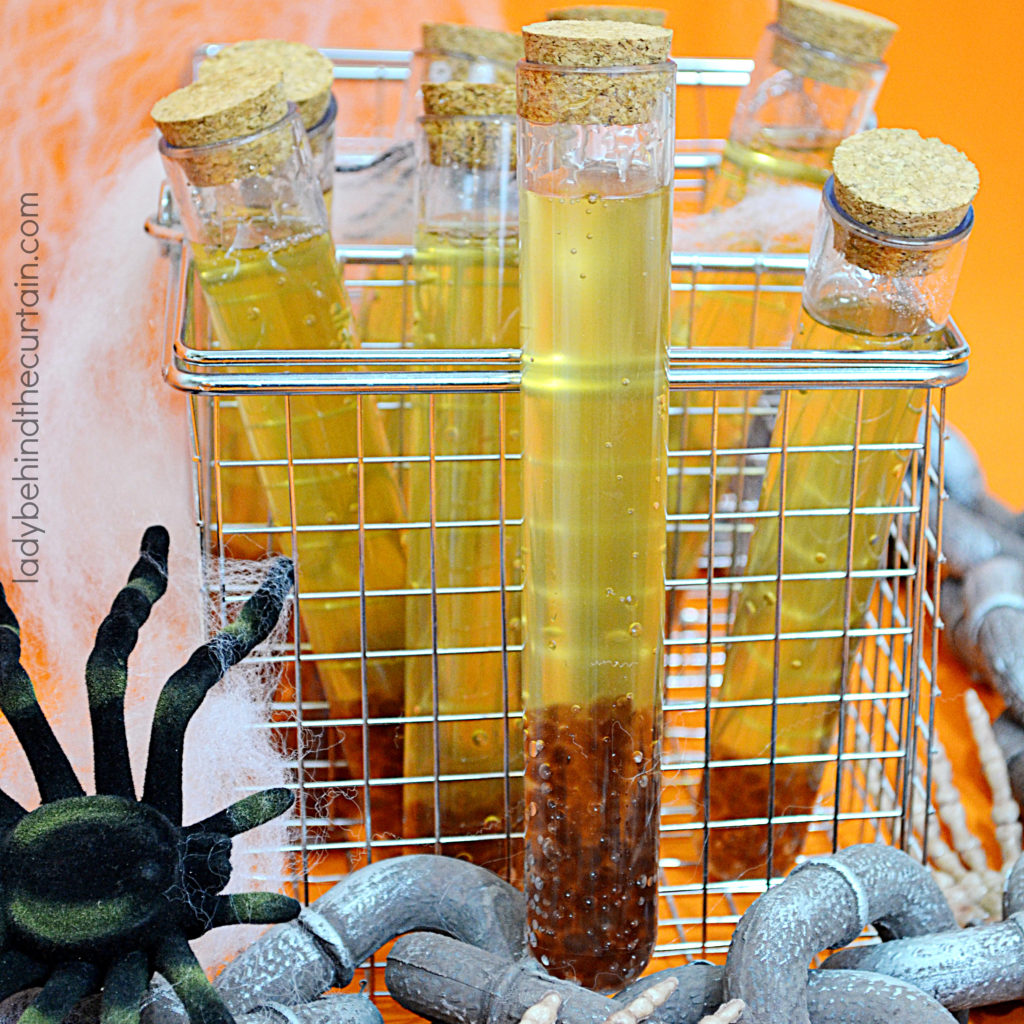
Test tubes are one of my favorite ways to serve this punch. Filled with bubbling green potion and topped with a few floating warts, they look like they came straight from a mad scientist’s laboratory. Arrange them in a laboratory rack or stand them upright in a container filled with black beans, dried lentils, or decorative moss to keep them from tipping over. They’re easy for guests to grab and eliminate the need for cups, making them a wonderful choice for classroom parties or buffet-style gatherings.
Flower vials create a completely different look. Their tall, slender shape gives the illusion of potion bottles collected from a witch’s greenhouse. Display several together in a weathered wooden crate or tuck them into baskets lined with Spanish moss for an old-world apothecary feel. If you’re creating a Haunted Pumpkin Patch Bakery display, these fit beautifully with the rustic theme.
Baby food jars are another inexpensive option that adds plenty of Halloween charm. Their wide opening makes it easy to spoon in the tapioca pearls before pouring in the Mountain Dew. Tie black and orange baker’s twine around the neck of each jar or add printable potion labels to turn them into individual party drinks. They also double as adorable party favors that guests can carry while mingling.
Of course, nothing says Halloween quite like a giant punch bowl filled with bubbling green potion. Watching guests ladle themselves a glass of “Wart Juice” never gets old. Every scoop reveals another collection of floating warts, making the punch bowl a centerpiece all on its own. Place it on a cake stand or wooden crate to add height to your drink station and surround it with black candles, miniature pumpkins, faux spiders, and vintage apothecary bottles for a dramatic display.
If you really want to embrace the theme, make a whimsical sign for your drink station. Labels like Fresh Wart Juice, Witch’s Wart Tonic, Premium Wart Extract, or simply Wart Juice instantly tell guests they’re in for something fun. Handwritten chalkboard signs work especially well, giving the display the look of an old potion shop.
Behind the Curtain Tip: No matter which container you choose, add the brown tapioca pearls first and pour the Mountain Dew over them slowly. This helps distribute the “warts” throughout the drink instead of having them all settle in one spot.
A Potion Bar Straight from the Witch’s Workshop

A dedicated drink station gives guests more than just a place to fill a glass. It becomes part of the Halloween experience. Witches’ Wart Juice Punch already has a playful personality, so surrounding it with themed decorations turns an ordinary beverage table into a display that draws everyone in.
Start by choosing a surface that gives the punch a little height. A wooden crate, cake stand, or overturned black planter works beautifully as a platform for a punch bowl or a collection of individual potion bottles. Adding different levels creates visual interest and makes the display feel thoughtfully arranged rather than everything sitting in a straight line across the table.
Layering decorations around the drinks helps tell the story. Scatter Spanish moss across the table and tuck in miniature pumpkins, black candle holders, faux spiders, and weathered potion bottles. Small glass jars filled with candy eyeballs, gummy worms, or colorful rock candy look like mysterious ingredients gathered for the day’s spell-making. A few branches from the yard, lightly sprayed black, can add height without taking up much space.
If you’re serving individual portions, arrange the containers in groups instead of long rows. Test tubes displayed in laboratory racks create the look of a mad scientist’s experiment, while flower vials gathered inside a vintage wooden box resemble freshly bottled potions waiting to be labeled. Baby food jars lined up on a rustic tray bring a farmhouse touch that pairs beautifully with a haunted pumpkin patch theme.
A handwritten chalkboard sign is the perfect finishing touch. Instead of simply writing the name of the drink, have fun with it. Guests always enjoy reading clever labels before they pour themselves a serving.
Some playful ideas include:
| Potion Name | Description |
|---|---|
| Witches’ Wart Juice | A witch’s favorite party drink |
| Fresh Wart Extract | Harvested under the full moon |
| Premium Wart Tonic | Brewed in small batches |
| Bubbling Bog Brew | A favorite among woodland witches |
| Cauldron Reserve | A special Halloween recipe |
Little details like these encourage guests to slow down and enjoy the display before helping themselves.
Lighting also plays a big role in setting the mood. Battery-operated candles are a safe choice and create a warm glow without the worry of open flames around children or busy party tables. If your punch is served in a clear glass bowl, placing a strand of green battery-operated fairy lights underneath the bowl creates an eerie glow that makes the Mountain Dew appear even more magical.
Remember, a Halloween drink station doesn’t need expensive decorations to make an impression. A handful of dollar store props, a few natural elements from the yard, and a little imagination are often all it takes to create a display that becomes one of the party’s highlights. Guests may arrive for the treats, but don’t be surprised if they leave talking about the bowl of Witches’ Wart Juice waiting for them at the potion bar.
Behind the Curtain Tip: If you’re serving the punch outdoors, keep extra bottles of chilled Mountain Dew in a cooler nearby instead of filling the bowl all at once. Refilling the bowl throughout the party keeps the soda fizzy and the punch looking fresh from beginning to end.
Party Planning Made Easy
Halloween parties are meant to be enjoyed, not spent rushing back and forth to the kitchen. A little planning ahead makes serving Witches’ Wart Juice Punch almost effortless, allowing you to spend more time visiting with guests and less time worrying about refilling drinks.
The biggest advantage of this recipe is that almost everything can be prepared in advance. The tapioca pearls can be cooked, colored, and refrigerated a day or two before the party. Having that step finished ahead of time means assembly takes only a few minutes when it’s time to serve. Simply spoon the chilled pearls into your serving containers and pour the Mountain Dew over the top just before guests arrive.
Waiting until the last minute to add the soda is worth the extra minute or two. Freshly opened bottles provide the brightest bubbles, giving the punch the appearance of a freshly brewed potion. Carbonation naturally fades over time, so assembling the drink just before serving helps maintain that lively, bubbling effect throughout the beginning of your party.
If you’re expecting a large crowd, don’t feel like everything has to be displayed at once. Instead, prepare a second batch of colored tapioca pearls and keep additional bottles of Mountain Dew chilled in the refrigerator or a cooler. As the punch bowl begins to empty, simply refill it with fresh soda and another spoonful of “warts.” Your guests will never know a refill happened.
Individual containers are another great option for busy parties. Filling test tubes, flower vials, or baby food jars before guests arrive creates a grab-and-go drink station that keeps the line moving. It’s especially helpful for children’s parties where little hands are eager to get back to the games.
If your party is outdoors, consider where the drink station will be located. A shaded area helps keep the punch colder longer, especially during warm autumn afternoons. If shade isn’t available, placing the punch bowl inside a larger bowl filled with ice helps maintain the temperature without watering down the drink.
Serving utensils deserve a little thought, too. A clear ladle works beautifully in a punch bowl because guests can see the floating tapioca pearls with every scoop. If you’re serving individual portions, provide a wide straw or a small spoon for anyone who wants to enjoy the chewy tapioca pearls along with the soda.
Creating a memorable Halloween party doesn’t have to mean making every recipe from scratch or spending days decorating. Sometimes the smallest details have the biggest impact. A bowl filled with bubbling green potion, a handful of floating “warts,” and a creative display are all it takes to give guests something they’ll remember long after the last piece of candy has disappeared.
Behind the Curtain Tip: Set a small stack of Halloween-themed napkins beside the drink station. Condensation on cold containers is completely normal, and having napkins within easy reach keeps little hands dry while adding another festive touch to the display.
Spellbinding Ways to Change Up the Brew
The beauty of Witches’ Wart Juice Punch is that the recipe is simple enough to become a blank canvas for your Halloween imagination. While Mountain Dew and brown tapioca pearls create the classic version, a few small additions can give the drink an entirely different personality without making it any more difficult to prepare.
For a witch’s apothecary theme, tuck fresh mint leaves into a few of the serving containers. The bright green leaves resemble herbs gathered from the garden and add another layer of color without changing the flavor of the drink. A cinnamon stick placed inside a baby food jar creates the appearance of a magical stirring stick while adding rustic charm to the display.
Hosting a mad scientist party? Arrange the filled test tubes in racks alongside laboratory beakers filled with gummy worms, candy eyeballs, or brightly colored rock candy. Small chalkboard labels identifying each “experiment” help carry the theme across the entire drink station.
If your celebration has a haunted pumpkin patch feel, surround the punch bowl with miniature pumpkins, pinecones, dried leaves, moss, and weathered lanterns. These natural elements soften the display while giving guests the feeling that the potion was brewed deep in an enchanted forest.
Even the color of the “warts” can be changed. Brown creates the most realistic look, but dark green pearls resemble swamp moss, while black pearls create a mysterious potion that looks as though it came from the darkest corner of a witch’s spell book. If you’re hosting several Halloween gatherings throughout the season, changing the pearl color is an easy way to give the same recipe a completely different appearance.
A festive paper straw, Halloween drink stirrer, or printable potion tag tied around each container adds a finishing touch that makes the presentation feel complete. These little details require very little effort but make the display feel thoughtfully planned.
Halloween is a holiday where imagination is encouraged. The more creative you become with the presentation, the more fun your guests will have discovering all the little details.
MORE BEWITCHING HALLOWEEN PARTY TREATS


LATEST POSTS
INSTANT WITCH HALLOWEEN PARTY FAVOR-FEATURED INGREDIENTS
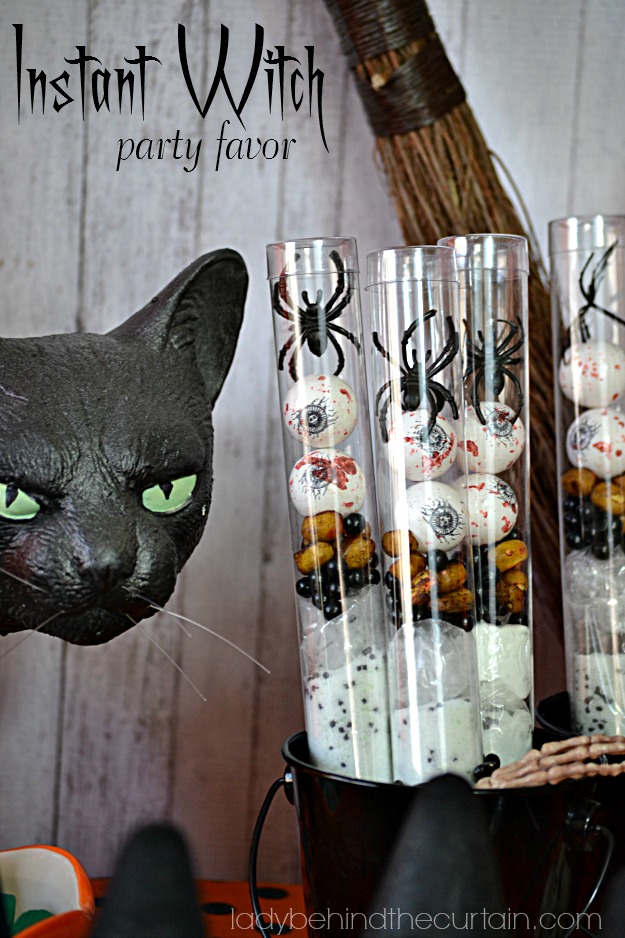
- GREEN WITCHES SKIN- Green apple Kool-Aid
- CHIN HAIR- black jimmies sprinkles
- ROTTEN TEETH- black pearl sprinkles
- EAR WAX- candy corn
- BLOODSHOT EYEBALLS- gum balls
Halloween has always been my favorite season to let my imagination run wild in the kitchen. There’s something so much fun about taking an ordinary ingredient and turning it into something that makes people stop, laugh, and look twice.
That’s exactly what happened with this punch. Who would have guessed that a package of tiny tapioca pearls could become witch’s warts? It’s a simple idea, but sometimes those are the recipes people remember the most.
I hope this playful drink brings plenty of smiles to your Halloween celebration, whether you’re serving it from a bubbling punch bowl or handing out test tubes filled with bright green potion. Don’t be surprised if guests ask how you came up with the idea or if they leave talking about the “wart juice” long after the party is over.
Thank you for spending a little time with me here at Lady Behind the Curtain. I hope your Halloween is filled with delicious treats, creative decorations, and lots of laughter shared with family and friends.
Happy Halloween!
Sheryl
Halloween Witches' Wart Juice Punch
Gross, Creepy and FUN!
Ingredients
- 8 test tubes
- ½ cup small tapioca pearls
- 6 cups water
- food coloring (mix together to make brown)
- Mountain Dew
Instructions
- Bring 6 cups of water to a boil and add the tapioca pearls.
- Reduce the heat and simmer for 20 to 25 minutes stirring occasionally.
- Take off the heat and add the food coloring.
- Stir and let sit uncovered for 20 minutes.
- HINT: The top of the water will become slimy and thick. Drain and rinse the pearls with cold water.
- Drop a teaspoon of pearls into a test tube and fill with soda.
- You can take a skewer or something that will reach to the bottom and swirl
the pearls a little to loosen them. - NOTE: The recipe to make the warts makes a lot of tapioca pearls so if you don’t have test tubes or can’t find them there is plenty for you to use baby food jars in the place of the test tubes.
Frequently Asked Questions-WTICHES’ WART JUICE PUNCH
Even a simple two-ingredient recipe can bring up a few questions, especially if you’ve never cooked with tapioca pearls before. The answers below will help you prepare the punch with confidence and offer a few extra tips for serving it at your Halloween celebration.
- Can I make the tapioca pearls ahead of time? Yes. The pearls can be cooked and colored up to two days before your party. Store them in an airtight container in the refrigerator until you’re ready to assemble the punch. Preparing them ahead of time leaves only one step on party day: adding the Mountain Dew.
- Do I need to rinse the tapioca pearls after cooking? Follow the directions on your package. Some brands recommend rinsing to remove excess starch, while others do not. Using the package instructions will give you the texture the manufacturer intended.
- Will the pearls stay suspended in the punch? Some pearls will float while others slowly settle to the bottom. This actually adds to the spooky appearance, making it look as though the “warts” are drifting throughout the potion. Giving the punch an occasional gentle stir redistributes the pearls.
- Can another soda be used? Absolutely. Any lemon-lime or citrus-flavored soda works well, but Mountain Dew provides the bright green color that gives this punch its signature witchy appearance without adding extra food coloring.
- Can children safely eat the tapioca pearls? The pearls are completely edible and have a soft, chewy texture. Because they’re small and chewy, very young children should always be supervised while eating them.
- How many servings does this recipe make? That depends entirely on how you’re serving it. A punch bowl is ideal for larger gatherings, while test tubes, flower vials, and baby food jars allow you to control individual portions. Since the recipe is inexpensive, making an extra batch is always a good idea when entertaining a crowd.
- What foods pair well with Witches’ Wart Juice Punch? This playful drink fits beautifully alongside Halloween cookies, decorated cupcakes, caramel apples, popcorn mixes, snack boards, candy bark, puppy chow, and spooky desserts. Because the drink is bright and colorful, it balances nicely with treats decorated in black, orange, purple, and green.

For an adult party, can alcohol be used?
Sure Gina!
What a fun idea! My kids are going to LOVE making this!
That is so disgusting!! And something I totally would have enjoyed as a kid. I can’t hardly look at the pictures though, reminds me of fish eggs.
Your Witches Wart Juice is awesome! Thank you so much for sharing with Full Plate Thursday and have a fun weekend!
Miz Helen
EW!! I LOVE it!! I never would have thought to make something like this. I am not sure if I could choke down the tapioca beads in mountain dew but I am willing to try! Pinning 🙂
If you have time, please come link up at The Blog Strut! We would love to have you there.
Have a wonderful day,
Amber
My Personal Accent
My kids would love this! Thanks for sharing, pinning this next. I’d love for you to come link up with me at http://cass-eats.blogspot.com/
Creepy and so fun for Halloween. Pinning!
Hi Beth,
Thanks, It looks disgusting but tastes fine. 🙂
Okay, that is disgusting looking! But hilarious! Would be perfect for bringing into school for Halloween party! Julia
Hi Julia,
I know, it’s gross but kids like gross. HA! 🙂