





Black Cocoa Raspberry Candle Cakes
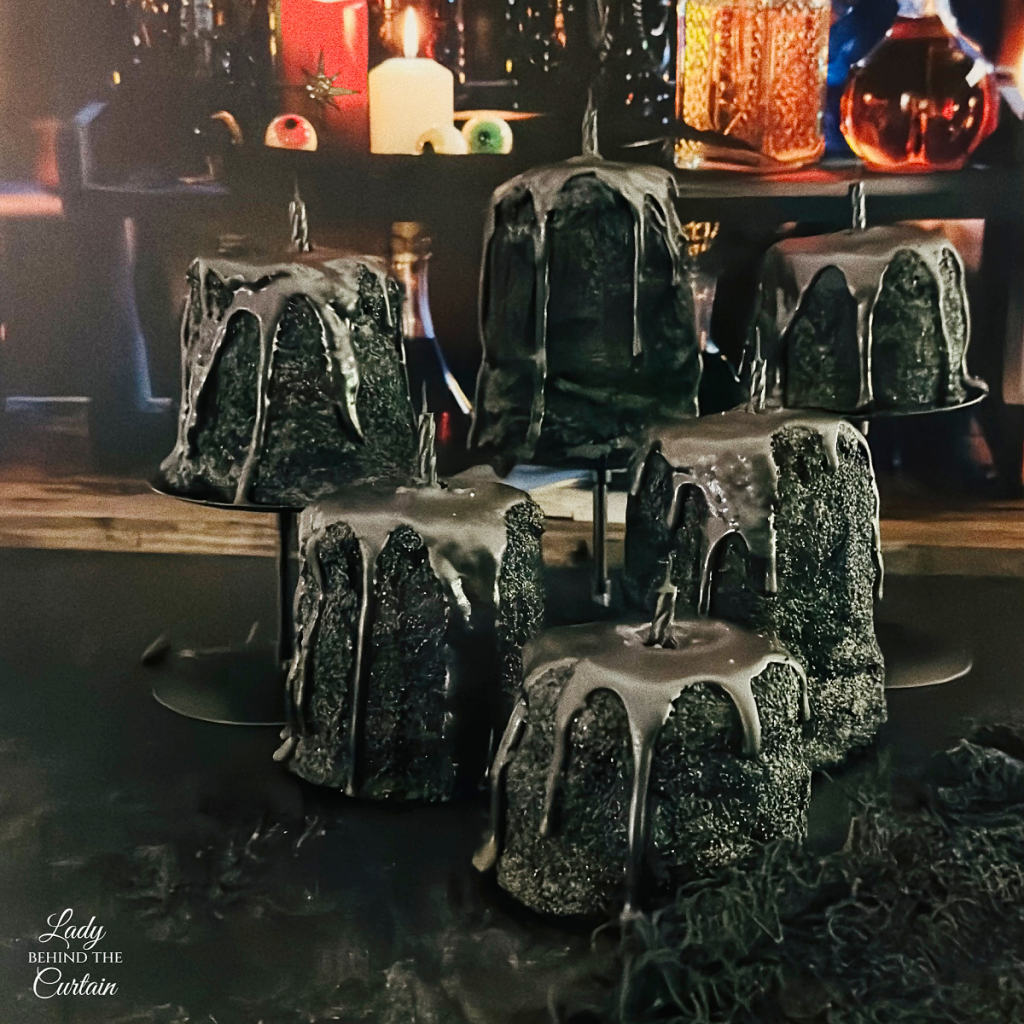
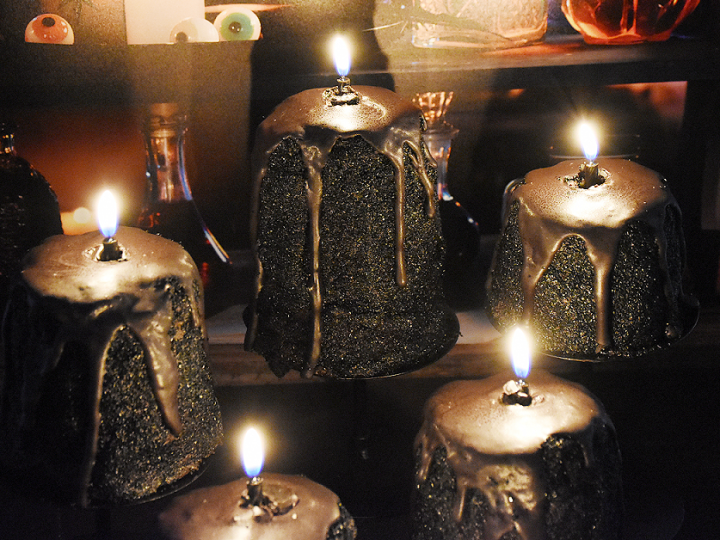
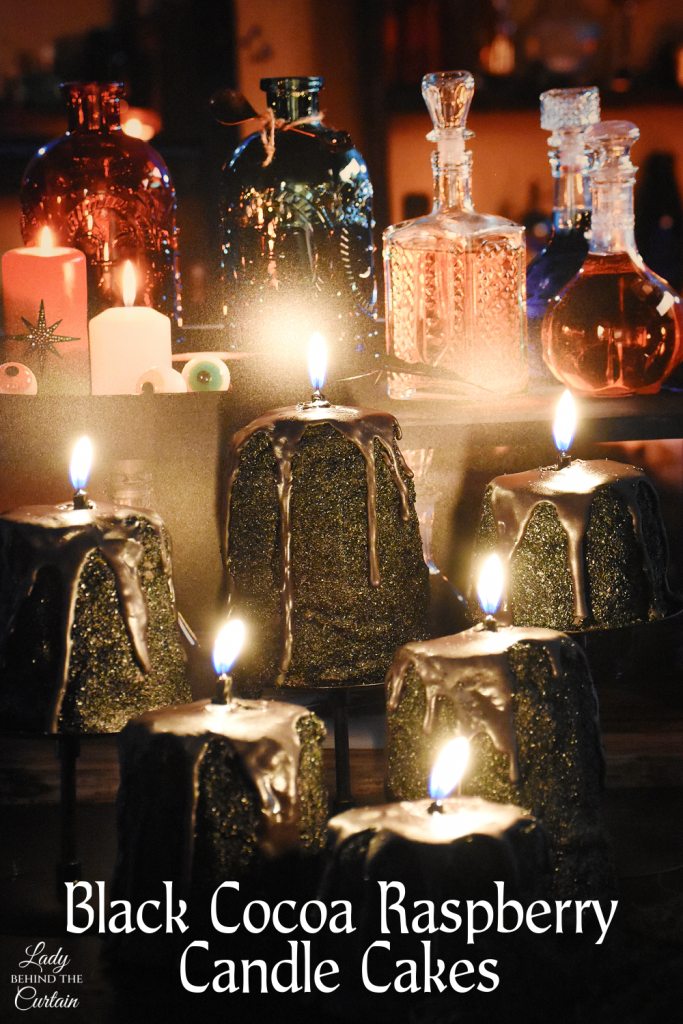
Black Cocoa Raspberry Candle Cakes are dark chocolate mini layer cakes filled with raspberry jam, covered with black cocoa frosting and sparkling black sugar, then finished with dripping black ganache and a tiny black candle. Put them on candlesticks, and they look like old black candles that have been burning long enough for the wax to drip down the sides. Cut into one, and underneath that completely black exterior are layers of chocolate cake with raspberry hiding between them.
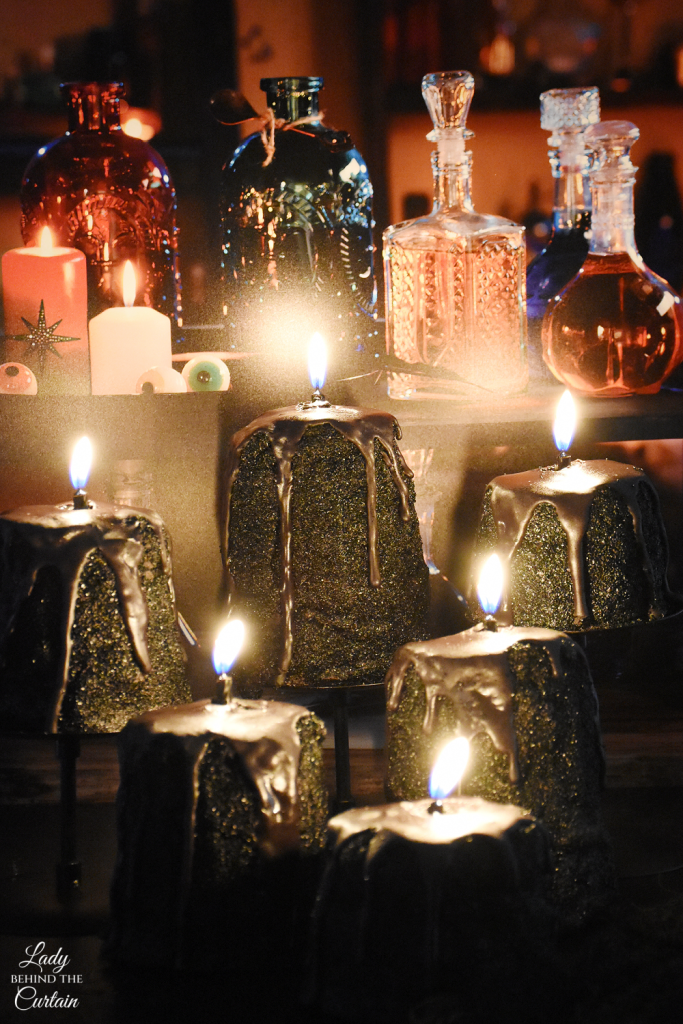
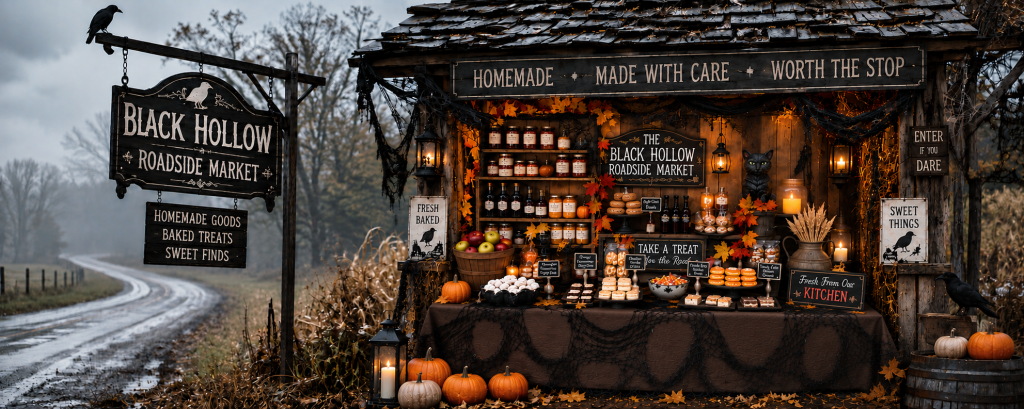
These candle cakes are Recipe #14 from the Black Hollow Roadside Market, and they bring something completely different to the market table. They aren’t simply another dessert to place on a platter. With tall, medium, and short cakes displayed on candlesticks, they add height to the table and become part of the Halloween decorations before anyone realizes they are actually cake.
What I love most about the finished look is that it doesn’t depend on lots of Halloween decorations. No candy pumpkins, plastic spiders, or bright orange frosting are needed for the idea to work. The different candle heights, black-on-black decorating, dripping ganache, and tiny wick on top tell the whole story. BONUS! NO BLACK FOOD COLORING WAS ADDED!
And then there’s the raspberry. With so much black on the outside, seeing that raspberry filling when the cake is cut is one more little surprise.
The Candle Cakes of Black Hollow
The Black Hollow Roadside Market is filled with jars, candies, cakes, and homemade treats, but these candle cakes add height to the shelves. That may not seem important until you start putting together a dessert table. When everything sits at roughly the same level, even a table filled with beautiful desserts can start to look flat. Raising these little cakes on candlesticks immediately changes the display’s shape.
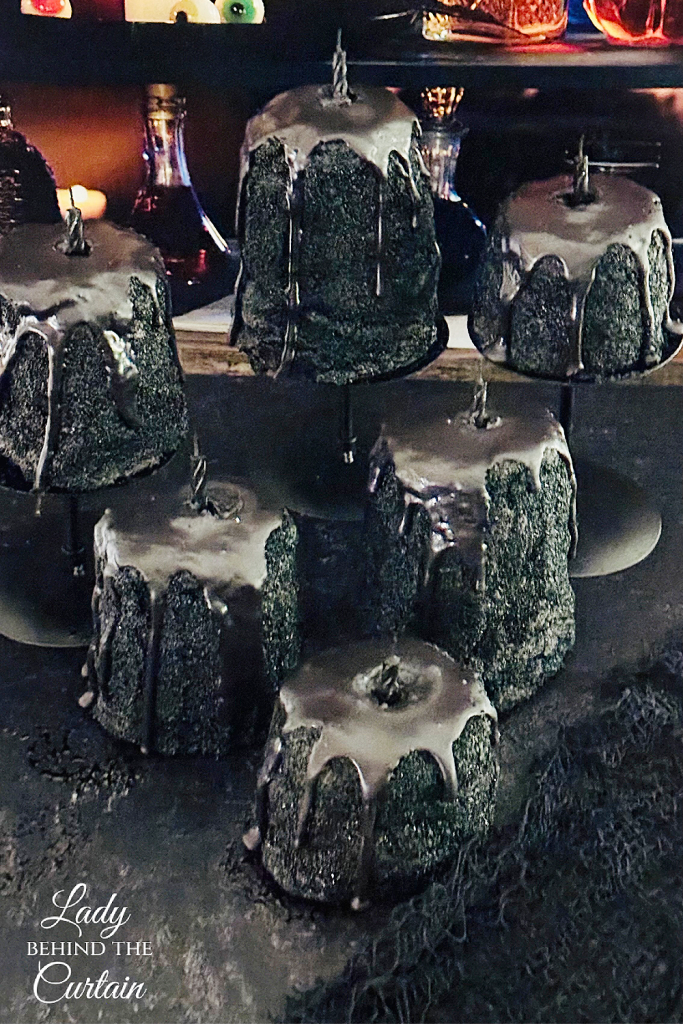
The different cake heights make that effect even better. Instead of creating identical mini cakes, build each cake with two, three, or four layers. Group them together, and they’ll look like candles that have been burning for different amounts of time. Place those cakes on candlesticks of different heights to create even more variation without changing the cakes themselves.
The deep black color fits naturally into the old-fashioned Halloween look of Black Hollow Roadside Market. Surrounded by crates, lanterns, chalkboard signs, crows, and other market details, the candle cakes look like they belong there. They’re desserts, but until someone takes one off its candlestick and cuts into it, they can easily pass for part of the display.
Building an All-Black Cake Without Losing the Details
One challenge of creating a dessert in a single color is keeping the details from disappearing. These cakes solve that problem with texture. Instead of relying on multiple colors for contrast, each black element has a different finish.
| Part of the Candle Cake | Texture and Appearance |
|---|---|
| Black cocoa chocolate cake | Soft, dark interior |
| Black cocoa frosting | Smooth, matte covering |
| Black sugar | Sparkling exterior |
| Black ganache | Smooth, glossy drips |
| Black birthday candle | Finishing wick detail |
Black cocoa is used in both the chocolate cake and the frosting, carrying the dark color throughout the dessert rather than limiting it to the exterior decoration. The black sugar adds sparkle to the frosting, and the ganache creates a smooth, shiny finish that stands out from the sugar beneath it.
The ganache is particularly important to the final appearance because it does more than add another black element. Once it begins to drip over the edge, the mini layer cake starts to look like a candle covered in melted wax. The effect becomes even more convincing when the shortened black birthday candle is added on top.
Wow! I Never Knew That… A dessert doesn’t need several colors to create dimension. Combining matte, sparkling, soft, and glossy finishes in the same color can create contrast through texture instead. It’s a decorating trick that works especially well when you want to stay within a very limited color palette.
Raspberry Hiding Between the Dark Chocolate Layers
From the outside, there’s no hint that raspberry is waiting inside these cakes. The filling is seedless raspberry jam, briefly warmed until soft enough to spoon into the center of the cake layers.
Because the cake rounds are only 2¾ inches across, there isn’t much room for filling. Instead of spreading raspberry over the entire layer, pipe a ring of frosting around the outside, and place the jam in the open center. Place the next cake layer on top, and repeat until the cake reaches its intended height.
Seedless jam is especially nice in these little cakes because it gives the filling a smooth texture between the thin layers. Once the cake is cut, the raspberry also gives you a completely different look from the black exterior. What appears to be an all-black dessert suddenly has raspberry running through the center.
Behind the Curtain Tip: I used a 1M piping tip for the frosting ring and thought it was a little too large for these small cake rounds. I recommend using a smaller piping tip. It gives you more room in the center for the raspberry filling and is better suited to the cake’s size.
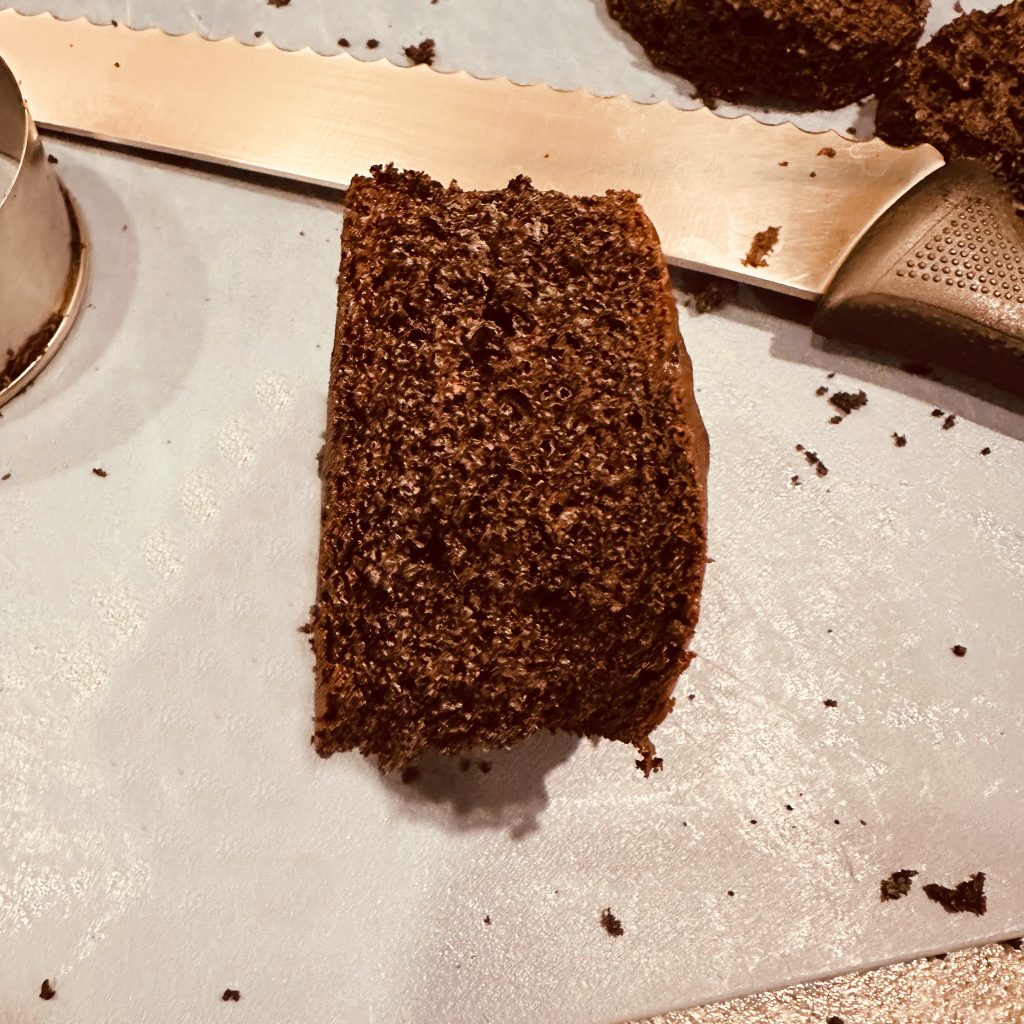
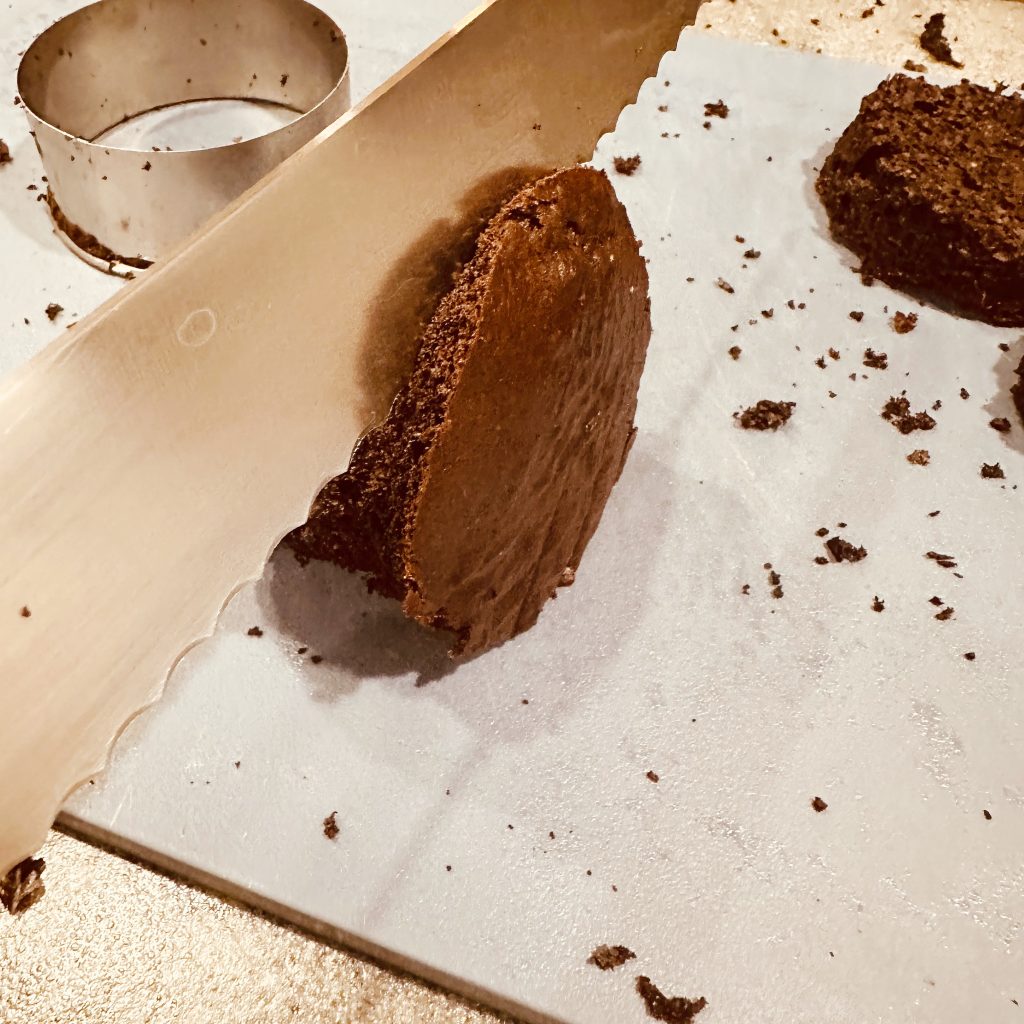
SLICE EACH CAKE ROUND IN HALF.
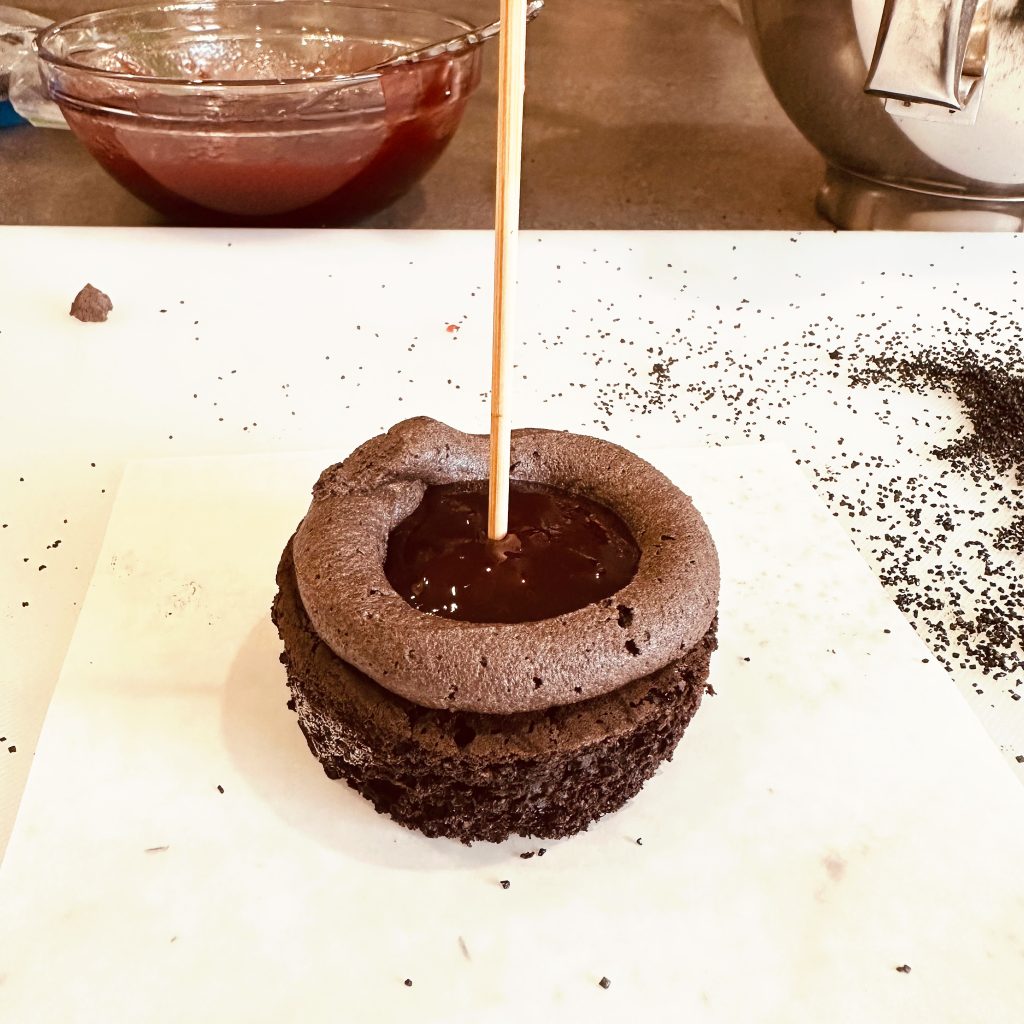
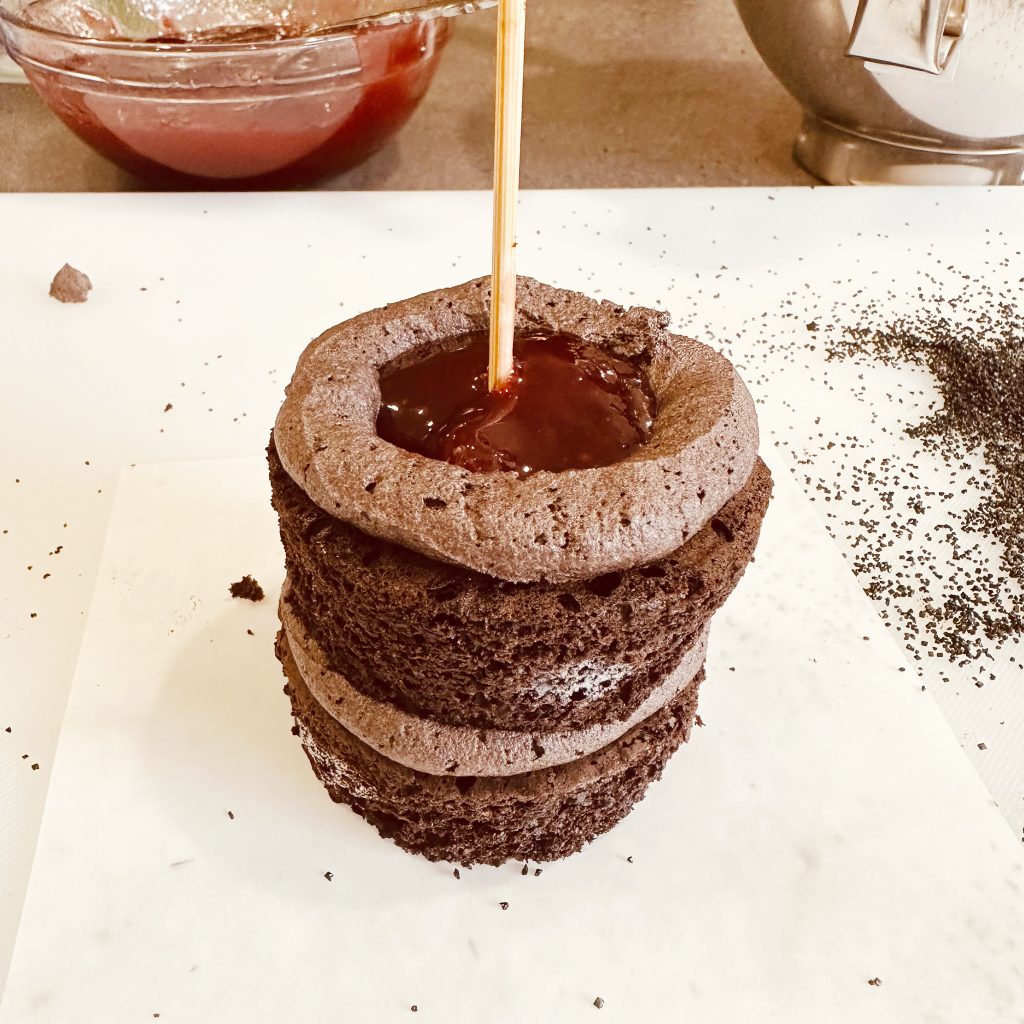
ADD A SKEWER TO THE BOTTOM LAYER, A RING OF FROSTING, AND RASPBERRY JAM IN THE CENTER. SLIDE THE NEXT CAKE LAYER THROUGH THE SKEWER ONTO THE FROSTING OF THE FIRST LAYER, ADD A RING OF FROSTING, AND RASPBERRY JAM. CONTINUE WITH LAYERS FOR THE LARGE SIZE CANDLE.
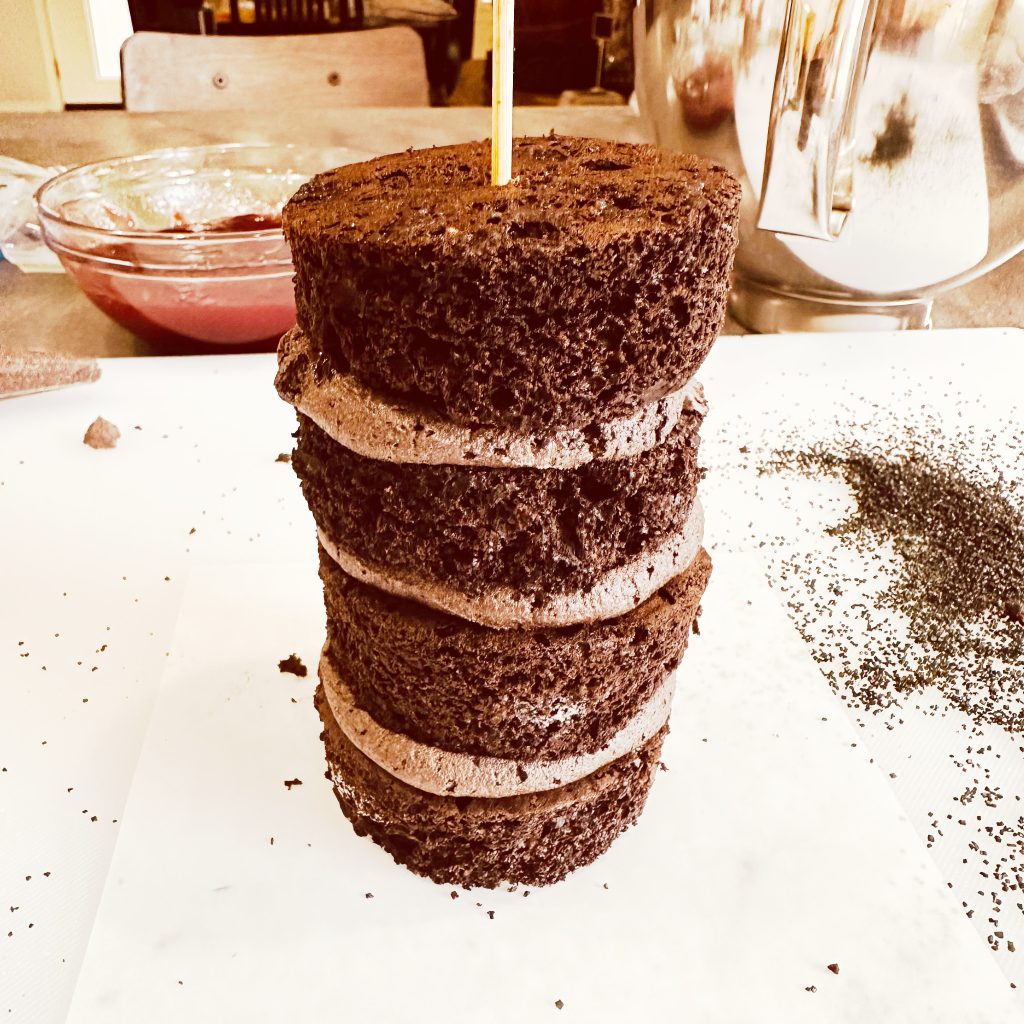
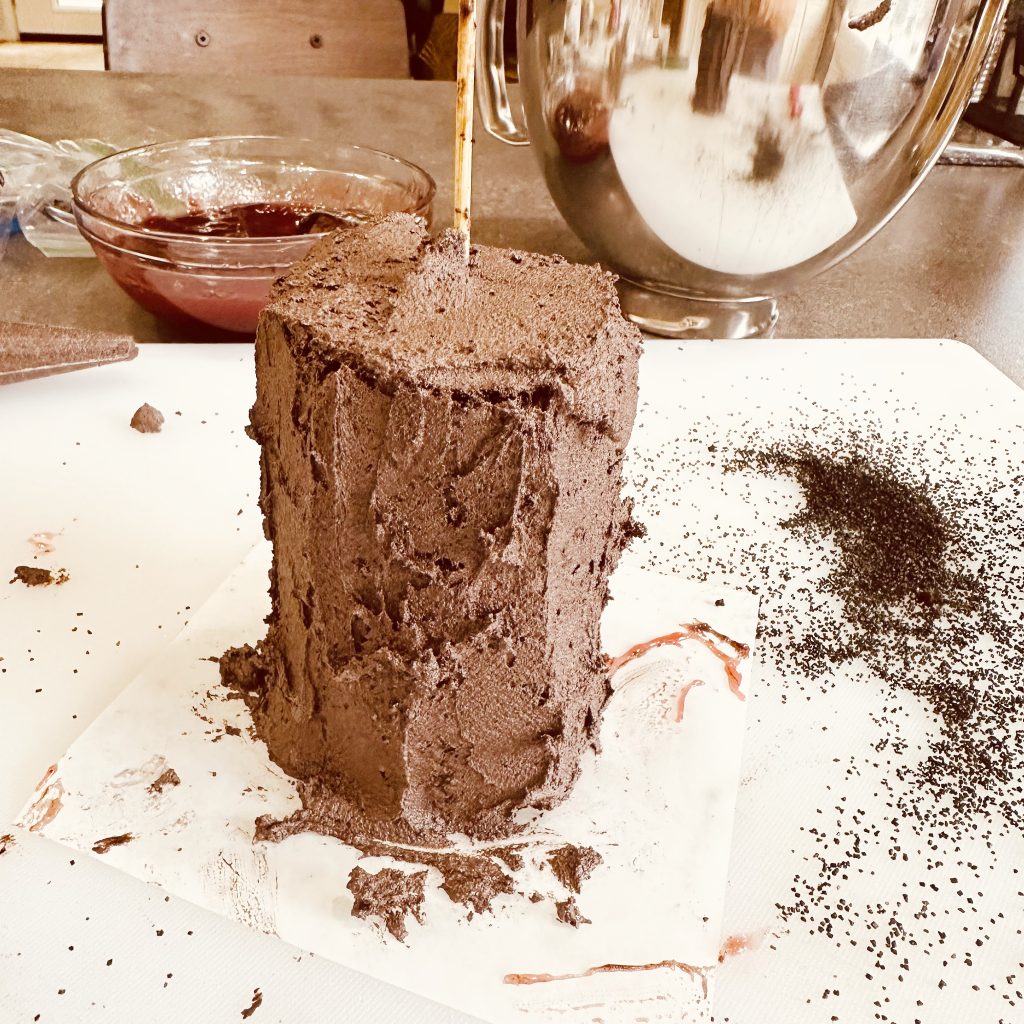
ONCE YOU HAVE THE CORRECT AMOUNT OF LAYERS FOR THE SIZE OF CANDLE YOU’RE MAKING, SLATHER FROSTING ONTO THE CAKE.
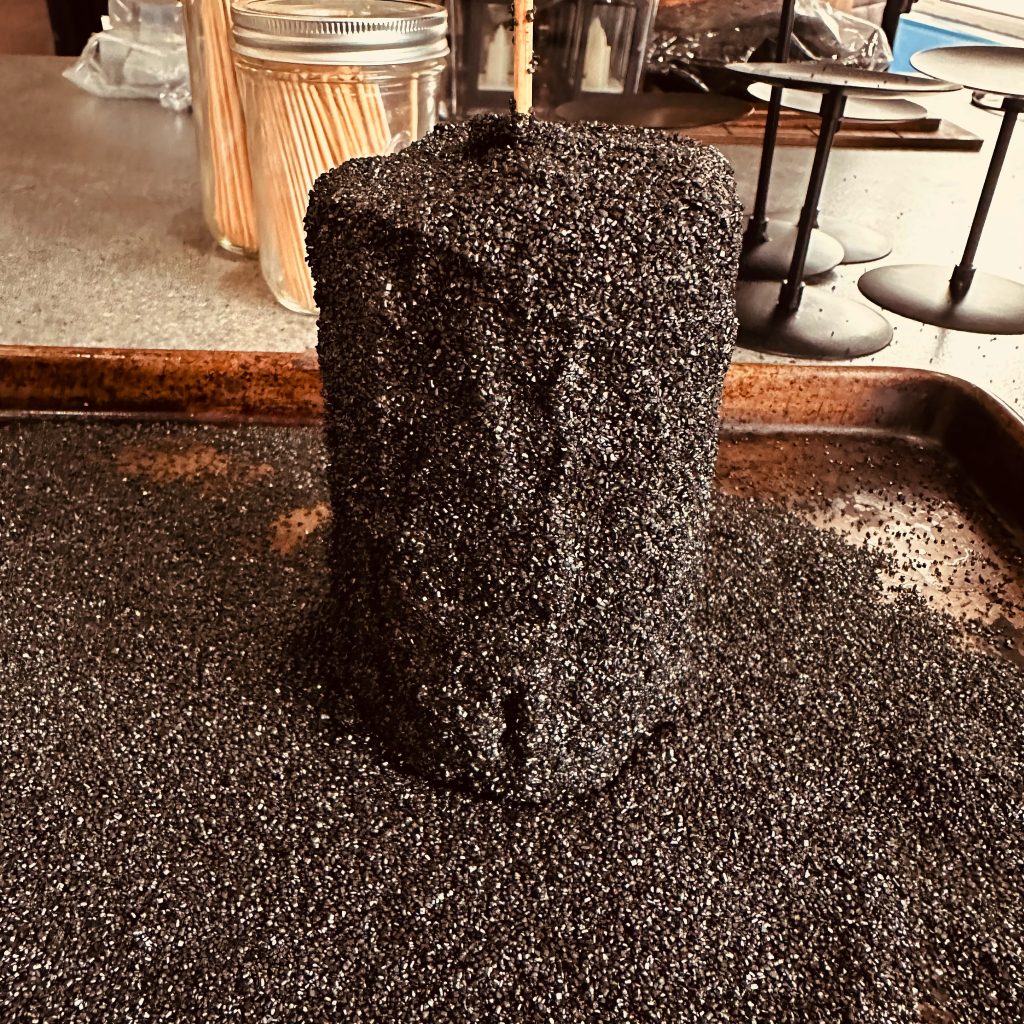
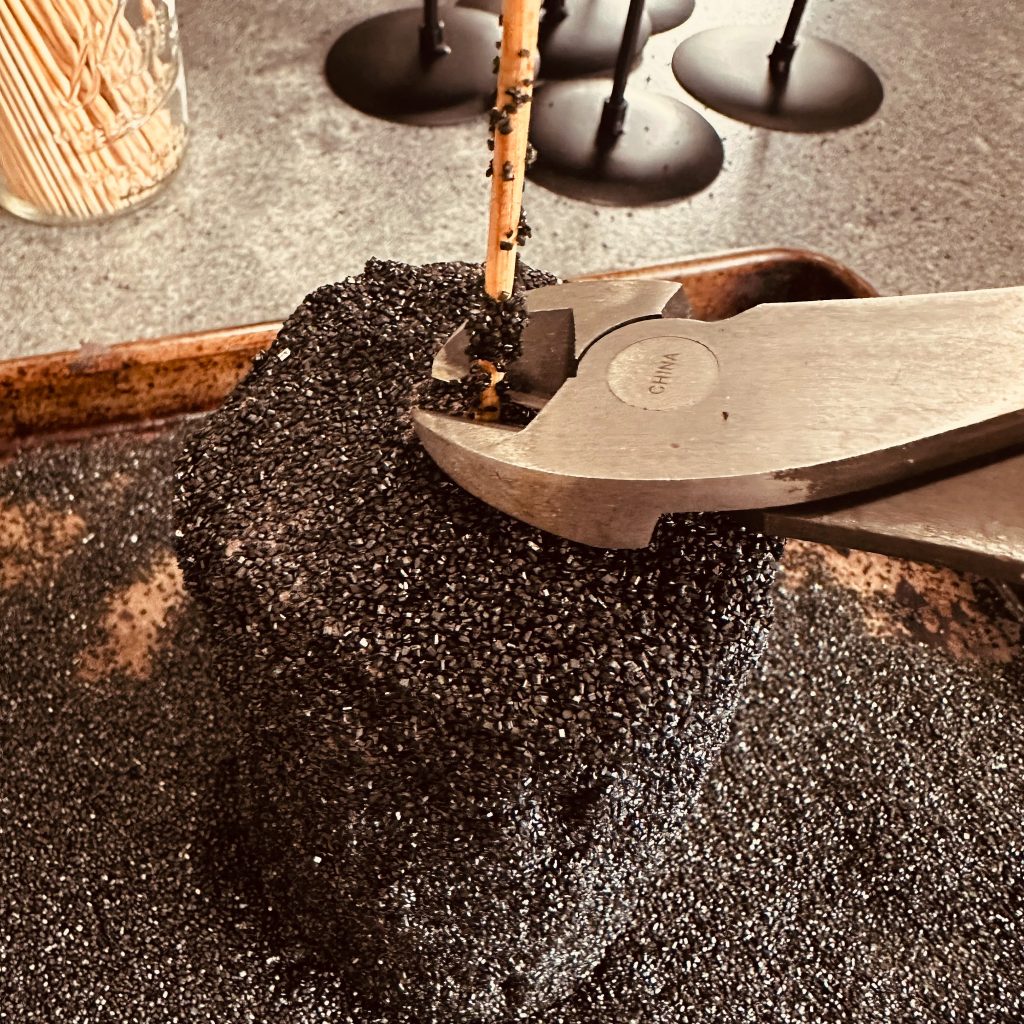
BECAUSE THE CAKE IS STILL A LITTLE FROZEN, YOU SHOULD BE ABLE TO PICK IT UP AND ROLL IT IN THE BLACK SUGAR SPRINKLES; IF NOT, THEN SPOON THEM ON. PULL THE SKEWER UP OUT OF THE CAKE A COUPLE OF INCHES AND SNIP THE SKEWER.
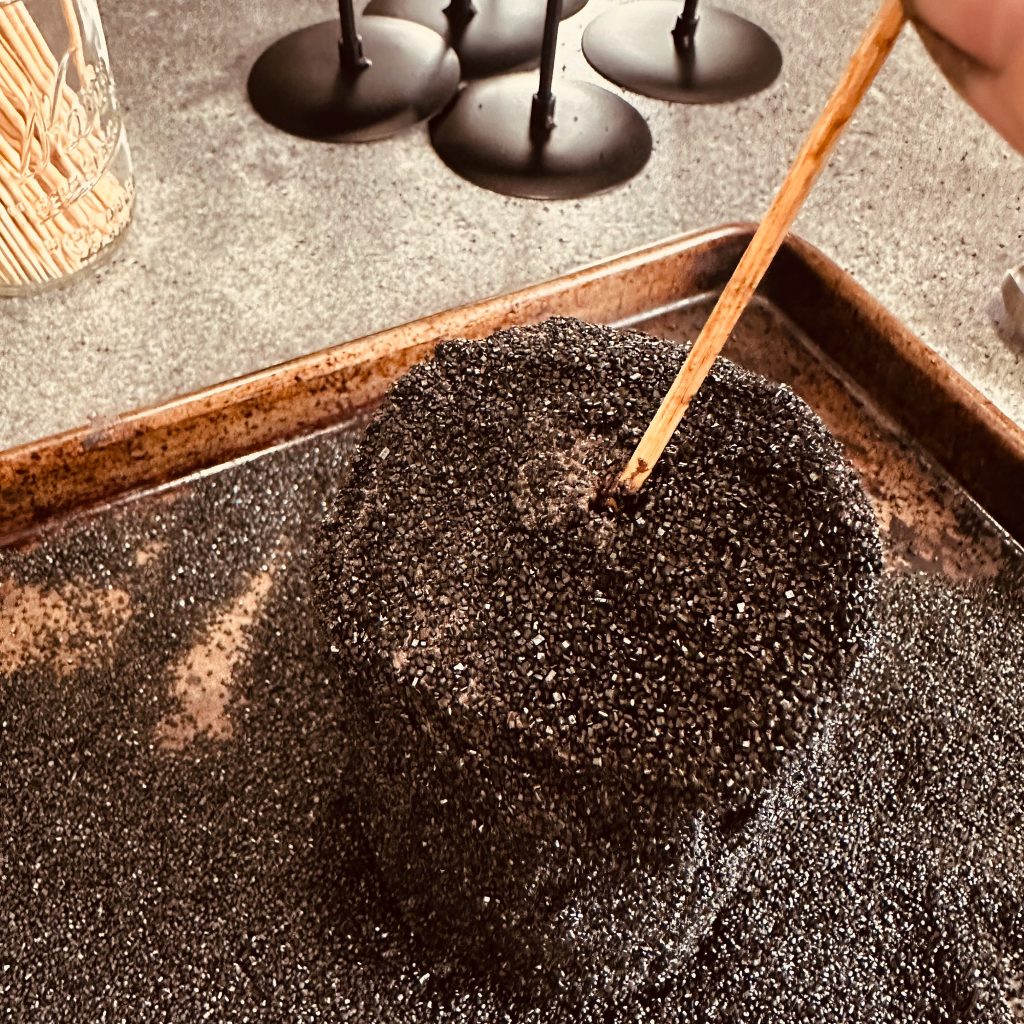
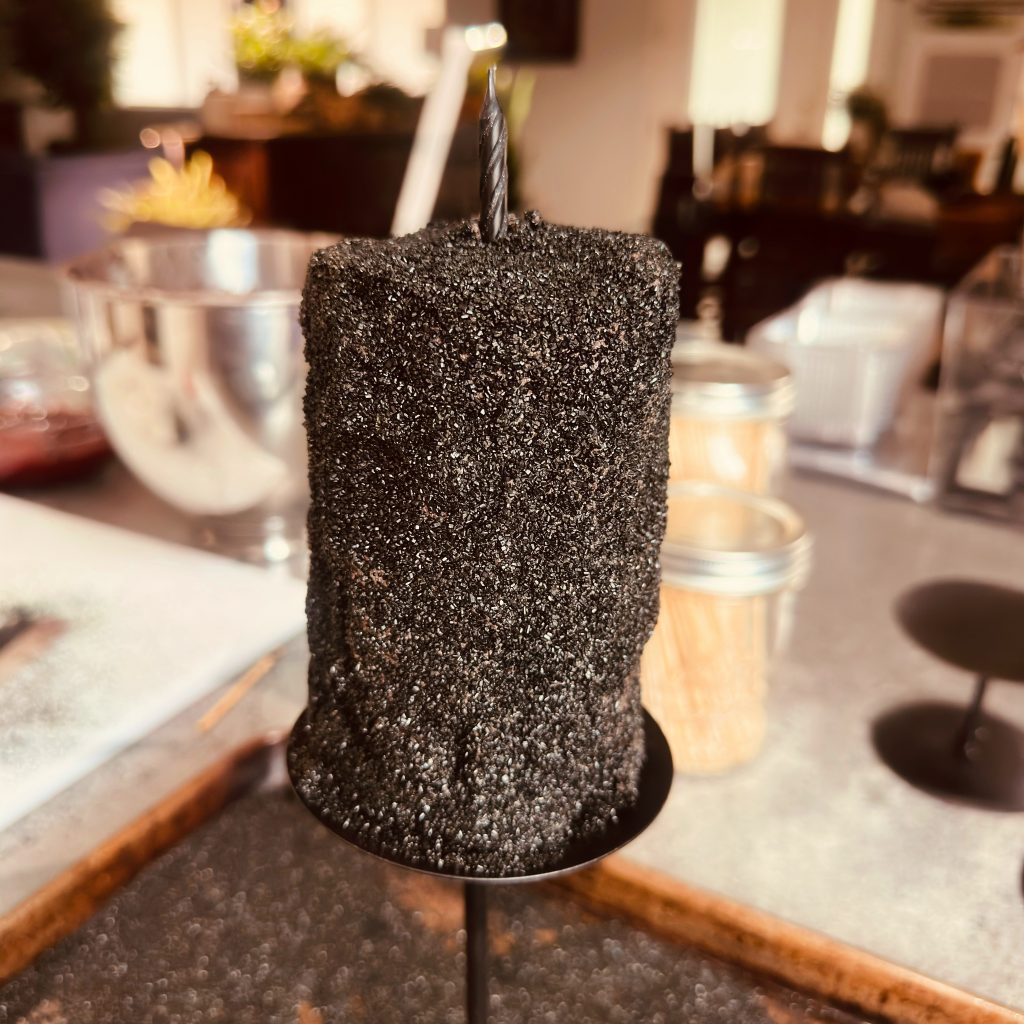
USE THE PORTION THAT WAS CUT TO PRESS THE SKEWER BACK DOWN INTO THE CAKE. REPLACE WHERE THE SKEWER WAS WITH A CUT OFF BLACK BIRTHDAY CAKE CANDLE.
Three Candle Heights From One Round Cutter
You don’t need a collection of miniature cake pans or several sizes of cookie cutters to create the different candles. Every cake starts with the same 2¾-inch round cutter. The height changes according to the number of layers you stack.
| Candle Style | Number of Cake Layers | Role in the Display |
|---|---|---|
| Tall Candle | 4 layers | Creates the tallest candle |
| Medium Candle | 3 layers | Adds a middle height |
| Short Candle | 2 layers | Creates the lowest candle |
Using a single diameter for all the cakes helps them look like they belong to the same collection, while varying the height keeps the arrangement from looking like a row of identical mini cakes. Once the cakes are placed on candlesticks, you can introduce another level of height by choosing different serving pieces.
This is also why I wouldn’t worry about arranging the finished cakes in a perfectly even line. The differences are what make the display interesting. Put a short candle near a tall one, move a medium candle slightly forward, and let the different candlestick heights help create the final arrangement. You’re building a collection of candles, not a row of matching cupcakes.
The Freezer Trick That Makes Mini Cakes Easier to Decorate
Mini layer cakes can actually be more awkward to frost than a full-size cake because there isn’t much surface area to hold while you work. For these candle cakes, I highly recommend freezing the cake rounds before assembly.
After the sheet cakes have completely cooled, cut the rounds and split them horizontally. Wrap each piece individually in plastic wrap, place the wrapped rounds flat inside a freezer bag, and freeze them for several hours or overnight. This step is optional, but it made frosting much easier for me and left hardly any crumbs.
Freezing also helps later when it’s time to add the black sugar. Once the small cake is frosted, you can pick it up and roll it through the sugar. That’s much easier than trying to cover every side while the cake sits on the work surface.
Keep the wrapped rounds flat while they freeze. Since those pieces eventually have to stack on top of one another, preserve their shape rather than create uneven layers that will need correction during assembly.
This is also a natural place to stop if you want to divide the project over two days. Instead of baking, cooling, cutting, filling, frosting, and decorating everything at once, you can finish all the cake preparation on the first day and save the assembly for later.
Turning Mini Layer Cakes Into Black Candles
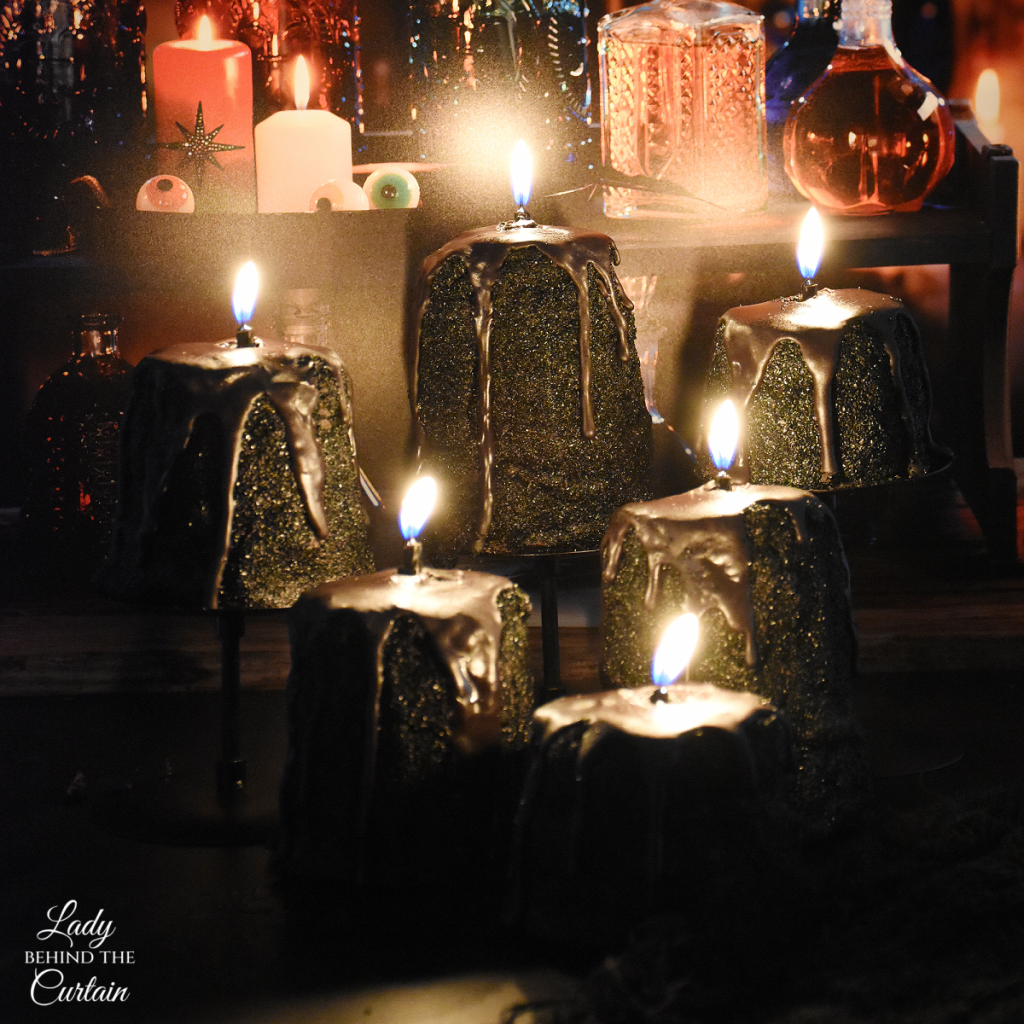
Once the cake layers are filled and stacked, use an offset spatula to cover the outside with black cocoa frosting. The cakes are small, so you don’t need a large collection of cake-decorating tools. The goal is simply to create a smooth enough surface for the black sugar and ganache that follow.
After you smooth the frosting, the black sugar goes around the sides. The sugar does more than decorate the cake. It changes the finish from smooth black frosting to a sparkling surface, adding another layer of texture before you add the glossy ganache.
Having your decorating supplies ready before you begin makes this part of the project much easier. Mini cakes require more handling than a single large cake, and there’s no reason to keep moving them around the kitchen while looking for tools.
Candle Cake Decorating Checklist
- Filled and stacked mini cakes
- Black cocoa frosting
- Piping bag with a smaller piping tip
- Offset spatula
- Black sugar sprinkles
- Black melting wafers and heavy cream
- Squeeze bottle
- Black birthday candles
- Sharp scissors
- Candlesticks or serving pieces
The ganache should be the last decorating component you prepare. Have the cakes frosted, sugared, and ready for their final decoration before making it.
Creating the Melted-Wax Effect
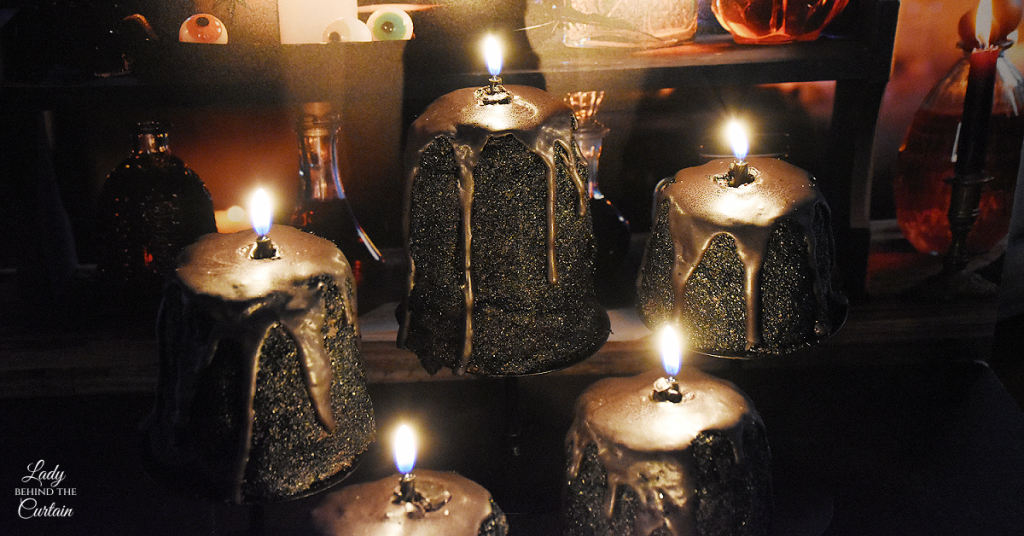
The black candy ganache turns the finished cake from a black mini layer cake into something that actually resembles a candle. A squeeze bottle makes it easier to control the drips one at a time rather than pouring ganache over the top and hoping it falls where you want it.
Start at the edge of the cake and squeeze until the ganache travels as far down the side as you want, then move to another spot. The drips don’t need to match. Some can be short, some can travel farther down the side, and there can be spaces between them. Different drip lengths make more sense for something meant to resemble melted candle wax.
Once you’re happy with the drips, use the remaining ganache to cover the top. Now you have sparkling black sugar under glossy black drips, keeping the two elements visually separate even though they’re the same color.
The last detail is a black birthday candle. Instead of inserting a full-length candle, use sharp scissors to trim it so only about ½ to 1 inch remains below the wick. When you insert that shortened piece into the top of the cake, the proportions change completely. It looks less like a birthday candle stuck into a dessert and more like the wick coming out of a large black candle.
Behind the Curtain Tip: Cut all the birthday candles before you make the ganache. Once you start creating the drips, you can move directly from the ganache to adding the wick without stopping to find scissors and trim candles.
One Candle Cake, Lots of Halloween Possibilities
These candle cakes were designed for the Black Hollow Roadside Market, but they can easily become the centerpiece of another Halloween dessert table. Group several heights together on pedestal candlesticks and surround them with your other desserts. Because the cakes are completely black, they pair well with a variety of Halloween colors and decorations without competing with their surroundings.
For individual desserts, one candle cake can make its own statement. You can also create smaller groups around a party table instead of placing all the cakes in one large arrangement. Changing the candlestick heights and the number of cakes in each group gives you plenty of ways to use the same dessert.
For a Black Hollow Roadside Market look, mix the candle cakes with crates, lanterns, chalkboard signs, crows, and other old-fashioned Halloween decorations. The cakes don’t need anything else added. The surrounding display does the decorating while the candle itself stays simple and black.
Another option is to use the cakes as an edible centerpiece until dessert is served. Instead of bringing dessert out at the end of the party, it can be part of the table from the beginning. When it’s time to eat, the decoration becomes dessert and everyone gets to see what was hiding underneath all that black.
A Two-Day Candle Cake Game Plan
These cakes have several components, but they become much more manageable when the work is divided into stages. The freezer step makes them especially well suited to a two-day schedule because you can finish the cake preparation and walk away until you’re ready to decorate.
| When | What to Do |
|---|---|
| Day One | Bake both sheet cakes and cool completely |
| Day One | Cut the rounds and split them horizontally |
| Day One | Wrap each round individually and freeze flat |
| Day One | Trim the black birthday candles and gather decorating supplies |
| Day Two | Prepare the raspberry filling and black cocoa frosting |
| Day Two | Fill and stack the different candle heights |
| Day Two | Frost the cakes and add black sugar |
| Final Step | Make the ganache, create the drips, cover the tops, and add the candles |
Breaking up the work this way also means you won’t have to wait for the cakes to cool before you decorate. Day two begins with firm cake layers ready for assembly, so you can concentrate on building the candles.
For an even easier decorating session, set out your candlesticks or serving pieces before you start. That gives every finished cake somewhere to go as soon as it’s decorated instead of making you move completed cakes later.
Storing and Organizing the Components
The cake layers are the easiest part to make ahead because freezing them is already part of my preferred method. Wrap each layer individually before placing it into a freezer bag. Wrapping them individually keeps the pieces separated and makes it easier to remove exactly what you need when you start building the different candle heights.
The raspberry filling doesn’t require much advance preparation because you’re starting with seedless jam. When you’re ready to assemble, stir it until smooth and warm it briefly until it can be easily spooned into the centers.
Save the ganache until the very end. Since its job is to create the final drips and cover the tops of the cakes, there’s no advantage to preparing it while the cakes are still waiting to be filled or frosted.
If you like having a simple order to follow when a dessert has several components, this is the sequence to remember:
BAKE → COOL → CUT → FREEZE → FILL → STACK → FROST → SUGAR → DRIP → CANDLE
This keeps each stage in place and keeps the final decorating from feeling like one long list of unrelated steps.
Why This Recipe Is Worth Making
Black Cocoa Raspberry Candle Cakes aren’t simply chocolate mini cakes decorated for Halloween. The candle illusion comes from a handful of simple elements, each with a purpose. Black cocoa carries the dark color through the cake and frosting, black sugar adds sparkle, glossy black ganache creates melted wax, and the shortened birthday candle becomes the wick.
Using one 2¾-inch cutter per cake also keeps the project simpler than the finished display suggests. Instead of buying several mini cake pans or different cutters, you can create variety by stacking two, three, or four layers. That one change gives you tall, medium, and short candles you can arrange in all kinds of ways.
Then there’s the part no one can see until dessert is served. Underneath that completely black exterior is raspberry filling tucked between the dark chocolate cake layers. It gives the candle’s inside its own surprise and keeps the dessert from being all about the decoration.
For Recipe #14 at the Black Hollow Roadside Market, these candle cakes bring height, texture, chocolate, raspberry, and a little Halloween trickery to the table. They look like decorations until someone discovers they’re dessert.
Shop the Black Hollow Roadside Market
Welcome to the Black Hollow Roadside Market, a curious little roadside stand where the shelves are crowded, the lanterns are glowing, and there’s always something homemade waiting to be discovered. What began as a collection of fall flavors has turned into a market filled with jars of caramel and fruit toppings, handcrafted extracts, cozy spice blends, freshly baked treats, old-fashioned candies, and a few delightfully spooky surprises.
This page is your guide to everything on the shelves at Black Hollow. Each item you see in the market has its own recipe, from pantry staples like Apple Pie Spice and Pure Vanilla Extract to seasonal favorites like Apple Cider Caramel Sauce, Mini Ube Cheesecakes, Candy Corn Cookies, and all the other treats that have found their way to the stand.
Some recipes were created especially for Black Hollow, while others are longtime Lady Behind the Curtain favorites that were simply too good to leave behind. Together, they make up one wonderfully mismatched little roadside market filled with things that are homemade, baked, bottled, and made for sharing.
So wander through the shelves, peek inside the jars, and see what looks good. Every recipe from the Black Hollow Roadside Market is gathered below, and as new treats arrive at the stand, you’ll find them added here.
THE MARKET IS OPEN. COME SEE WHAT'S ON THE SHELVES.
Homemade Pumpkin Spice and Pumpkin Spice Caramel Coffee Creamers
I hope you have as much fun making these Black Cocoa Raspberry Candle Cakes as I did bringing all the different pieces together. They start as simple round layers of chocolate cake, and it’s so much fun to watch them change as the raspberry, black frosting, sparkling sugar, and ganache are added.
My favorite part is still adding that tiny black candle to the top. It’s such a small detail, but it’s the moment when the whole idea finally comes together and the little layer cake suddenly looks like a candle.
These cakes are Recipe #14 at the Black Hollow Roadside Market, and I love how different they look mixed in with all the other treats and decorations. They bring height to the display, they’re hiding raspberry underneath all that black, and they’re just plain fun for Halloween.
Whether you make a whole collection for a Halloween party or just a few to add to your dessert table, I hope you enjoy creating them, sharing them, and watching everyone discover that those spooky black candles are actually cake.
Happy Halloween!
Sheryl
LATEST POSTS
Black Cocoa Raspberry Candle Cakes
Ingredients
For the Black Candle Cakes:
- 2 ( 15.25 ounce) dark chocolate cake mixes
- 1 cup unsalted butter, melted and divided
- 6 large eggs, divided
- 2 cups sour cream, divided
- ½ cup black cocoa powder
- 12 tablespoons hot water
For the Raspberry Filling:
- 9-ounces seedless raspberry jam
For the Black Frosting
- 1 cup vegetable shortening
- 1 teaspoon espresso powder
- ¾ cup unsweetened black cocoa
- 4 cups powdered sugar
- 4 tablespoons warm water
For the Garnish:
- black sugar sprinkles
For the Black Ganache:
- 1 (12-ounce) bag black melting wafers
- ½ cup heavy cream
For the Decorations:
- black birthday cake candles
Instructions
For the Black Chocolate Cakes:
- Preheat the oven to 350°. Spray TWO 9x13-inch pans with nonstick cooking spray. Line the pans with parchment paper, making sure the paper hangs over enough to use as handles.
- NOTE: TO ENSURE THE MEASUREMENT IS ACCURATE FOR EACH CAKE, I MAKE ONE BATTER AT A TIME. First, add the black cocoa to the hot water and stir until combined. In a large mixing bowl, add the cake mix, butter, eggs, sour cream, black cocoa, and hot water.
- Mix only until everything is combined. Do not overmix. Transfer to prepared pan.
- Bake for 25 minutes or until a wooden toothpick inserted into the center comes out clean. NOTE: These cakes were baked in a convection oven; you may need to adjust your baking time for a gas or electric stove.
- REPEAT THIS FOR THE SECOND CAKE.
- FOR THE MINI CAKES: Once the cakes have completely cooled, use the parchment paper to remove them from the pans and onto a cutting board.
- FOR THE LARGE CANDLE CAKES, you will need a 2 ¾-inch round cookie cutter.
You will need TWO 2¾-inch rounds for ONE large candle. Cut four 2¾-inch rounds for TWO large candles. Cut each round in half horizontally. Each large candle will have FOUR LAYERS. - FOR THE MEDIUM CANDLE CAKES, you will need a 2¾-inch round cookie cutter. Cut THREE 2¾-inch rounds for two medium candles. Cut each round in half horizontally. Each candle will have THREE LAYERS.
- FOR THE SMALL CANDLE CAKES, you will need a 2¾-inch round cookie cutter. Cut FOUR 2¾-inch rounds for four small candles. Cut each round in half horizontally. Each small cake will have two layers.
FOR BEST RESULTS: Cut the rounds the day before, wrap each round individually in plastic wrap, put them in a freezer bag, and freeze the cakes flat. This is optional, but it helped make the frosting process much easier, with hardly any crumbs.
For the Raspberry Filling:
- Transfer the jam to a microwave-safe bowl. Stir until all the lumps are gone.
- Heat for 15 seconds or until the jam is soft and can be easily spooned onto the cakes.
- Set aside until ready to use.
For the Black Cocoa Frosting:
- Add the shortening to a large mixing bowl. Whip on medium-high until light and fluffy.
- Add the espresso powder, black cocoa, powdered sugar, and warm water.
- Beat until light and fluffy (about 3 minutes).
- Set aside 1½ cups of frosting for piping between layers.
For the Black Ganache Drizzle:
- In a medium microwave-safe bowl, add the black chocolate wafers and cream.
- Heat on high for 1 minute.
- Remove from the microwave and let sit for one minute before stirring. (The cream is hot and will melt the chocolate)
- Using a small whisk, combine the cream and chocolate.
- Pour into a squeeze bottle. NOTE: Don't make the ganache until you are ready to use it.
Putting it All Together: How to Create Candle Cakes:
- FOR THE MINI CAKES: Once the cakes have completely cooled, remove them from the pans and put them onto a cutting board using the parchment paper.
- FOR THE LARGE CANDLE CAKES, you will need a 2¾-inch round cookie cutter.
You will need TWO 2¾-inch rounds for ONE large candle. Cut four 2¾-inch rounds for TWO large candles. Cut each round in half horizontally. Each candle will have FOUR LAYERS. - FOR THE MEDIUM CANDLES, you will need a 2¾-inch round cookie cutter. Cut THREE 2¾-inch rounds for two medium candles. Cut each round in half horizontally. Each candle will have THREE LAYERS.
- FOR THE SMALL CANDLES, you will need a 2¾-inch round cookie cutter. Cut FOUR 2¾-inch rounds for four small candles. Cut each round in half horizontally. Each small candle will have two layers.
- I HIGHLY RECOMMEND WRAPPING EACH LAYER IN PLASTIC WRAP, ADDING THEM TO A ZIP TOP BAG, AND FREEZING THEM FOR SEVERAL HOURS. This will help the mini cakes keep their shape and make adding the sprinkles easier.
- THE LAYERS: For each layer, add a ring of frosting, leaving the center open. I used a 1M piping tip, which seemed a little too large; I suggest using a smaller tip.
- Add a spoonful of the raspberry jam in the center of each layer. Add another cake layer and repeat.
- THE FROSTING: Once all the layers have been assembled, use an offset spatula to add the frosting to the outside of the layered cakes. Smooth the sides with the offset spatula. Once you are happy with the frosting, add the black sugar sprinkles. Because the cakes are frozen, you should be able to pick each one up and roll it in the black sugar sprinkles. Place the candle cakes onto the candlestick.
- THE CANDLES: Use a sharp pair of scissors to cut the candles to ½- 1 inch below the wick. Set aside.
- THE BLACK CANDY GANACHE: For the drips, hold the point of the bottle to the edge of the cake, give it a little squeeze until you are happy with the drip, and continue moving along the edge of the cake. Fill the top with the melted candy, and place the candle on top. MAKES 4 LARGE CANDLES, 3 MEDIUM CANDLES, AND 2 SMALL CANDLES
Black Cocoa Raspberry Candle Cake FAQ
Even though these cakes have several components, most of the project involves repeating the same process at different heights. These details can help with smaller decisions that come up when you’re planning the cakes.
- Why do you make each sheet cake batter separately? I make one batter at a time to ensure accurate measurements for each cake. Instead of preparing one oversized batch and trying to divide it evenly between two pans, I measure out batter for each 9×13-inch cake.
- Will my baking time be exactly the same as yours? Not necessarily. My cakes were baked in a convection oven, so a gas or electric oven may require adjusting the baking time. Check the cake for doneness rather than relying only on the clock.
- Do I have to display the cakes on candlesticks? No. The cake itself creates the candle shape, so you can use another serving surface. Candlesticks simply continue the illusion and offer another way to introduce varying heights into the display.
- Can I make every candle the same height? Yes. For a uniform display, use the same number of layers for each cake. Using multiple heights adds variation to the finished arrangement.
- What can I do with the cake left after cutting the rounds? Cutting circles from two sheet cakes will leave scraps behind, but there’s no reason to throw them away. Save those pieces for snacking or use them for another dessert.
- Can I prepare the candle pieces before decorating day? Yes. You can trim the black birthday candles ahead of time and store them with your decorating supplies. Taking care of that small job early means the wick pieces are ready as soon as you put ganache on the cakes.
- Can I change how much ganache drips down the sides? Yes. The drip pattern is part of the decorating, so you can decide how much melted-wax effect you want. A few drips create a simpler candle, while additional drips make the top look more heavily melted.
Once the cake layers are cut and frozen, most of the prep is done. From there, the fun is watching each little layer cake turn into something that looks completely different.
Comments
Black Cocoa Raspberry Candle Cakes — No Comments
HTML tags allowed in your comment: <a href="" title=""> <abbr title=""> <acronym title=""> <b> <blockquote cite=""> <cite> <code> <del datetime=""> <em> <i> <q cite=""> <s> <strike> <strong>